Creating and navigating from one window to another
In WPF standalone applications, a window is used to host the UI elements to enable users to interact with the UI and data. The base class Window provides all the APIs to create and interact with the Window UI.
In WPF applications, the generic window layout is divided into multiple parts. Here is a screenshot of a basic window, containing its various parts:
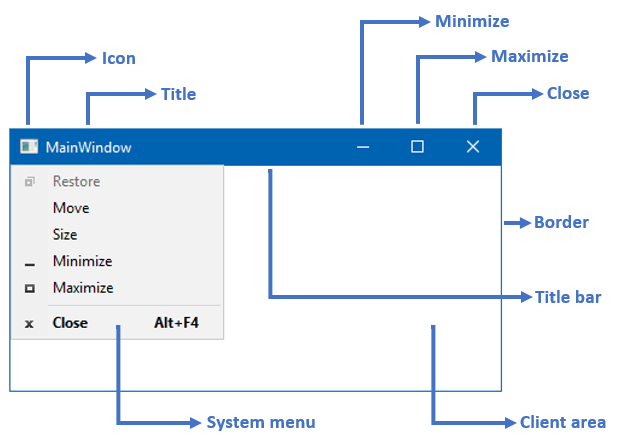
The various parts of the window are as mentioned here:
- The outer part of the window is a Border, which you can utilize to enable the resizing option:
- The outer border can contain a resizing grip, which enables you to resize the window diagonally
- The window contains a Title bar at the top, which consists of the following parts:
- An Icon to provide a unique brand to your application window
- A Title, showing the identifiable name of the window
- A small panel, containing
Minimize,Maximise/Restore, andClosebuttons - A System menu with menu items to allow users to perform
Minimize,Maximize/Restore,Move,Size, andCloseoperations on the window
- A client area for the developers to add application/window specific layouts and controls
Getting ready
To get started with this recipe, open your Visual Studio instance and create a WPF project called CH01.WindowDemo based on the WPF App (.NET Framework) template. Once the project has been created, it will have files called MainWindow.xaml and MainWindow.xaml.cs, along with the other default files.
Let's get started with creating a new window in the same project and invoke a button to open the new window from the MainWindow.
How to do it...
To create a new window, follow these simple steps:
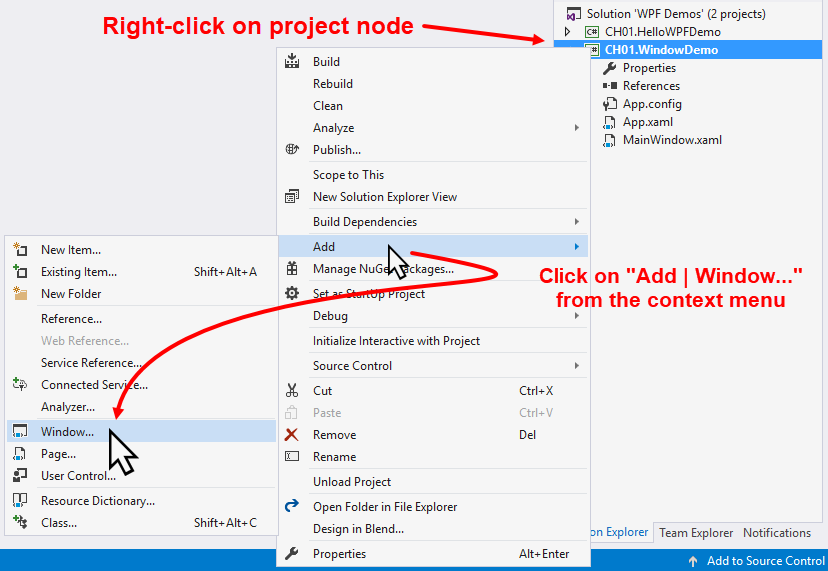
- Open the
Solution Explorerand right-click on the project node. - From the right-click context menu, navigate to
Add|Window...as shown in the following screenshot:
- The following Add New Item dialog will appear on the screen:
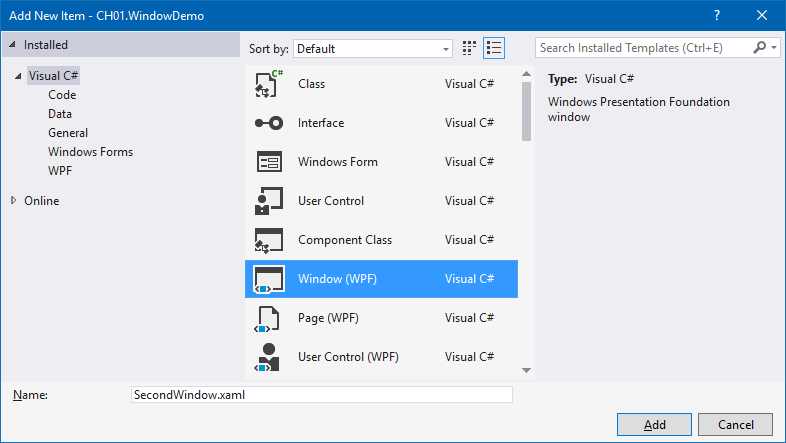
- Make sure that the selected template is
Window (WPF). Give it a name,SecondWindow.xaml, and click theAddbutton. - This will create the
SecondWindow.xamlfile and its associated code-behind fileSecondWindow.xaml.csin the project directory. - Open the XAML file (
SecondWindow.xaml) and replace the entire contents with the following XAML code:
<Window x:Class="CH01.WindowDemo.SecondWindow"
  xmlns=
    "http://schemas.microsoft.com/winfx/2006/xaml/presentation"
    xmlns:x="http://schemas.microsoft.com/winfx/2006/xaml"
    Title="Second Window" Height="200" Width="300">
    <Grid>
        <TextBlock Text="Second Window Instance"
                   HorizontalAlignment="Center"
                   VerticalAlignment="Center"
                   FontSize="16"/>
    </Grid>
</Window>- Now open the
MainWindow.xamlfile to add a button into it. Replace the entire<Grid> </Grid>block, with the following XAML code:
<Grid>
    <Button Content="Open Second Window"
            Height="30" Width="150"
            Click="OnSecondWindowButtonClicked"/>
</Grid> - Now we need to add the implementation for the button-click event. Simply open the
MainWindow.xaml.csfile and add the following lines of code inside the class definition:
private void OnSecondWindowButtonClicked(object sender,
RoutedEventArgs e)
{
    var window = new SecondWindow();
    window.Show();
} - Now, when you run the application, you will see that the
MainWindowopens on the screen, containing a button labeledOpen Second Window. Clicking on this button opens the second window on the screen that has text content ofSecond Window Instance. Here's the screenshot for your reference: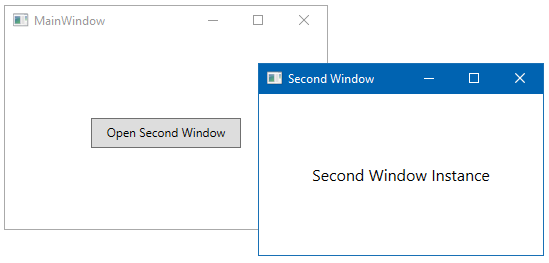
Note
Please note that if you click the button again, it will create another instance of the second window because it's modeless.
How it works...
When you create the instance of the Window class, it will not become visible to the user. It only becomes visible when you call the Show() method, which returns the handle to the originated caller without waiting for the window to close.
When you call the Show() method, it basically creates a modeless window, and hence you can interact with other windows within the same application when the same is already open. The Window class also exposes a method called ShowDialog(), which creates a model window and prevent users from interacting with other windows of the application. We will discuss the more later in this chapter, in the Creating a dialog boxsection.
There's more...
The Window class provides you with a bunch of properties, methods, and events to customize the look of the window, and perform specific operations or to be notified of the current context. To ask the client area to support transparency, set the AllowsTransparency property of the window to true. This is often useful when you want to create a custom-shaped window or a skinned theme.
You can change the default icon of the window by setting the Icon property and enable/disable the window resizing by setting the ResizeMode property. You can also set the window title, startup location, window state, window style, and taskbar visibility by settings the Title, WindowStartupLocation, WindowState, WindowStyle, and ShowInTaskbar properties, respectively.
Not only these but you can bring the window to the foreground by calling its Activate() method and close the window by calling the Close() method available in the Window class. Sometimes, when you want to hide the window instead of quitting it completely, you can utilize the Hide() method to make the window hidden and bring it back again by calling the Show() method on the same instance.
The class also exposes some events to notify you of the current contextual information. You can use the Activated, Deactivated, Closing, Closed, and StateChanged, events in your code to get such notifications.