Creating a dialog box
A dialog box is also a kind of window, and is generally used to get some inputs from the user or to show a message to the user. It uses a model window to prevent users from interacting with other windows of the same application when it is already open. In this recipe, we will learn how to create a model dialog and use the common dialog boxes that the framework provides.
Getting ready
To get started with building and using dialog boxes in a WPF application, open your Visual Studio IDE and create a new WPF project, calling it CH01.DialogBoxDemo.
How to do it...
Follow these steps to create the dialog window and invoke it from the MainWindow to show a message to the user:
- Open the
Solution Explorerand right-click on the project node. - From the context menu, select
Add|Window...to open theAdd New Itemdialog. - Making sure that the
Window (WPF)template is selected, give it the nameMessageDialog, and clickAddto continue. This will createMessageDialog.xamlandMessageDialog.xaml.csfiles in the project. - Open the
MessageDialog.xamlfile and replace the entire XAML content with the following:
<Window x:Class="CH01.DialogBoxDemo.MessageDialog"
 xmlns=
   "http://schemas.microsoft.com/winfx/2006/xaml/presentation"
    xmlns:x="http://schemas.microsoft.com/winfx/2006/xaml"
    ShowInTaskbar="False" WindowStyle="SingleBorderWindow"
    Title="Message" Height="150" Width="400"
    FontSize="14" Topmost="True" ResizeMode="NoResize">

    <Grid>
       <TextBlock TextWrapping="Wrap" Margin="8"
        Text="Thank you for reading 'Windows Presentation
        Foundation Cookbook'. Click 'OK' to continue next."/>
        <StackPanel Orientation="Horizontal"
                    VerticalAlignment="Bottom"
                    HorizontalAlignment="Right"
                    Margin="4">
            <Button Content="OK" Width="60" Height="30"
                    Margin="4" IsDefault="True"
                    Click="OnOKClicked"/>
            <Button Content="Cancel" Width="60" Height="30"
                    Margin="4" IsCancel="True"
                    Click="OnCancelClicked"/>
        </StackPanel>
    </Grid>
</Window>- Open the
MessageDialog.xaml.csfile, and add the following event implementations for theOKbutton andCancelbutton:
private void OnOKClicked(object sender, RoutedEventArgs e)
{
    DialogResult = true;
}

private void OnCancelClicked(object sender, RoutedEventArgs e)
{
    DialogResult = false;
} - Now open the
MainWindow.xamlpage and replace theGridwith the following XAML content:
<Grid>
    <ListBox x:Name="result" Height="100" Margin="8"
             HorizontalAlignment="Stretch"
             VerticalAlignment="Top" />
    <Button Content="Show Message" Width="150" Height="30"
            VerticalAlignment="Bottom" Margin="8"
            Click="OnShowMessageButtonClicked"/>
</Grid> - Go to the code-behind file,
MainWindow.xaml.cs, and add the button event implementation as shared in the following code section:
private void OnShowMessageButtonClicked(object sender, RoutedEventArgs e)
{
    var messageDialog = new MessageDialog();
    var dialogResult = messageDialog.ShowDialog();

    if (dialogResult == true)
    {
        result.Items.Add("You clicked 'OK' button.");
    }
    else if (dialogResult == false)
    {
        result.Items.Add("You clicked 'Cancel' button.");
    }
}- Now run the application. The visible window will have a button labeled
Show Message. Click on it to invoke the message dialog window that we have created:
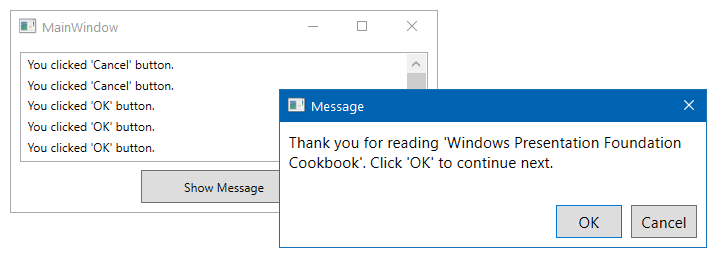
- Click on the
Cancelbutton, which will addYou clicked 'Cancel' buttontext into the list present in theMainWindow. - Launch the message window again and click on the
OKbutton. This will addYou clicked 'OK' buttonin the list.
How it works...
When you call the ShowDialog() method of the Window instance, it opens it as a model dialog and waits until the user provides an input to it. In this case, the user input is the interaction with the OK and Cancel button. When you click the OK button, the associated event handler assigns true to the DialogResult property and returns to the caller. Similarly, the Cancel button event handler, assigns false to the DialogResult property and returns.
Based on the return value of the ShowDialog() method, which actually returns the value of DialogResult, you can decide whether the user clicked the OK or Cancel button.
The dialog window has been customized by setting the following properties to the Window instance:
- The
ShowInTaskbarproperty has been set toFalseto prevent the window from being visible in the Taskbar. - The
WindowStyleproperty has been set toSingleBorderWindowto add a thin border to the window, removing the minimize and maximize buttons from the title bar. - The
Topmostproperty has been set toTrueto keep it always visible on top of other windows. This is optional, but good to have. - The
ResizeModeproperty has been set toNoResizeto prevent the user from resizing the dialog window.
There's more...
The operating system provides some reusable dialog boxes, which provide a user experience consistent with the version of the operating system in which the application is running. The experience also stays consistent across all applications to provide a unique interface for performing common operations such as opening files, saving files, printing files, color selection, and more.
WPF provides these reusable, common dialog boxes as managed wrapper classes, encapsulating the core implementation. This reduces the extra effort creating and managing the common operations.
Using the open file dialog
To open files in your WPF application, you can use the managed wrapper class OpenFileDialog, which is present under the Microsoft.Win32 namespace. You just have to create the instance and call the ShowDialog() method by optionally setting a few properties for UI customization.
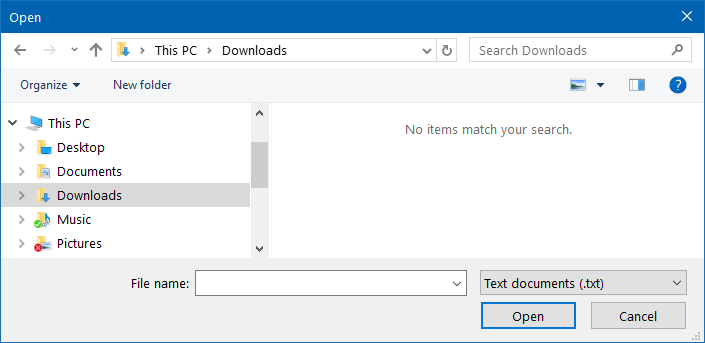
A basic open file dialog looks like the following screenshot, providing you with an option to select one or more files to open:
The following code snippet demonstrates how to initiate the open file dialog by optionally filling the file-extension filter:
private void OnOpenButtonClicked(object sender, RoutedEventArgs e)
{
    var openfileDialog = new OpenFileDialog
    {
        Filter = "Text documents (.txt) | *.txt | Log files (.log) |
        *.log"
    };

    var dialogResult = openfileDialog.ShowDialog();
    if (dialogResult == true)
    {
        var fileName = openfileDialog.FileName;
    }
}
The dialogResult returned by the ShowDialog() method tells us whether the operation was performed successfully. Based on that, you can call the instance of the file dialog to get more details about the selected file.
Using the save file dialog
Along with the OpenFileDialog interface, the Microsoft.Win32 namespace also provides the SaveFileDialog managed wrapper to perform file saving operations from your WPF application. Similar to the open file dialog, you need to create the instance of it by optionally filling its various properties to finally call the ShowDialog() method.
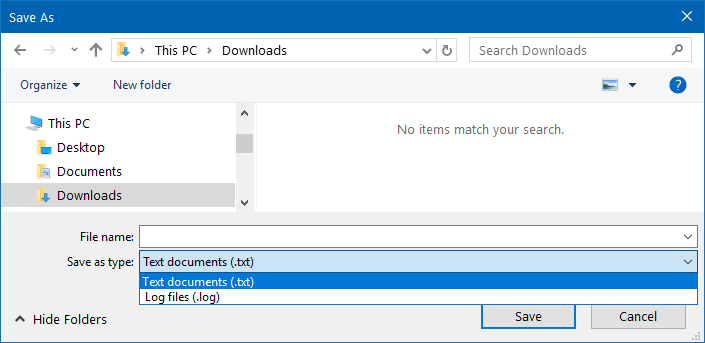
The save file dialog looks like the following screenshot, where you can provide a name to save as a file:
Optionally, you can set the extension filter, default file name, and other properties before launching the dialog window, as shown in the following code snippet:
private void OnSaveButtonClicked(object sender, RoutedEventArgs e)
{
    var saveFileDialog = new SaveFileDialog
    {
        Filter = "Text documents (.txt) | *.txt | Log files (.log) |
         *.log"
    };

    var dialogResult = saveFileDialog.ShowDialog();
    if (dialogResult == true)
    {
        var fileName = saveFileDialog.FileName;
    }
}
Based on the dialogResult returned by the ShowDialog() call you can decide whether the save was successful and retrieve more information about the saved file from the file dialog instance.
Using the print dialog
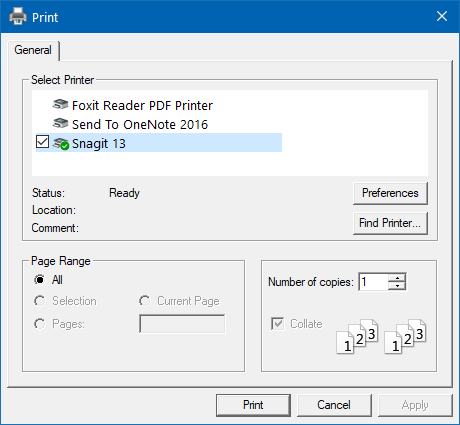
The managed wrapper PrintDialog is also present in the Microsoft.Win32 namespace, and provides you with the interface to call the operating system's printer properties and perform the print operation. The dialog gives you the option to Select Printer, configure the printing preferences, and select the page range and other parameters, as shown in the following screenshot:
To invoke the same, just create the instance of the PrintDialog and call its ShowDialog() method. You can optionally set page range, printable area, and other properties. If the dialogResult returned by the ShowDialog() method is set to true, it confirms that the printing job has been queued up successfully, and based on that you can perform the next set of actions.
Here's the code snippet for your reference:
private void OnPrintButtonClicked(object sender, RoutedEventArgs e)
{
    var printDialog = new PrintDialog();
    var dialogResult = printDialog.ShowDialog();

    if (dialogResult == true)
    {
        // perform the print operation
    }
}
Other common dialogs
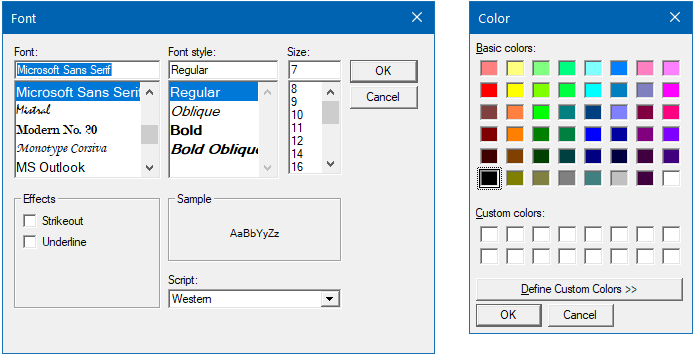
WPF also provides some other common dialog boxes to perform the selection of various formatting options, such as font, font style, font size, text effects, and color. You can use the FontDialog and ColorDialog, present under the System.Windows.Forms namespace, to add support for the font and color selections, respectively.
Here's the screenshot presenting the font selector and color selector dialogs: