Creating and navigating from one page to another
The WPF application supports a browser style navigation mechanism, which can be used in both standalone applications as well as in XBAP applications. To implement it, WPF provides the Page class to encapsulate the Page content that can be navigated to and hosted by the browser, a NavigationWindow and/or a Frame.
Getting ready
To get started with this recipe to build an application that supports navigations mechanisms from one WPF page to another, open the Visual Studio IDE and create a project based on the WPF App (.NET Framework) template. Give it a name (in our case, it's CH01.PageDemo).
How to do it...
Once you have created your project based on the WPF App (.NET Framework) template, follow these steps to add pages to your project and integrate them with the NavigationService:
- Right-click on the project node where you want to create the pages.
- As shown in this screenshot, navigate to
Add|Page...from the context menu: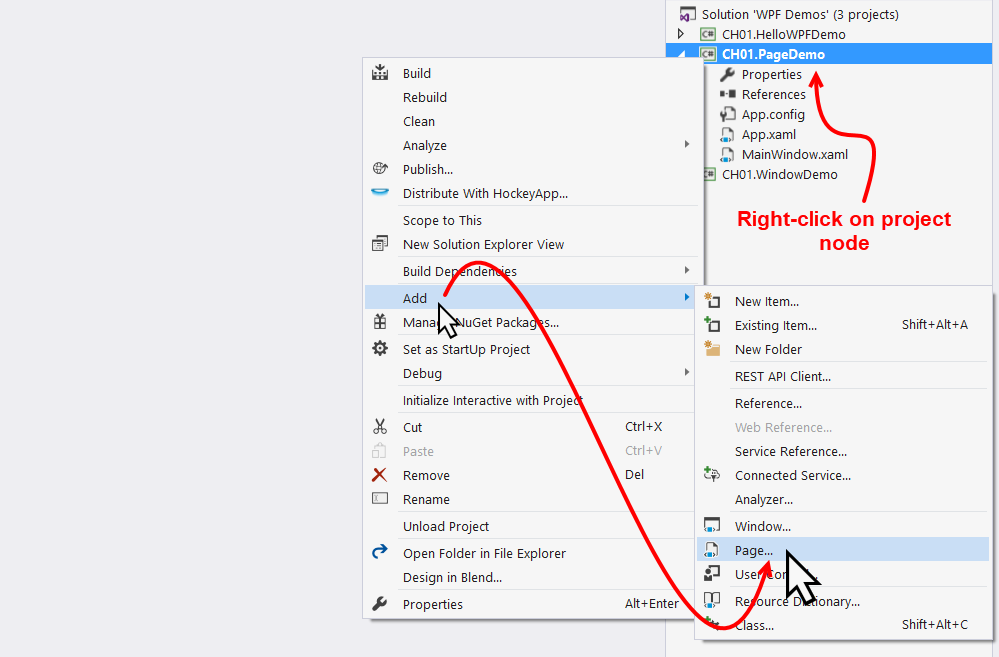
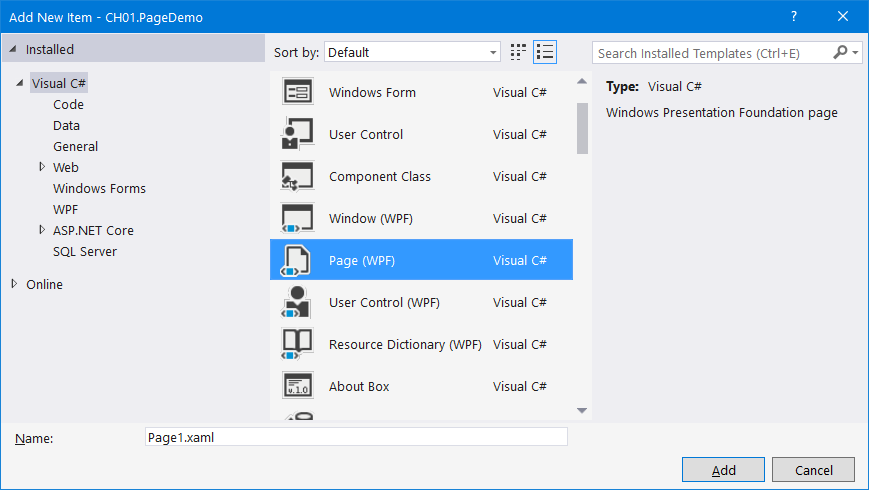
- This will open the following
Add New Itemdialog window, where the item titledPage (WPF)is already selected. Give it a name,Page1.xamland clickAdd. It will create thePage1.xamland the associated code-behind filePage1.xaml.csin your project:
- Now follow the same steps, 1 to 3, to create another page
Page2.xaml, which will add both the XAML and associated C# code-behind file into the project. - Open the
Page1.xamlfile and replace theGridwith the following XAML:
<Grid>
    <TextBlock Text="This is Page 1" FontSize="20"
               HorizontalAlignment="Center"
               VerticalAlignment="Center"/>
    <Button Content="Next" Height="30" Width="120"
            Margin="20"
            HorizontalAlignment="Right"
            VerticalAlignment="Bottom"
            Click="OnNextButtonClicked"/>
</Grid>- In the associated code-behind file (
Page1.xaml.cs), add the following button-click event handler:
private void OnNextButtonClicked(object sender,
 RoutedEventArgs e)
{
  NavigationService.Navigate(new Uri("Page2.xaml",
   UriKind.Relative));
} - Similarly, add the following XAML into the
Page2.xamlpage, replacing the existingGrid:
<Grid>
    <TextBlock Text="This is Page 2" FontSize="20"
               HorizontalAlignment="Center"
               VerticalAlignment="Center"/>
    <Button Content="Previous" Height="30" Width="120"
            Margin="20"
            HorizontalAlignment="Right"
            VerticalAlignment="Bottom"
            Click="OnPreviousButtonClicked"/>
</Grid> - Add the following button-click event handler into the
Page2.xaml.csfile:
private void OnPreviousButtonClicked(object sender, RoutedEventArgs e)
{
    if (NavigationService.CanGoBack)
    {
        NavigationService.GoBack();
    }
} - Now open the
MainWindow.xamlfile and replace the XAML content with the following:
<NavigationWindow x:Class="CH01.PageDemo.MainWindow"
  xmlns=
   "http://schemas.microsoft.com/winfx/2006/xaml/presentation"
    xmlns:x="http://schemas.microsoft.com/winfx/2006/xaml"
    Title="MainWindow" Height="350" Width="525"
    Source="Page1.xaml">

</NavigationWindow>- Now open the
MainWindow.xaml.csfile and change its base class toNavigationWindow, instead ofWindow. - Run the application, which will open the following screen containing
Page 1:
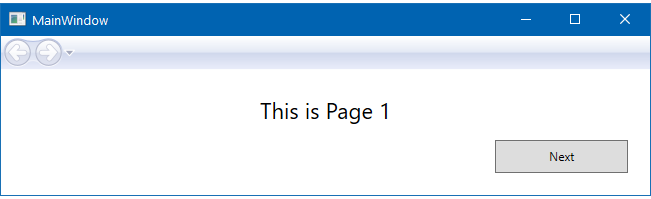
- Clicking on the
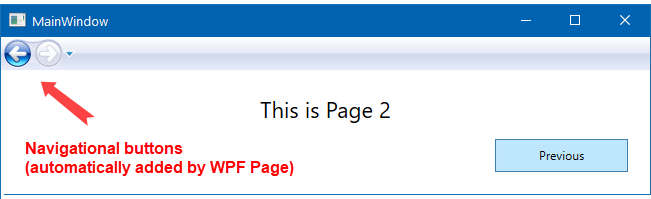
Nextbutton will navigate you toPage 2, as shown here, which contains the activated navigational button automatically provided by the WPF Framework:
- Now, if you click on the
Previousbutton or thebackbutton in the navigation panel, it will navigate you toPage 1.
How it works...
The NavigationWindow, which is defined in the MainWindow.xaml page, provides the basic mechanism to support the content navigation. The Source attribute (Source="Page1.xaml"), defined as URI, asks NavigationWindow to load the mentioned page (Page1.xaml) by default.
When you click on the Next button of Page1, the NavigationService.Navigate method executes, passing the URI of the page that you want to load next. The navigation buttons automatically activate based on the history of the navigation that you performed.
In Page2, when you click on the Previous button, it first checks whether the NavigationService has an immediate history item to navigate you to a previous page. If it finds a previous page, it then automatically navigates you to the desired page by calling the NavigationService.GoBack() method call. In this case, you don't have to pass the URI of the page.
There's more...
NavigationService offers a variety of properties, methods, and events to perform navigation mechanisms on your page content. CanGoBack() and CanGoForward() return a Boolean value indicating whether there is at least one entry in the back and forward navigation history, respectively. The method GoBack() navigates you to the most recent entry from back navigation history, whereas the GoForward() method navigates you to the forward navigation history, if there's one available.
To refresh the current content, you can call the Refresh() method. The StopLoading() method stops the current execution from downloading/loading the content part of the current navigation context. You can also programmatically add or remove an entry from the navigation history. The AddBackEntry method takes a parameter for the CustomContentState object to add the entry into the back-navigation history. The RemoveBackEntry() method removes the most recent entry from the back-navigation history.
Events such as Navigating, Navigated, NavigationFailed, NavigationStopped, NavigationProgress, and LoadCompleted are there to notify you of the various statuses of the current navigation process. Use them wisely, based on your requirements.