Creating obstacles
It's great that we have some basic tiles, but it's a good idea to give the player something to do or, in our case, something to avoid. In this section, you'll learn how to customize your tiles to add obstacles for your player to avoid:
- So, just like we created a prefab for our basic tile, we will create a single obstacle through code. I want to make it easy to see what the obstacle will look like in the world and make sure that it's not too large, so I'll drag and drop a
Basic Tileprefab back into the world.
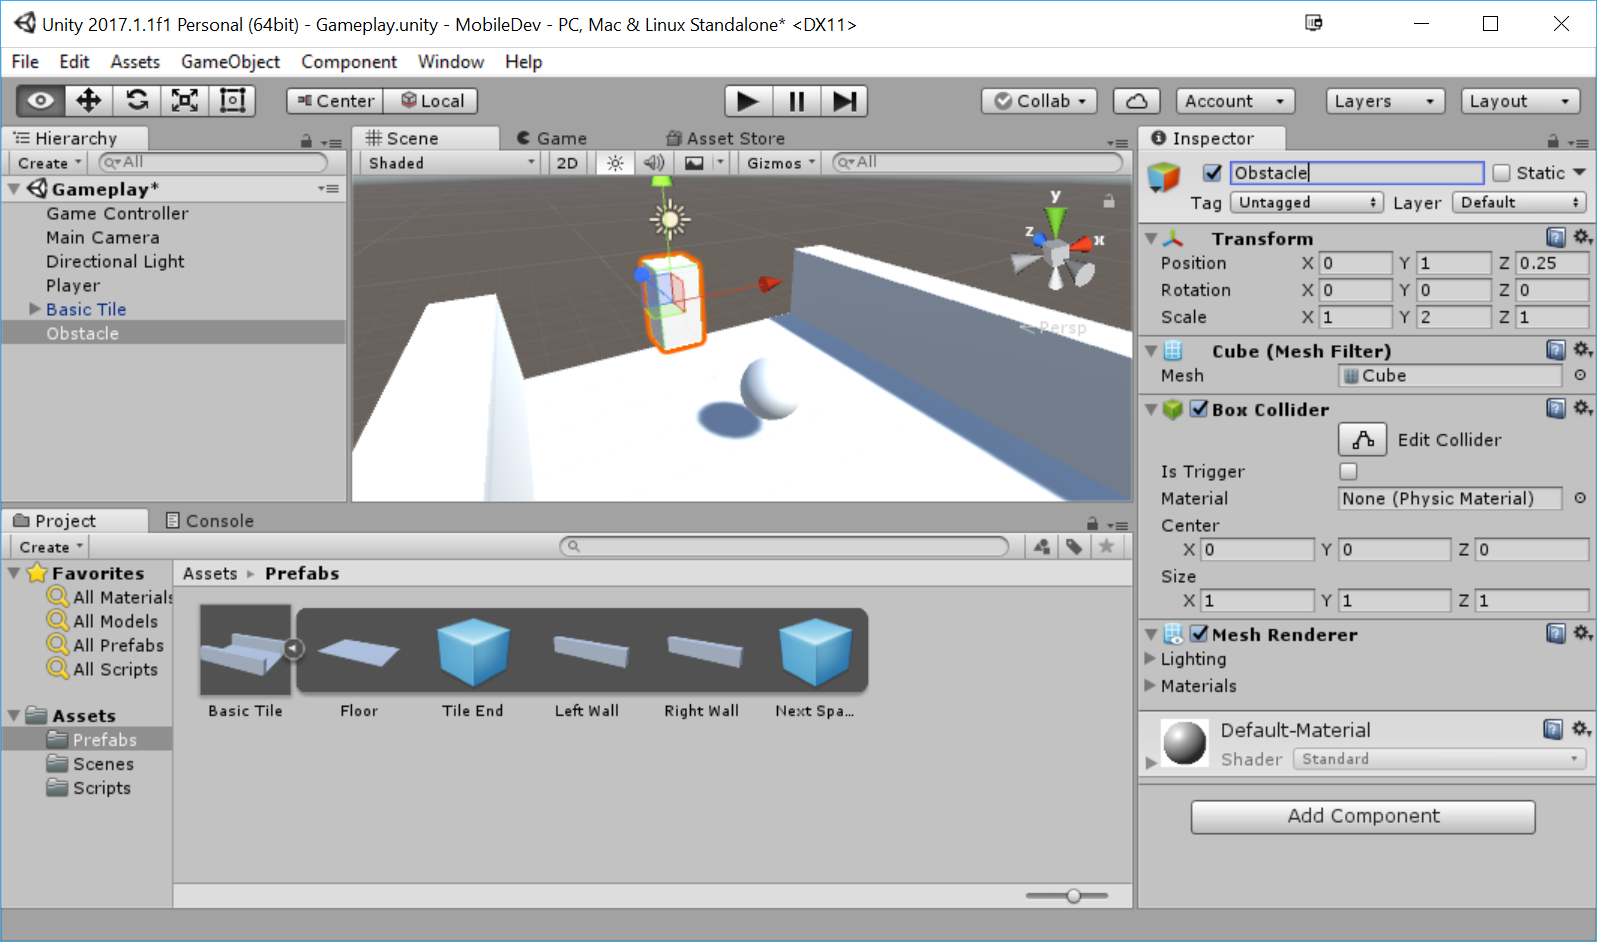
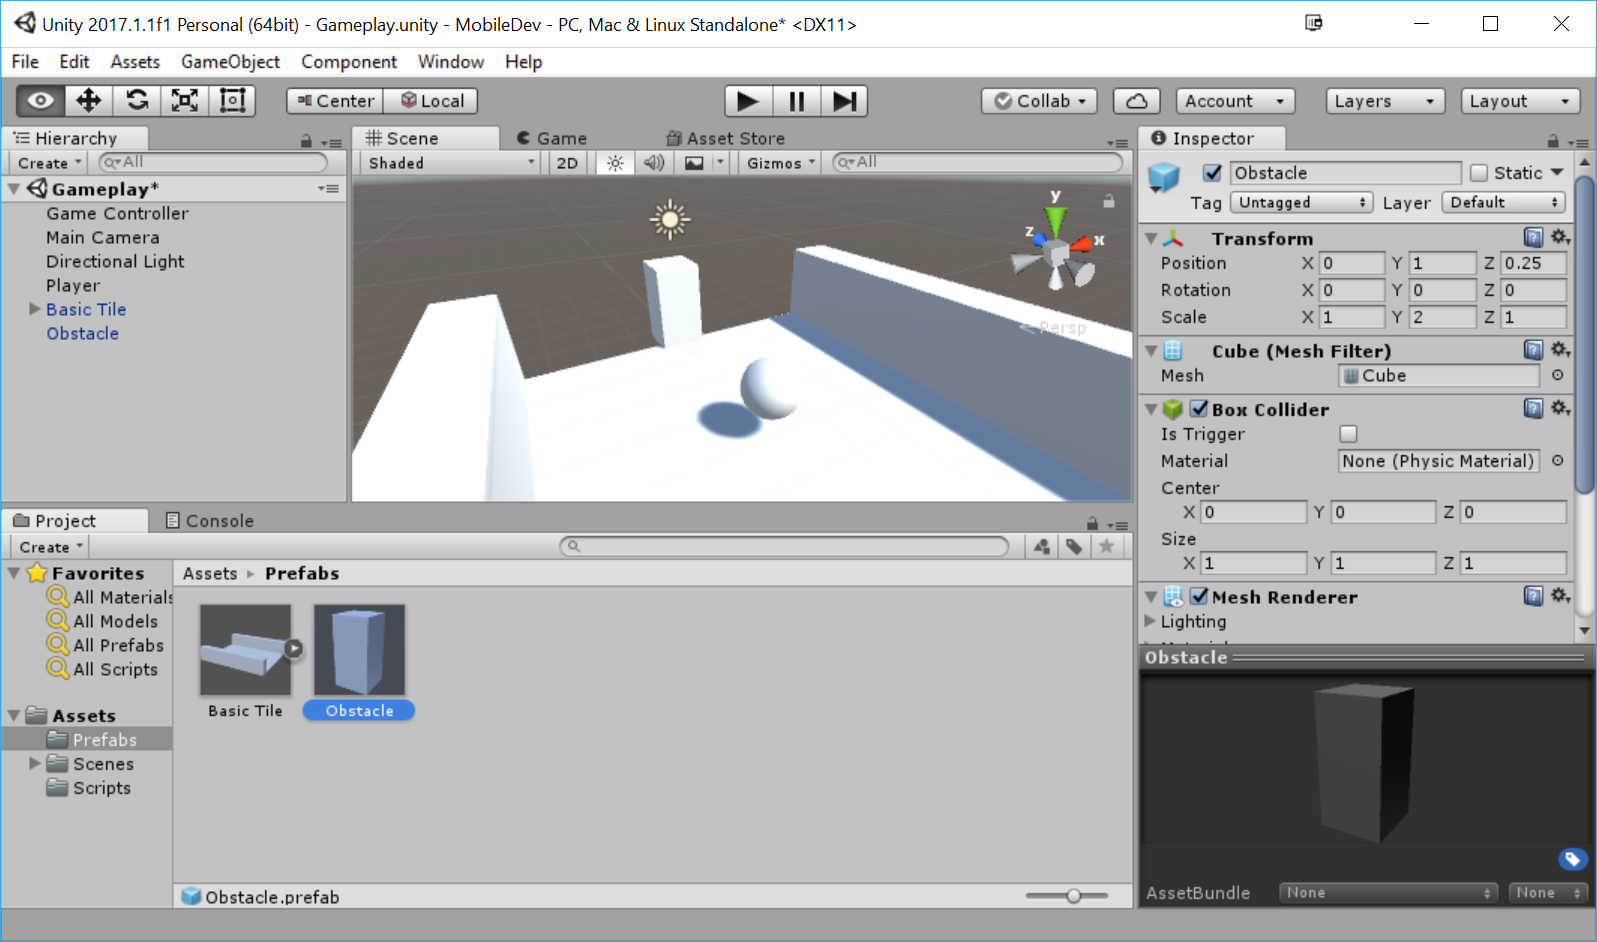
- Next, we will create a cube by going to
GameObject|3D Object|Cube. We will then name this objectObstacle. Change theY Scaleto2and position it above the platform at(0, 1, .025):
- We can then play the game to see how this'll work:
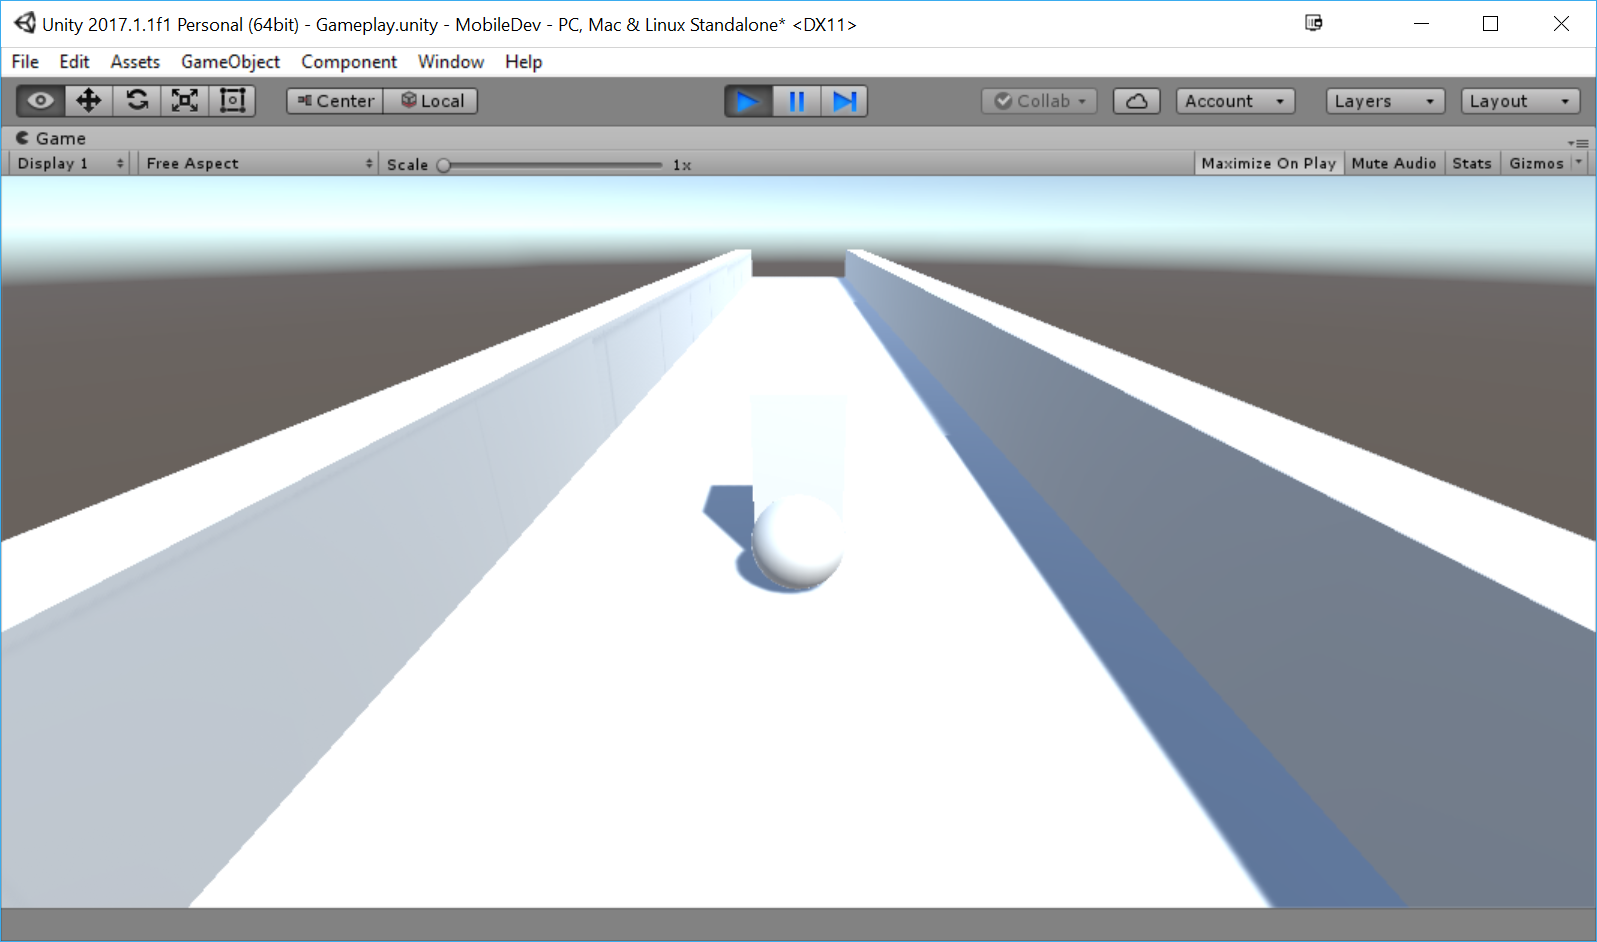
- As you can see in the preceding screenshot, the player gets stopped, but nothing really happens. In this instance, we want the player to lose when he hits this and then restart the game; so, to do that, we'll need to write a script. From the
Projectwindow, go to theScriptsfolder and create a new script calledObstacleBehaviour. We'll use the following code:
using UnityEngine;
using UnityEngine.SceneManagement; // LoadScene

public class ObstacleBehaviour : MonoBehaviour {

    [Tooltip("How long to wait before restarting the game")]
    public float waitTime = 2.0f;

    void OnCollisionEnter(Collision collision)
    {
        // First check if we collided with the player
        if (collision.gameObject.GetComponent<PlayerBehaviour>())
        {
            // Destroy the player
            Destroy(collision.gameObject);

            // Call the function ResetGame after waitTime has passed
            Invoke("ResetGame", waitTime);
        }
    }

    /// <summary>
    /// Will restart the currently loaded level
    /// </summary>
    void ResetGame()
    {
        // Restarts the current level
        SceneManager.LoadScene(SceneManager.GetActiveScene().name);
    }
} - Save the script and return to the editor, attaching the script to the
Obstacleproperty we just created. - Save your scene and try the game:
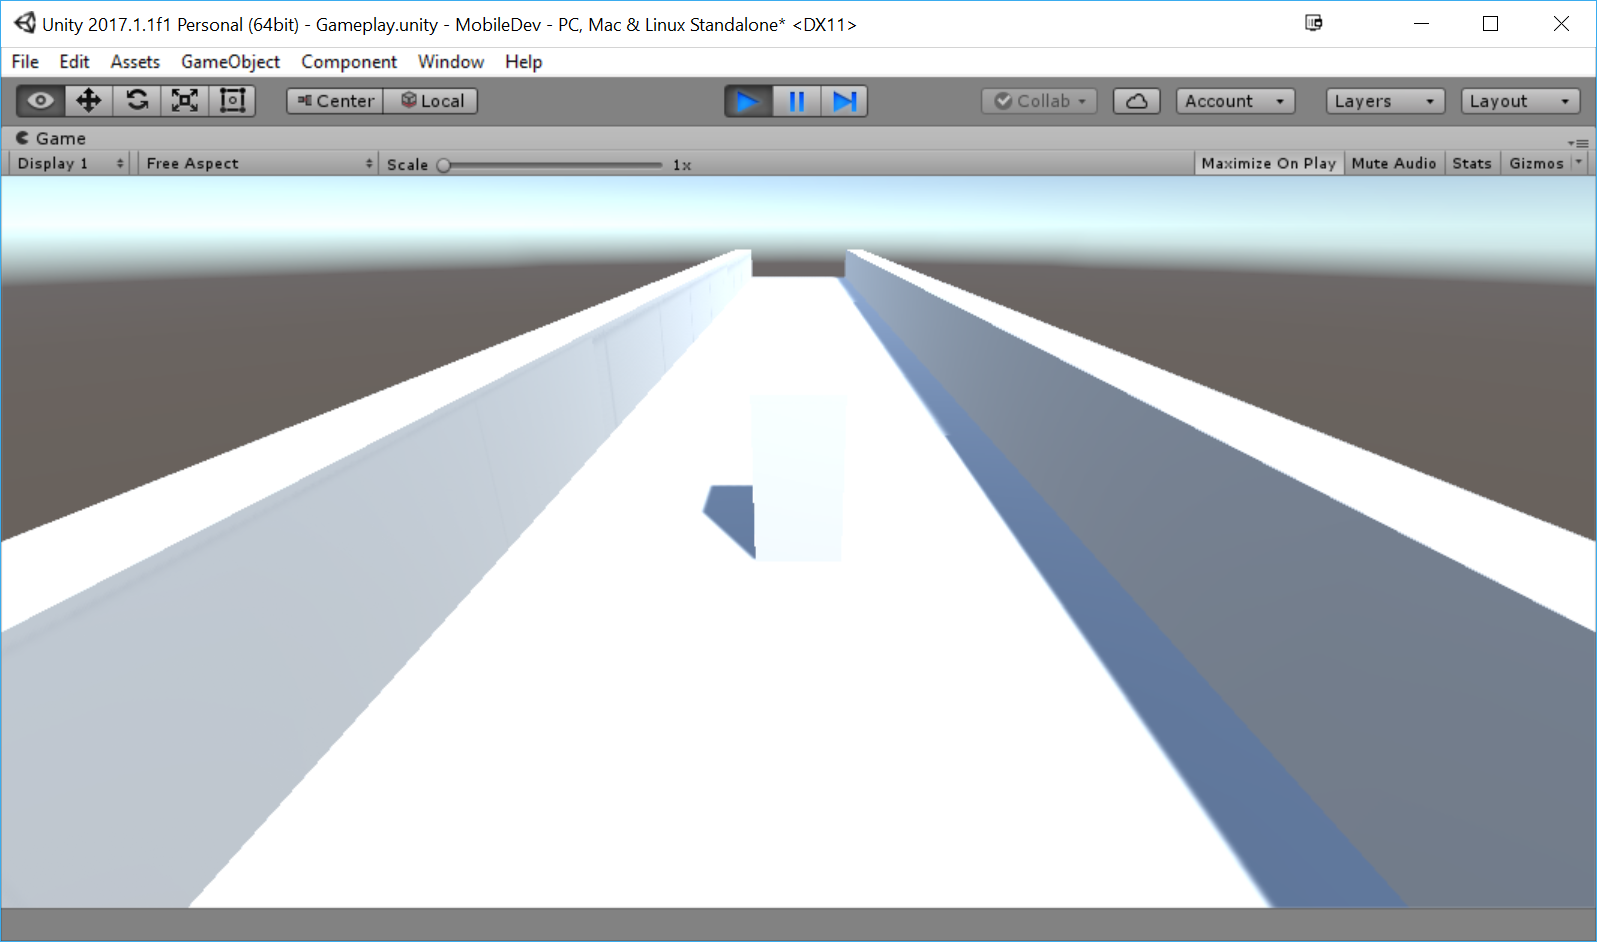
As you can see in the preceding screenshot, once we hit the obstacle, the player gets destroyed, and then after a few seconds, the game starts up again. You'll learn to use particle systems and other things to polish this up, but at this point, it's functional, which is what we want.
You may note that when the level is reloaded, there are some lighting issues in the editor. The game will still work correctly when exported, but this may be a minor annoyance.
- (Optional) To fix this, go to
Window|Lighting|Settings. Uncheck theAuto Generate option from there, and click on--once it is finished, our issue should be solved.Generate Lighting
Note
It isn't an issue with our game, but if you employ the fix above in your own titles, you must remember to go here every time you alter a game level and rebuild the lightmap for it to be updated correctly.
- Now that we know it works correctly, we can make it a prefab. Just as we did with the original tile, go ahead and drag and drop it from the
Hierarchyinto theProjecttab and into thePrefabsfolder:
- Next, we will remove the
Obstacle, as we'll spawn it upon creating the tile.
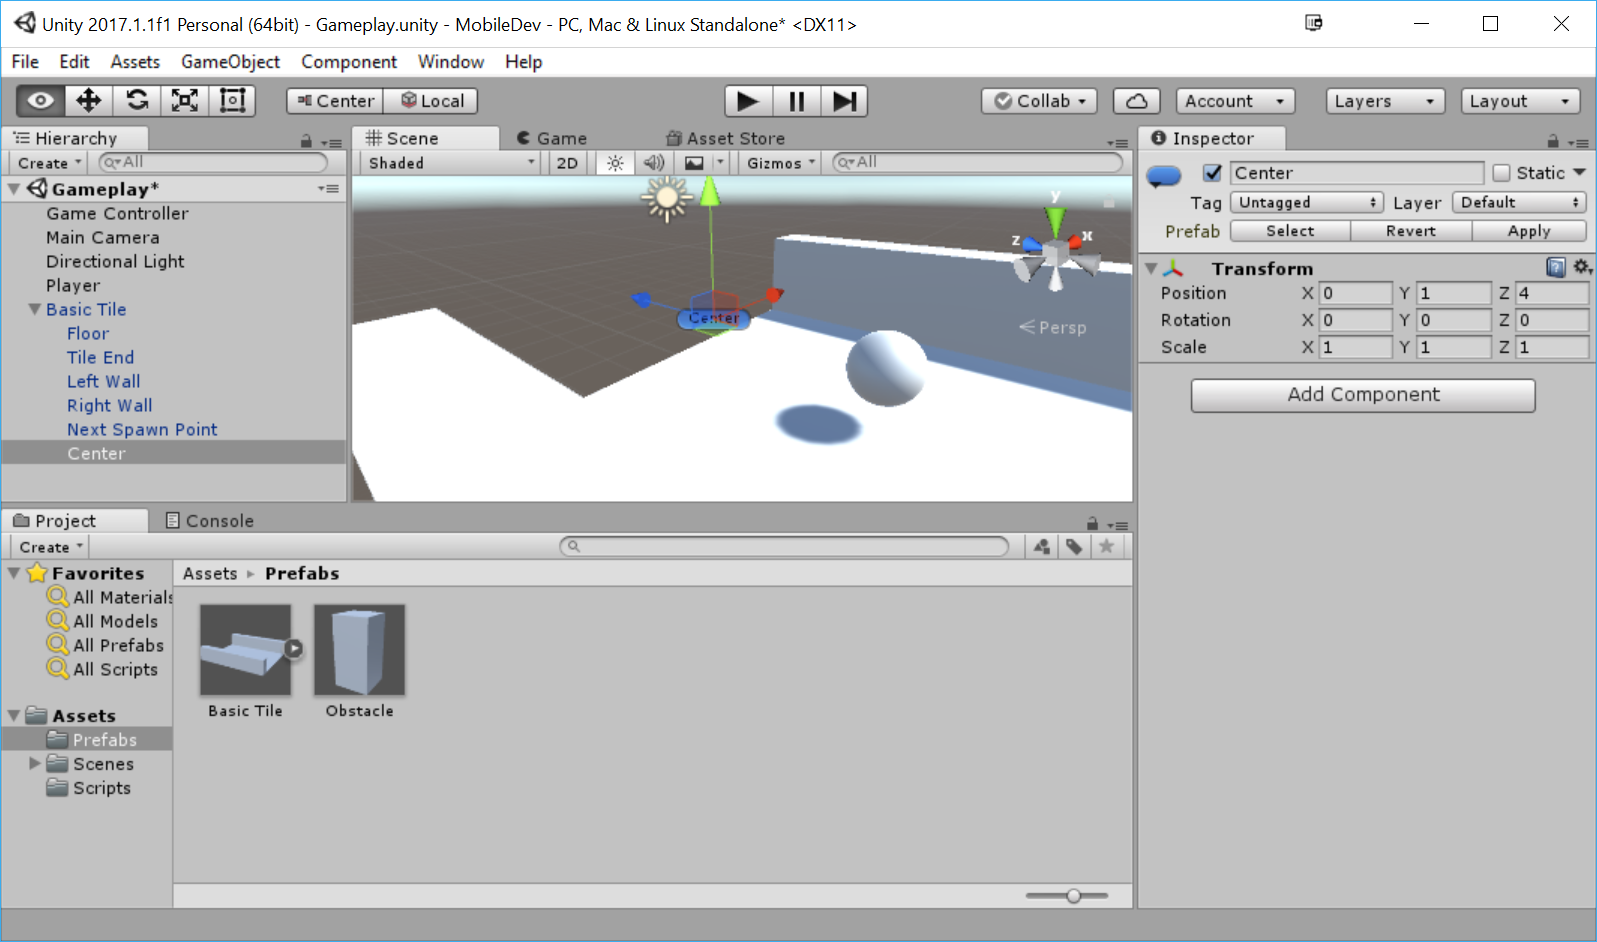
- We will make markers to indicate where we would possibly like to spawn our obstacles. Duplicate the
Next Spawn Objectobject and move the new one to(0, 1, 4). We will then rename the object asCenter. Afterwards, click on the icon on the top left of the blue box and then select the blue color. Upon doing this, you'll see that we can see the text inside the editor, if we are close to the object (but it won't show up in theGametab by default):
- We want a way to get all of the potential spawn points we will want in case we decide to extend the project in the future, so we will assign a tag as a reference to make those objects easier to find. To do that at the top of the
Inspectorwindow, click on the tag dropdown and selectAdd Tag. From the menu that pops up, press the + button and then name itObstacleSpawn.
Note
For more information on tags and why we'd want to use them, check out https://docs.unity3d.com/Manual/Tags.html.
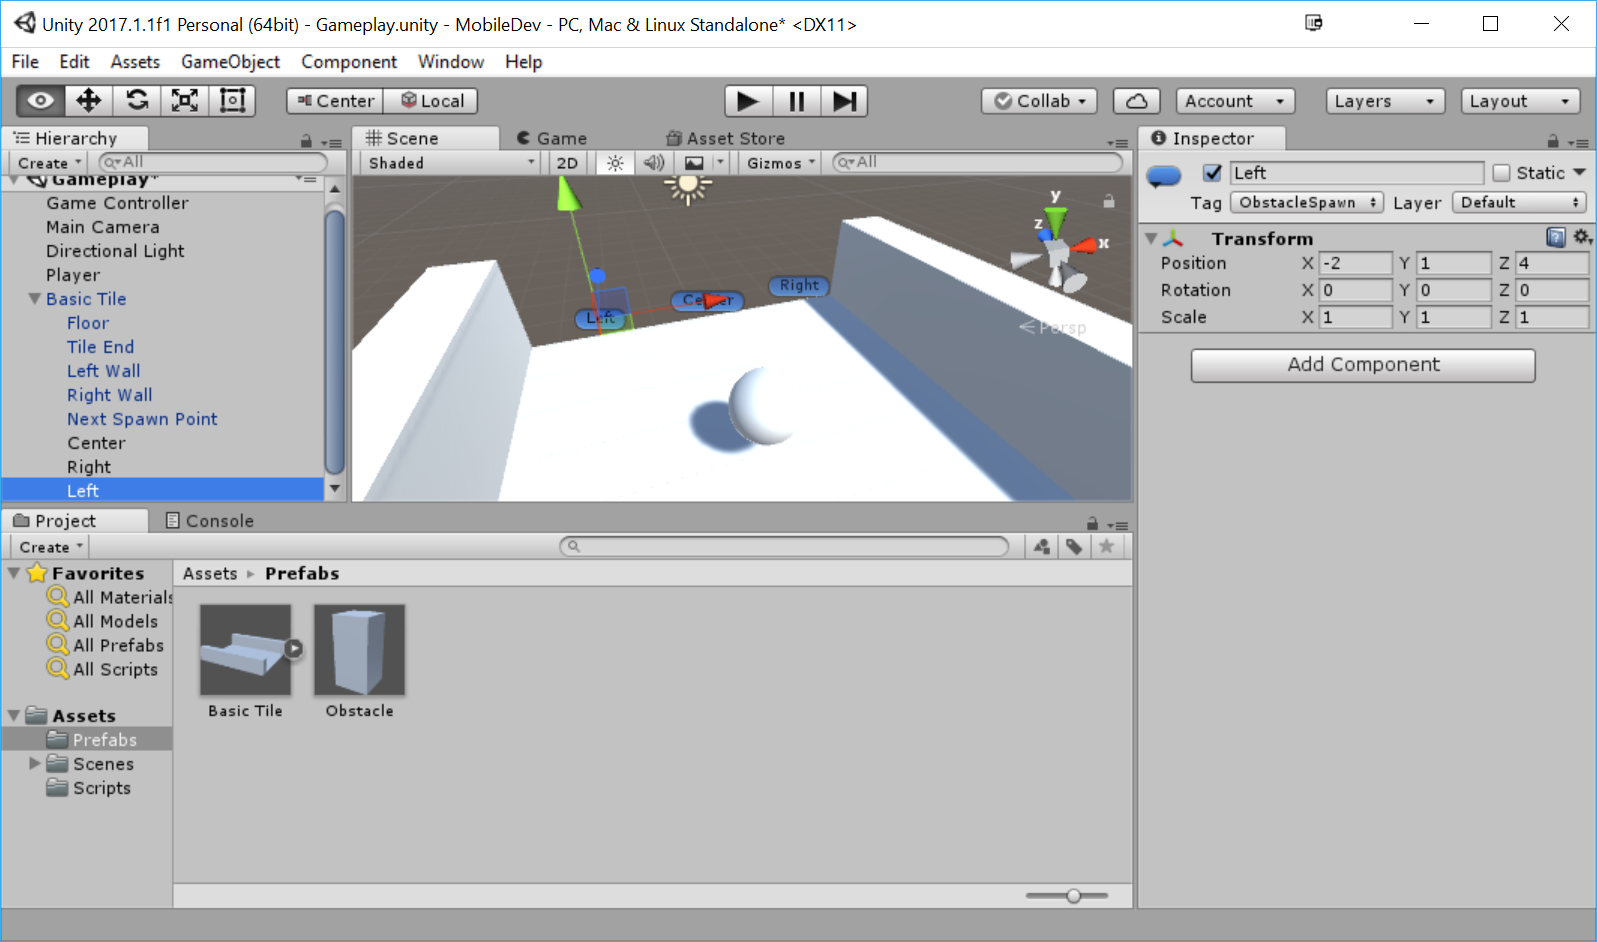
- Go ahead and duplicate this twice and name the others
LeftandRight, respectively, moving them 2 units to the left and right of the center to become other possible obstacle points:
- Note that these changes don't affect the original prefab, by default; that's why the objects are currently black text. To make this happen, select
Basic Tile, and then in theInspectorwindow under thePrefabsection, click onApply. - Now that the prefab is set up correctly, we can go ahead and remove it by selecting it and pressing Delete.
- We then need to go into the
GameControllerscript and modify it to have the following code:
using UnityEngine;
using System.Collections.Generic; // List

/// <summary>
/// Controls the main gameplay
/// </summary>

public class GameController : MonoBehaviour
{
    [Tooltip("A reference to the tile we want to spawn")]
    public Transform tile;

    [Tooltip("A reference to the obstacle we want to spawn")]
    public Transform obstacle;

    [Tooltip("Where the first tile should be placed at")]
    public Vector3 startPoint = new Vector3(0, 0, -5);

    [Tooltip("How many tiles should we create in advance")]
    [Range(1, 15)]
    public int initSpawnNum = 10;

    [Tooltip("How many tiles to spawn initially with no obstacles")]
    public int initNoObstacles = 4;

    /// <summary>
    /// Where the next tile should be spawned at.
    /// </summary>
    private Vector3 nextTileLocation;

    /// <summary>
    /// How should the next tile be rotated?
    /// </summary>
    private Quaternion nextTileRotation;

    /// <summary>
    /// Used for initialization
    /// </summary>
    void Start()
    {
        // Set our starting point
        nextTileLocation = startPoint;
        nextTileRotation = Quaternion.identity;

        for (int i = 0; i < initSpawnNum; ++i)
        {
            SpawnNextTile(i >= initNoObstacles);
        }
    }

    /// <summary>
    /// Will spawn a tile at a certain location and setup the next
    position
    /// </summary>
    public void SpawnNextTile(bool spawnObstacles = true)
    {
        var newTile = Instantiate(tile, nextTileLocation,
                                  nextTileRotation);

        // Figure out where and at what rotation we should spawn
        // the next item
        var nextTile = newTile.Find("Next Spawn Point");
        nextTileLocation = nextTile.position;
        nextTileRotation = nextTile.rotation;

        if (!spawnObstacles)
            return;

        // Now we need to get all of the possible places to spawn the
        // obstacle
        var obstacleSpawnPoints = new List<GameObject>();

        // Go through each of the child game objects in our tile
        foreach (Transform child in newTile)
        {
            // If it has the ObstacleSpawn tag
            if (child.CompareTag("ObstacleSpawn"))
            {
                // We add it as a possibilty
                obstacleSpawnPoints.Add(child.gameObject);
            }
        }

        // Make sure there is at least one
        if (obstacleSpawnPoints.Count > 0)
        {
            // Get a random object from the ones we have
            var spawnPoint = obstacleSpawnPoints[Random.Range(0,
                                          obstacleSpawnPoints.Count)];

            // Store its position for us to use
            var spawnPos = spawnPoint.transform.position;

            // Create our obstacle
            var newObstacle = Instantiate(obstacle, spawnPos,
                                          Quaternion.identity);

            // Have it parented to the tile
            newObstacle.SetParent(spawnPoint.transform);
        }
    }
}
Note that we modified the SpawnNextTile function to now have a default parameter set to true, which will tell us if we want to spawn obstacles or not. At the beginning of the game, we may not want the player to have to start dodging immediately, but we can tweak the value to increase or decrease the number we are using.
- Save the script and go back to the Unity editor. Then, assign the
Obstaclevariable in theInspectorwith the obstacle prefab we created previously. - It's a bit hard to see things currently due to the default light settings, so let's go to the
Hierarchywindow and select theDirectional Lightobject.
A directional light acts similarly to how the sun works on earth, shining everywhere from a certain rotation.
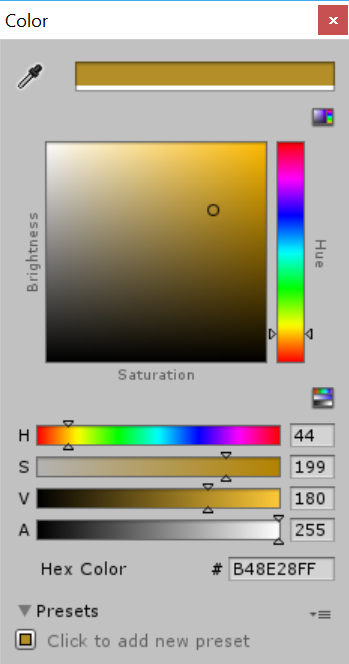
- With the default settings the light is too bright, making it difficult to see, so we can just change the
Colorto be darker. I used the following:
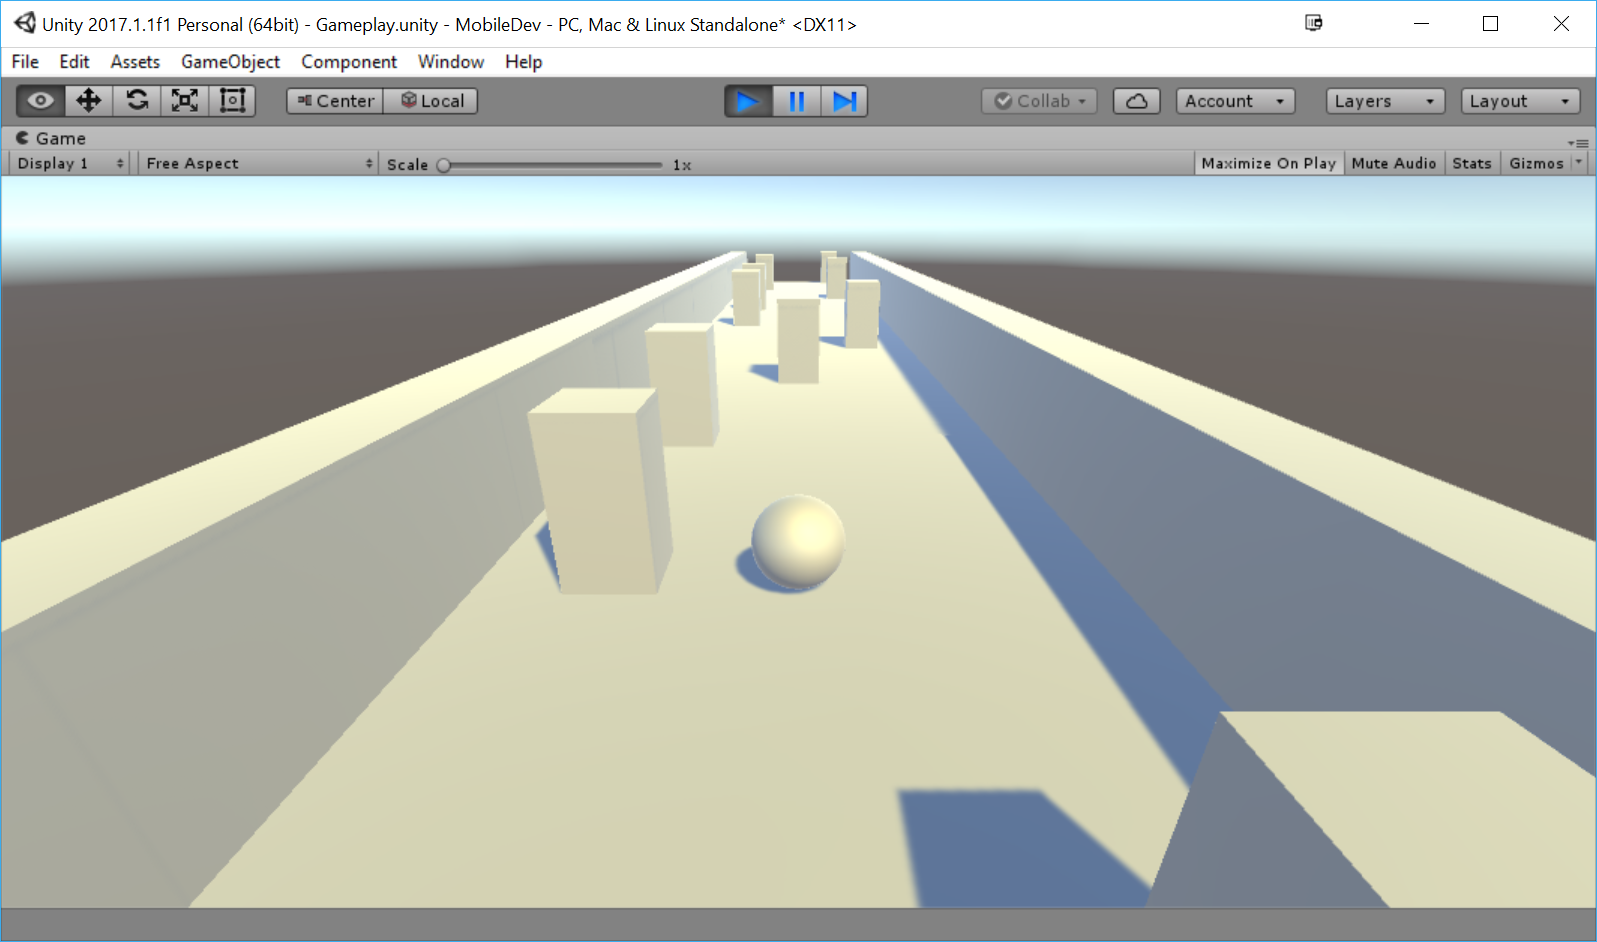
- Save your scene and play the game:
Note
For more information on directional lights and the other lighting types that Unity has, check out: https://unity3d.com/learn/tutorials/topics/graphics/light-types?playlist=17102.
As you can see in the preceding screenshot, we now have a number of obstacles for our player to avoid, and due to how the player works, he will gradually get faster and faster, causing the game to increase in difficulty over time.