Caching strategies
There are some strategies of caches for web applications. These same strategies can be applied for microservices. The most common strategy for caching is when we store the information in a cache after a query. In the following diagram, we receive a request through our API and we will, in the application, make the data query. The first search is performed in the cache and, if the data is not in the cache, the search is performed in the database. To return the query from the database, the value is recorded in the cache:
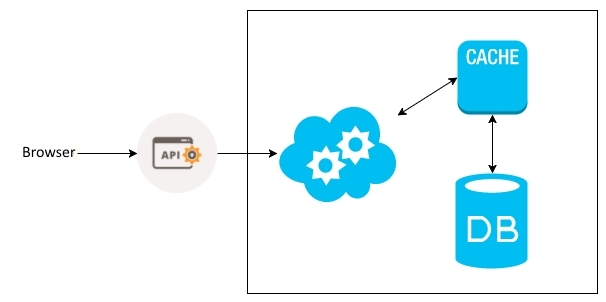
This kind of strategy is the simplest cache that can be applied. We see the changes we should make in our application to have the cache layer.
Applying cache
The first step is to download dependency with Redis as the connection driver:
$ go get github.com/garyburd/redigo/redisThe Redigo is our communication interface with Redis. We will use Redis as a cache tool of our microservice.
Now, we will create the cache.go file. This file is responsible for delivering us a configured instance of the cache. Similar to the other files we've ever created, let's declare the package where we are working and the dependencies, as follows:
    package main

    import (
      "log"
      "time"

      redigo "github.com/garyburd/redigo/redis"
    )
Then, we create an interface to create a pool of connections to the Redis and a struct with all the settings of the connection. Note that the instance of our pool will also be in the struct.
Pool is the interface to pool of Redis:
      type Pool interface {
        Get() redigo.Conn
      }
Cache is the struct with cache configuration:
      type Cache struct {

        Enable          bool

        MaxIdle         int

        MaxActive       int

        IdleTimeoutSecs int

        Address         string

        Auth            string

        DB              string

        Pool            *redigo.Pool

      }
Now, we'll create the method of our struct responsible for giving us a new connection pool. Redigo has a struct called Pool, which, when configured correctly, returns exactly what we need. In our cache configuration, we have the option Enable. If the option is enabled, we will apply the settings to return connection pooling; if it is not enabled, we simply ignore this process and return null. This implies that the pool will be validated at final; if something is wrong, we launch a fatal error and stop the server, followed by provisioning the service:
// NewCachePool return a new instance of the redis pool
  func (cache *Cache) NewCachePool() *redigo.Pool {
    if cache.Enable {
      pool := &redigo.Pool{
        MaxIdle: cache.MaxIdle,
        MaxActive: cache.MaxActive,
        IdleTimeout: time.Second * time.Duration(cache.IdleTimeoutSecs),
        Dial: func() (redigo.Conn, error) {
          c, err := redigo.Dial("tcp", cache.Address)
          if err != nil {
            return nil, err
          }
          if _, err = c.Do("AUTH", cache.Auth); err != nil {
            c.Close()
            return nil, err
          }
          if _, err = c.Do("SELECT", cache.DB); err != nil {
            c.Close()
            return nil, err
          }
          return c, err
        },
        TestOnBorrow: func(c redigo.Conn, t time.Time) error {
          _, err := c.Do("PING")
          return err
        },
      }
      c := pool.Get() // Test connection during init
      if _, err := c.Do("PING"); err != nil {
        log.Fatal("Cannot connect to Redis: ", err)
      }
      return pool
    }
    return nil
  }
Now, we create the method that searches our cache and that enters the data in our cache. The getValue method receives, as a parameter, the search key in the cache. The setValue function receives, as parameters, the key and the value that should be inserted in the cache:
func (cache *Cache) getValue(key interface{}) (string, error) {
     if cache.Enable {
                 conn := cache.Pool.Get()
                 defer conn.Close()
                 value, err := redigo.String(conn.Do("GET", key))
                 return value, err
     }
     return "", nil
}

func (cache *Cache) setValue(key interface{}, value interface{}) error {
     if cache.Enable {
                 conn := cache.Pool.Get()
                 defer conn.Close()
                 _, err := redigo.String(conn.Do("SET", key, value))
                 return err
     }
     return nil
}
In this way, our file, cache.go, is mounted and ready to be used in our application. However, we have to make some changes to our cache file before it is used. We will start by changing our file main.go.
In the file main.go, let's add a new import. When we import flags, we can receive information directly from the command line, and use them in our configuration of Redis:
    import (
      "flag"
      "fmt"
      "github.com/jmoiron/sqlx"
      _ "github.com/lib/pq"
      "log"
      "os"
    )
What we must do now is add the options that can be passed to the command line. This change also happens in the file main.go. First, we create an instance of our Cache, then add to the pointer of this instance, the settings. All settings have a default value if no argument is passed on the command line.
The order of the settings is as follows:
- Address: This is where Redis runs
- Auth: This is the password used to connect to the Redis
- DB: This is the Redis Bank that will be used as cache
- MaxIdle: This denotes the maximum number of connections that can be idle
- MaxActive: This denotes the maximum number of connections that can be active
- IdleTimeoutSecs: This is the time a connection timeout leads to enter activity
At the end of all settings, we'll create a new pool of connections with the NewCachePool method and pass the pointer to our cache instance, as follows:
    func main() {
     cache := Cache{Enable: true}

     flag.StringVar(
                 &cache.Address,
                 "redis_address",
                 os.Getenv("APP_RD_ADDRESS"),
                 "Redis Address",
     )

     flag.StringVar(
                 &cache.Auth,
                 "redis_auth",
                 os.Getenv("APP_RD_AUTH"),
                 "Redis Auth",
     )

     flag.StringVar(
                 &cache.DB,
                 "redis_db_name",
                 os.Getenv("APP_RD_DBNAME"),
                 "Redis DB name",
     )

     flag.IntVar(
                 &cache.MaxIdle,
                 "redis_max_idle",
                 10,
                 "Redis Max Idle",
     )

     flag.IntVar(
                 &cache.MaxActive,
                 "redis_max_active",
                 100,
                 "Redis Max Active",
     )

     flag.IntVar(
                 &cache.IdleTimeoutSecs,
                 "redis_timeout",
                 60,
                 "Redis timeout in seconds",
     )

     flag.Parse()
     cache.Pool = cache.NewCachePool()
     ...
Another change that should be made within main.go is to pass the App cache to the initialize method:
    ...
    a.Initialize(
      cache,
      db,
    )
    ...
We edit the app.go file to effectively use the cache according to the diagram given earlier. The first change is in the struct of the App, because it happens to store the cache:
    type App struct {
      DB         *sqlx.DB
      Router *mux.Router
      Cache   Cache
    }
Now, we should make sure that the initialize method receives the cache and passes the value to the instance of the App:
    func (a *App) Initialize(cache Cache, db *sqlx.DB) {

      a.Cache = cache
      a.DB = db
      a.Router = mux.NewRouter()
      a.initializeRoutes()
    }
Now, we can apply the cache in any part of the App; let's modify the getUser method to use the cache structure that we talked about earlier. Two parts of the method should be changed, so that the cache is applied.
First, rather than seek user data directly in PostgreSQL, we check if the data is already in the cache. If the data is already in the cache, we're not even going to get the data in the base.
The second amendment is that if the data is not in cache, perform a search in the database, and register this same data into the cache before returning a response to the request. In this way, in a subsequent search, the data will be in the cache, and the query on the database will not be performed:
    func (a *App) getUser(w http.ResponseWriter, r *http.Request) {
      vars := mux.Vars(r)
      id, err := strconv.Atoi(vars["id"])
      if err != nil {
       respondWithError(w, http.StatusBadRequest, "Invalid product ID")
       return
     }

     if value, err := a.Cache.getValue(id); err == nil && len(value) != 0 {
       w.Header().Set("Content-Type", "application/json")
       w.WriteHeader(http.StatusOK)
       w.Write([]byte(value))
       return
     }

     user := User{ID: id}
     if err := user.get(a.DB); err != nil {
       switch err {
        case sql.ErrNoRows:
           respondWithError(w, http.StatusNotFound, "User not found")
        default:
           respondWithError(w, http.StatusInternalServerError, err.Error())
       }
       return
     }

     response, _ := json.Marshal(user)
     if err := a.Cache.setValue(user.ID, response); err != nil {
       respondWithError(w, http.StatusInternalServerError, err.Error())
       return
     }

     w.Header().Set("Content-Type", "application/json")
     w.WriteHeader(http.StatusOK)
     w.Write(response)
    }
With the preceding amendments, after consultation in the database, the cache is replaced by query values and responds without the need for access to the database. This approach is sufficient for most cases but, in some scenarios, where the load of requests is high or the database may be very demanding, even having a cache, the database can become a point of slowness. The next cache strategy is very interesting for this kind of problem.
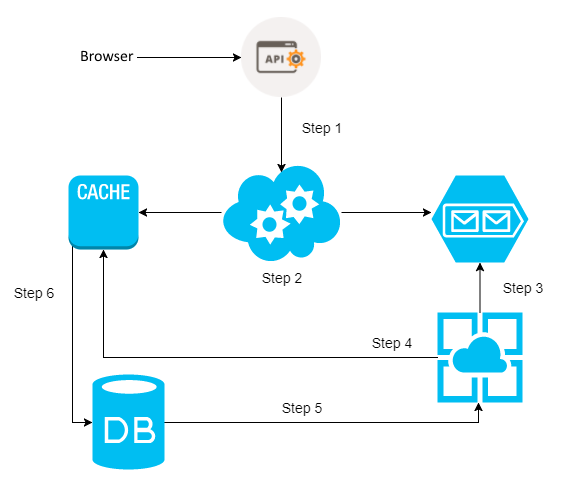
Caching first
A very useful cache strategy performance is caching first. This strategy is to use the cache as the first level of the database. The process can be considered quite simple. All common operations on the database are performed primarily in the cache, and sent in a queue at the same time that the workers begin to consume this queue and normalize the data in a real database:

To apply this technique, it is essential to use queues and asynchrony for consuming data. Something highly recommended with this approach is the use of cache with persistence.
In the next topic in this chapter, we will continue working to implement the strategy of caching first.
Enqueuing tasks
We know that we want to use the cache as a draft database, where all information can be consumed immediately, and only later consolidate our data in the database effectively.
Let's understand a little about the internal flow of persistence by looking at the following points:
- This executes a request to the application.
- Information sent to the application is registered in two places when it comes to
POST/PUT/DELETE. The first is the cache, where it will be all the information sent in the request. The second place is the queue, where it will be an identification key to the cached information. - The workers start and check if there is some content in the queue.
- If there is content in the queue, the workers seek the data in the cache.
- After searching the data in the cache, the data is persisted in the database.
- This step is only for when the request is a
GET. In this case, step 2 will only cache to fetch the data. If you can't find the data in the cache, step 6 runs by going to the database for the search. To return data, the searches are recorded in the cache.
It is important to make it clear that the mere sending to the cache and queue is sufficient to return a message to the client, which is a message of success or failure. Take a look at the following diagram:
Now that you understand the concept, let's modify our code to apply it. The main.go file is the point of application, as well as the place where all the settings are obtained. In this file, we will declare the names of the queues that are used in our process. The following are the imports, and we will create the following constants:
    const (
      createUsersQueue = "CREATE_USER"
      updateUsersQueue = "UPDATE_USER"
      deleteUsersQueue = "DELETE_USER"
    )
These constants are used in other parts of the application to send data to the queue.
In the file cache.go, we will create a new method for the instance from the cache. This method is responsible for storing the keys in the queues:
    func (cache *Cache) enqueueValue(queue string, uuid int) error {
      if cache.Enable {
                 conn := cache.Pool.Get()
                 defer conn.Close()
                 _, err := conn.Do("RPUSH", queue, uuid)
                 return err
      }
      return nil
    }
The next step is to modify the createUser method in the app.go file. This method removes every part of persistence that stemmed from the database. The only access we should have is to the PostgreSQL at this point is the capture of a new sequence to be applied to the instance of the entity.
After assigning the ID entity, we register in the cache using the ID as the key and the entity in JSON format as the value. Then, we send the key to the queue CREATE_USER. Take a look at the following example:
func (a *App) createUser(w http.ResponseWriter, r *http.Request) {
     var user User
     decoder := json.NewDecoder(r.Body)
     if err := decoder.Decode(&user); err != nil {
                 respondWithError(w, http.StatusBadRequest, "Invalid request payload")
                 return
     }
     defer r.Body.Close()

     // get sequence from Postgres
     a.DB.Get(&user.ID, "SELECT nextval('users_id_seq')")

     JSONByte, _ := json.Marshal(user)
     if err := a.Cache.setValue(user.ID, string(JSONByte)); err != nil {
                 respondWithError(w, http.StatusInternalServerError, err.Error())
                 return
     }

     if err := a.Cache.enqueueValue(createUsersQueue, user.ID); err != nil {
                 respondWithError(w, http.StatusInternalServerError, err.Error())
                 return
     }

     respondWithJSON(w, http.StatusCreated, user)
}
Now, we have the data in the queue and the cache before the record in the database. If a query is performed right now, the data will be returned from the cache and not from the base.
The next step is to register the information in the cache only database, but we will cover that a little later in the chapter.
Asynchronism and workers
Our information is already in a queue, but not yet stored in the database. This is due to the fact that we are not consuming the information that is in the queue, but sending it to the database instead.
The processes of recovering the data that is in the queue and that of sending them to a normalized database must be asynchronous. In the end, it's like we have two applications within the same software. The first part of the application is responsible for receiving the data, while the second part is responsible for processing the data.
Let's see how we conduct this process in the application code. We will first create a file named workers.go. Then, we will declare the package where we are working and the imports, as seen in the following code:
    package main

    import (
      "encoding/json"
      redigo "github.com/garyburd/redigo/redis"
      "github.com/jmoiron/sqlx"
      "log"
      "sync"
    )
After the opening statements, let's write the struct that will meet all the workers. The struct contains the instance cache settings, and the database instance ID of the worker and the queue that the worker will consume.
Worker is the struct with worker configuration values:
    type Worker struct {
      cache Cache
      db       *sqlx.DB
      id       int
      queue string
    }
Let's create a newWorkerfunction, which will be responsible for initializing the worker that will receive all data as a parameter to the struct of the worker:
    func newWorker(id int, db *sqlx.DB, cache Cache,
    queue string) Worker {
      return Worker{cache: cache, db: db, id: id, queue: queue}
    }
The next step is to create the method process that belongs to the worker. This is the method that will run the queue and send data to the database. If the process fails, the method will resend the data which will be held for the queue.
The process method receives the ID of the worker. Within the method, there is an infinite loop where a cached connection is requested to the connection pool and two variables, channel and uuid, are declared. Both variables are populated with the information from the queue. In our case, the channel exists only to fulfil the subscription Redigo API. What we are going to use is the variable uuid.
We will use the BLPOP function of Redis to consume the queue. With uuid populated, we use the GET function of Redis to get the data in the cache. On the basis of the information retrieved, we will instantiate a user using the struct. Then, we'll call the create method of the own instance of the user to register the new user in the database:
    func (w Worker) process(id int) {
      for {
        conn := w.cache.Pool.Get()
        var channel string
        var uuid int
        if reply, err := redigo.Values(conn.Do("BLPOP", w.queue,
         30+id)); err == nil {

          if _, err := redigo.Scan(reply, &channel, &uuid); err != nil {
            w.cache.enqueueValue(w.queue, uuid)
            continue
          }

          values, err := redigo.String(conn.Do("GET", uuid))
          if err != nil {
            w.cache.enqueueValue(w.queue, uuid)
            continue
          }

          user := User{}
          if err := json.Unmarshal([]byte(values), &user); err != nil {
            w.cache.enqueueValue(w.queue, uuid)
            continue
          }

          log.Println(user)
          if err := user.create(w.db); err != nil {
            w.cache.enqueueValue(w.queue, uuid)
            continue
          }

        } else if err != redigo.ErrNil {
            log.Fatal(err)
        }
        conn.Close()
      }
    }
Now, staying in the workers.go file, write the UsersToDB function, which creates a number of workers that we wish for the queue to instantiate additionally, and initialize the workers asynchronously.
UsersToDB creates workers to consume the queues:
    func UsersToDB(numWorkers int, db *sqlx.DB, cache Cache,
     queue string) {
      var wg sync.WaitGroup
      for i := 0; i < numWorkers; i++ {
           wg.Add(1)
           go func(id int, db *sqlx.DB, cache Cache, queue string) {
               worker := newWorker(i, db, cache, queue)
               worker.process(i)
               defer wg.Done()
           }(i, db, cache, queue)
      }
      wg.Wait()
    }
The following is the final result of the workers.go file:
    package main

    import (
      "encoding/json"
      redigo "github.com/garyburd/redigo/redis"
      "github.com/jmoiron/sqlx"
      "log"
      "sync"
    )
Worker is the struct with worker configuration values:
    type Worker struct {
      cache Cache
      db       *sqlx.DB
      id       int
      queue string
    }
UsersToDB create workers to consume the queues:
    func UsersToDB(numWorkers int, db *sqlx.DB, cache Cache,
     queue string) {
      var wg sync.WaitGroup
      for i := 0; i < numWorkers; i++ {
        wg.Add(1)
        go func(id int, db *sqlx.DB, cache Cache, queue string) {
          worker := newWorker(i, db, cache, queue)
          worker.process(i)
          defer wg.Done()
        }(i, db, cache, queue)
      }
      wg.Wait()
    }

    func newWorker(id int, db *sqlx.DB, cache Cache,
     queue string) Worker {
      return Worker{cache: cache, db: db, id: id, queue: queue}
    }

    func (w Worker) process(id int) {
      for {
        conn := w.cache.Pool.Get()
        var channel string
        var uuid int
        if reply, err := redigo.Values(conn.Do("BLPOP", w.queue,
         30+id)); err == nil {

           if _, err := redigo.Scan(reply, &channel, &uuid); err != nil {
             w.cache.enqueueValue(w.queue, uuid)
             continue
           }

           values, err := redigo.String(conn.Do("GET", uuid))
           if err != nil {
             w.cache.enqueueValue(w.queue, uuid)
             continue
           }

           user := User{}
           if err := json.Unmarshal([]byte(values), &user); err != nil {
             w.cache.enqueueValue(w.queue, uuid)
             continue
           }

           log.Println(user)
           if err := user.create(w.db); err != nil {
             w.cache.enqueueValue(w.queue, uuid)
             continue
           }

         } else if err != redigo.ErrNil {
             log.Fatal(err)
         }
         conn.Close()
       }
    }
However, to invoke our workers, we should do a little editing in the main.go file. Recall that the main.go file is the one that initializes the microservice. Two new items have been added to the main function. There is also the possibility of receiving the number of workers by queue via the command line to initialize the application, and initialization of the workers itself, using the prefix go, as shown in the following code:
    func main() {
      var numWorkers int
      cache := Cache{Enable: true}
      flag.StringVar(
         &cache.Address,
         "redis_address",
         os.Getenv("APP_RD_ADDRESS"),
         "Redis Address",
      )
      flag.StringVar(
         &cache.Auth,
         "redis_auth",
         os.Getenv("APP_RD_AUTH"),
         "Redis Auth",
      )
      flag.StringVar(
         &cache.DB,
         "redis_db_name",
         os.Getenv("APP_RD_DBNAME"),
         "Redis DB name",
      )
      flag.IntVar(
         &cache.MaxIdle,
         "redis_max_idle",
         10,
         "Redis Max Idle",
      )
      flag.IntVar(
         &cache.MaxActive,
         "redis_max_active",
         100,
         "Redis Max Active"
      )
      flag.IntVar(
         &cache.IdleTimeoutSecs,
         "redis_timeout",
         60,
         "Redis timeout in seconds"
      )
      flag.IntVar(
         &numWorkers,
         "num_workers",
         10,
         "Number of workers to consume queue"
      )
      flag.Parse()
      cache.Pool = cache.NewCachePool()

      connectionString := fmt.Sprintf(
         "user=%s password=%s dbname=%s sslmode=disable",
         os.Getenv("APP_DB_USERNAME"),
         os.Getenv("APP_DB_PASSWORD"),
         os.Getenv("APP_DB_NAME"),
      )

      db, err := sqlx.Open("postgres", connectionString)
      if err != nil {
         log.Fatal(err)
      }

      go UsersToDB(numWorkers, db, cache, createUsersQueue)
      go UsersToDB(numWorkers, db, cache, updateUsersQueue)
      go UsersToDB(numWorkers, db, cache, deleteUsersQueue)

      a := App{}
      a.Initialize(cache, db)
      a.Run(":8080")
    }
At last, we have our application using the caching first strategy. In case of UsersService, this strategy works very well, because the user ID is always something simple to obtain and calculate. A positive point is that everything we need to adopt this strategy is already in the application. There's no need to add something new to the stack. However, along with the advantages, there are some downsides as well.
Imagine if the ID to retrieve the cache is very difficult to obtain or calculate. Think also of the case where the identification key can be composed. How do we deal with this kind of obstacle to implement the caching first strategy?
For this type of problem, it is better to adopt another pattern. The Command Query Responsibility Segregation (CQRS) is a great option when the search scenario and maintenance is more complex.
We'll explain this pattern in the next section of this chapter.