Using Kali Linux from bootable media
As you will see in the pages that follow, there are a tremendous number of uses for Kali Linux, and for these uses, it is not always practical to dedicate a device to one particular use case, as this would be a tremendous waste of resources. To address this, you can use the Kali Linux installation ISO downloaded in the previous section as a live CD as well; or you can maintain persistence with a live USB drive with persistence (with or without Linux Unified Key Setup encryption).
We will show you how to create the Live USB (no persistence, no history maintained).
Additional options such as live USB with persistence, live USB with encrypted persistence, and custom rolled Kali Linux ISO (which can be incorporated into the bootable USB options) can be found on the Kali Linux documentation wiki at http://docs.kali.org under the section called 02. Kali Linux Live.
Getting ready
In order to be able to complete this section successfully, you will need the following:
- USB Drive (8 GB or larger)
- USB disk imager (Win32DiskImager)
How to do it...
Let's begin the process of creating a bootable Kali Linux USB device:
- Starting with the Kali Linux ISO file we downloaded in the earlier recipe, installing VirtualBox, we will use Win32DiskImager (https://sourceforge.net/projects/win32diskimager/) to create a bootable USB using the ISO. Download and install Win32DiskImager.
- Once installed, launch Win32DiskImager.
Note
In order to format the USB drive and to write the raw image, Win32DiskImager needs admin permissions to run. You will need to give permission for it to run when the user access control dialog is presented.
- Win32DiskImager will use IMG files, but we will tell it to use an ISO file as the source. From the application screen, click on the
File Openbutton, and when presented with theFile Openbox, change the file filter to*.*in the lower right, and navigate to theKali Linux ISOfile. - Select the drive letter of your USB device, and click on
Write:
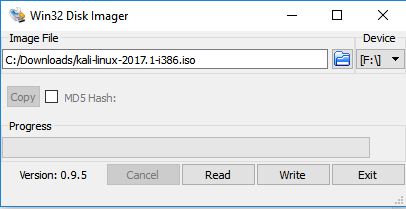
FW32 DiskImager example
- Once the image has been written to the USB drive, you will be able to boot from this device on machines that support the USB bootable media. In this configuration, you now have a bootable USB drive that will from which the Kali Linux operating system will boot, as if it were installed onto the local disk. Across reboots, you will lose any documents you may have created. If you choose it, you can create an additional partition on the USB drive that will be persistent, and keep files and documents you may wish to keep. The step-by-step instructions on how to extend this functionality can be found on the Kali Linux documentation wiki at http://docs.kali.org under
02. Kali Linux Live.