Setting up the environment
Remember, no matter how you have configured your environment to develop web applications with PHP and Laravel, keep the main server requirements in mind, and you will be able to follow the examples in this chapter.
It is important to note that some operating systems do not have PHP installed. As this is the case with Windows machines, here are some alternatives for you to create your development environment:
- HOMESTEAD (recommended by Laravel documentation): https://laravel.com/docs/5.6/homestead
- MAMP: https://www.mamp.info/en/
- XAMPP: https://www.apachefriends.org/index.html
- WAMP SERVER (only for Windows OS): http://www.wampserver.com/en/
- PHPDOCKER: https://www.docker.com/what-docker
Installing Composer package manager
Laravel uses Composer, a dependency manager for PHP, very similar to Node Package Manager(NPM) for Node.js projects, PIP for Python, and Bundler for Ruby. Let's see what the official documentation says about it:
"A Composer is a tool for dependency management in PHP. It allows you to declare the libraries your project depends on and it will manage (install/update) them for you."
So, let's install Composer, as follows:
Go to https://getcomposer.org/download/ and follow the instructions for your platform.
Note
You can get more information at https://getcomposer.org/doc/00-intro.md.
Note that you can install Composer on your machine locally or globally; don't worry about it right now. Choose what is easiest for you.
All PHP projects that use Composer have a file called composer.json at the root project, which looks similar to the following:
{
 "require": {
     "laravel/framework": "5.*.*",
 }
}
This is also very similar to the package.json file on Node.js and Angular applications, as we will see later in this book.
Note
Here's a helpful link about the basic commands: https://getcomposer.org/doc/01-basic-usage.md
Installing Docker
We will use Docker in this chapter. Even though the official documentation of Laravel suggests the use of Homestead with virtual machines and Vagrant, we chose to use Docker because it's fast and easy to start, and our main focus is on Laravel's core concepts.
Note
You can find more information about Docker at https://www.docker.com/what-docker.
As the Docker documentation states:
Docker is the company driving the container movement and the only container platform provider to address every application across the hybrid cloud. Today’s businesses are under pressure to digitally transform, but are constrained by existing applications and infrastructure while rationalizing an increasingly diverse portfolio of clouds, datacenters, and application architectures. Docker enables true independence between applications and infrastructure and developers and IT ops to unlock their potential and creates a model for better collaboration and innovation.
Let's install Docker, as follows:
- Go to https://docs.docker.com/install/.
- Choose your platform and follow the installation steps.
- If you have any trouble, check the getting started link at https://docs.docker.com/get-started/.
As we are using Docker containers and images to start our application and won't get into how Docker works behind the scenes, here is a short list of some Docker commands:
Command: | Description: |
| Show running containers |
| Show all containers |
| Start a container |
| Stop a container |
| Start containers in background |
| Stop all containers on |
| Start all containers on |
| Kill all containers on |
| Log all containers on |
Note
You can check the whole list of Docker commands at https://docs.docker.com/engine/reference/commandline/docker/. And Docker-compose commands at https://docs.docker.com/compose/reference/overview/#command-options-overview-and-help.
Configuring PHPDocker.io
PHPDocker.io is a simple tool that helps us to build PHP applications using the Docker/Container concept with Compose. It's very easy to understand and use; so, let's look at what we need to do:
- Go to https://phpdocker.io/.
- Click on the
Generatorlink. - Fill out the information, as in the following screenshot.
- Click on the
Generateproject archivebutton and save the folder:

PHPDocker interface
The database configuration is asper the following screenshot:
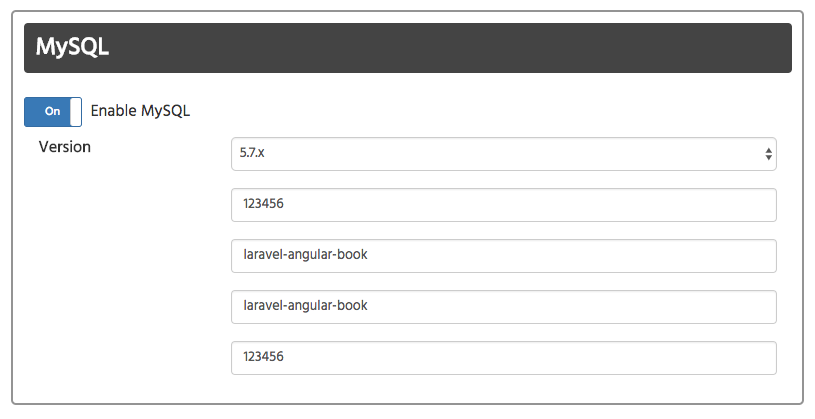
Database configuration
Note
Note that we are using the latest version of the MYSQL database in the preceding configuration, but you can choose whatever version you prefer. In the following examples, the database version will not matter.
Setting up PHPDocker and Laravel
Now that we have filled in the previous information and downloaded the file for our machine, let's begin setting up our application so as to delve deeper into the directory structure of a Laravel application.
Execute the following steps:
- Open
bash/Terminal/cmd. - Go to
Users/yournameon Mac and Linux, orC:/on Windows.
- Open your Terminal inside the folder and type the following command:
composer create-project --prefer-dist laravel/laravel chapter-01At the end of your Terminal window, you will see the following result:
Writing lock file
Generating autoload files
> Illuminate\Foundation\ComposerScripts::postUpdate
> php artisan optimize
Generating optimized class loader
php artisan key:generate- In the Terminal window, type:
cd chapter-01 && lsThe results will be as follows:

Terminal window output
Congratulations! You have your first Laravel application, built with the Composer package manager.
Now, it's time to join our application with the file downloaded from PHPDocker (our PHP/MySQL Docker screenshot). To do so, follow the next steps.
- Grab the downloaded archive,
hands-on-full-stack-web-development-with-angular-6-and-laravel-5.zip, and unzip it. - Copy all of the folder content (a
phpdockerfolder and a file,docker-compose.yml). - Open the
chapter-01folder and paste the content.
Now, inside the chapter-01 folder, we will see the following files:
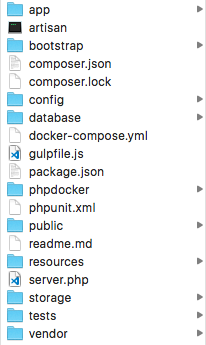
chapter-01 folder structure
Let's check to make sure that everything will go well with our configuration.
- Open your Terminal window and type the following command:
docker-compose up -dNote
It's important to remember that at this point, you need to have Docker up and running on your machine. If you are completely new to how to run Docker on your machine, you can find more information at https://github.com/docker/labs/tree/master/beginner/.
- Note that this command may take more time to create and build all of the containers. The results will be as follows:

Docker containers up and running
The preceding screenshot indicates that we have started all containers successfully: memcached, webserver (Nginx), mysql, and php-fpm.
Open your browser and type http://localhost:8081; you should see the welcome page for Laravel.
At this point, it is time to open our sample project in a text editor and check all of the Laravel folders and files. You can choose the editor that you are used to, or, if you prefer, you can use the editor that we will describe in the next section.
Installing VS Code text editor
For this chapter, and throughout the book, we will be using Visual Studio Code (VS Code), a free and highly configurable multiplatform text editor. It is also very useful for working with projects in Angular and TypeScript.
Install VS Code as follows:
- Go to the download page and choose your platform at https://code.visualstudio.com/Download.
- Follow the installation steps for your platform.
VS Code has a vibrant community with tons of extensions. You can research and find extensions at https://marketplace.visualstudio.com/VSCode. In the next chapters, we will install and use some of them.
For now, just install VS Code icons from https://marketplace.visualstudio.com/items?itemName=robertohuertasm.vscode-icons.