Search icon CANCEL
Subscription
0
Cart icon
Your Cart (0 item)
Close icon
You have no products in your basket yet
Save more on your purchases! discount-offer-chevron-icon
Savings automatically calculated. No voucher code required.
Arrow left icon
All Products
Best Sellers
New Releases
Books
Videos
Audiobooks
Learning Hub
Newsletter Hub
Free Learning
Arrow right icon
timer SALE ENDS IN
0 Days
:
00 Hours
:
00 Minutes
:
00 Seconds
Arrow up icon
GO TO TOP
3D printing with RepRap Cookbook

You're reading from   3D printing with RepRap Cookbook Over 80 fast-paced recipes to help you create and print 3D models

Arrow left icon
Product type Paperback
Published in Jun 2014
Publisher
ISBN-13 9781782169888
Length 346 pages
Edition 1st Edition
Tools
Arrow right icon
Author (1):
Arrow left icon
 Salinas Salinas
Author Profile Icon Salinas
Salinas
Arrow right icon
View More author details
Toc

Table of Contents (19) Chapters Close

3D Printing with RepRap Cookbook
Credits
About the Author
About the Reviewers
www.PacktPub.com
Preface
1. Getting Started with 3D Printing 2. Optimizing the Printing Process FREE CHAPTER 3. Scanning and Printing with a Higher Resolution 4. Modeling and Printing with Precision 5. Manipulating Meshes and Bridges 6. Making the Impossible 7. Texture – the Good and the Bad 8. Troubleshooting Issues in 3D Modeling 9. Troubleshooting Issues in 3D Printing Understanding and Editing Firmware Taking a Closer Look at G-code Filament Options for RepRap Printers Index

Bridging with Slic3r


Slic3r is generally known to perform better bridging methods than Skeinforge. As we'll see in the following recipes, this holds true. We'll see how easy it is to achieve decent results printing a bridge 50 mm across!

First, we'll look at layer height. As we can see in the following example, a lower-print layer will generally give a better result:

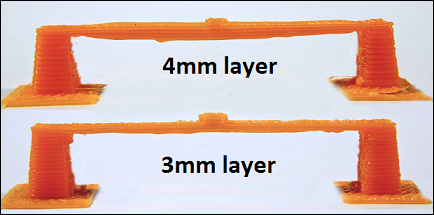
For this reason, we'll be printing the following tests in this recipe with a 3 mm layer.

We'll also be experimenting with both ABS and PLA filament. Keep in mind that the filament isn't consistent in grade and the results may vary.

Getting ready

You'll need Slic3r and ABS and PLA filament. You'll also need to download the Bridge Torture Test from www.thingiverse.com/thing:12925. You'll also need the cube you made in the Wireframe modeling with TopMod recipe.

How to do it...

We will proceed as follows:

  1. Slice and print the Bridge Torture Test and cube using PLA and the default settings with your best cooling settings.

  2. Under Print Settings...

lock icon The rest of the chapter is locked
Register for a free Packt account to unlock a world of extra content!
A free Packt account unlocks extra newsletters, articles, discounted offers, and much more. Start advancing your knowledge today.
Unlock this book and the full library FREE for 7 days
Get unlimited access to 7000+ expert-authored eBooks and videos courses covering every tech area you can think of
Renews at $15.99/month. Cancel anytime
Visually different images