Search icon CANCEL
Subscription
0
Cart icon
Your Cart (0 item)
Close icon
You have no products in your basket yet
Save more on your purchases! discount-offer-chevron-icon
Savings automatically calculated. No voucher code required.
Arrow left icon
All Products
Best Sellers
New Releases
Books
Videos
Audiobooks
Learning Hub
Newsletter Hub
Free Learning
Arrow right icon
timer SALE ENDS IN
0 Days
:
00 Hours
:
00 Minutes
:
00 Seconds
Arrow up icon
GO TO TOP
The Complete Guide to DAZ Studio 4

You're reading from   The Complete Guide to DAZ Studio 4 Bring your 3D characters to life with DAZ Studio

Arrow left icon
Product type Paperback
Published in Oct 2013
Publisher Packt
ISBN-13 9781849694087
Length 348 pages
Edition 1st Edition
Languages
Arrow right icon
Author (1):
Arrow left icon
 Ciccone Ciccone
Author Profile Icon Ciccone
Ciccone
Arrow right icon
View More author details
Toc

Table of Contents (20) Chapters Close

The Complete Guide to DAZ Studio 4
Credits
About the Author
About the Reviewers
www.PacktPub.com
Preface
1. Quick Start – Our First 3D Scene FREE CHAPTER 2. Customizing Studio 3. Posing Figures 4. Creating New Characters with Morphs 5. Rendering 6. Finding and Installing New Content 7. Navigating the Studio Environment 8. Building a Full Scene 9. Lighting 10. Hyper-realism – the Reality Plugin 11. Creating Content 12. Animation Installing DAZ Studio Index

Saving the pose


After all this hard work, it would be great if we can save this pose so that we can re-use it in the future. We might even start thinking about making poses for commercial use, so saving them into files is definitely something that we want to be able to do.

This is very easy, so you can immediately relax. All that we need to do is select the Genesis figure and then navigate to File | Save As… | Pose Preset.

When we do that, the standard Save window shows up. In there, we need to enter the name of the file that we want to use for our pose. I selected Chapter3_SurferPose.duf. Once that operation is done, Studio shows us the window where we can select some other options for the way we want to save the pose.

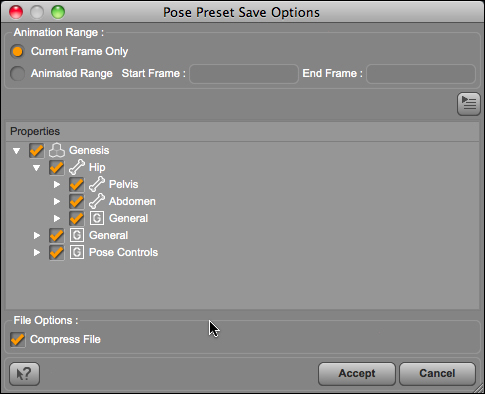
For now we can simply click on the Accept button.

To test the pose file, let's create a new empty scene and add the Basic Female figure to it. To use a custom pose file that is not part of the content manager, we need to navigate to File | Merge and select the file that is saved...

lock icon The rest of the chapter is locked
Register for a free Packt account to unlock a world of extra content!
A free Packt account unlocks extra newsletters, articles, discounted offers, and much more. Start advancing your knowledge today.
Unlock this book and the full library FREE for 7 days
Get unlimited access to 7000+ expert-authored eBooks and videos courses covering every tech area you can think of
Renews at £13.99/month. Cancel anytime
Visually different images