Search icon CANCEL
Subscription
0
Cart icon
Your Cart (0 item)
Close icon
You have no products in your basket yet
Save more on your purchases! discount-offer-chevron-icon
Savings automatically calculated. No voucher code required.
Arrow left icon
All Products
Best Sellers
New Releases
Books
Videos
Audiobooks
Learning Hub
Newsletter Hub
Free Learning
Arrow right icon
timer SALE ENDS IN
0 Days
:
00 Hours
:
00 Minutes
:
00 Seconds
Arrow up icon
GO TO TOP
Mastering Unreal Engine 4.X

You're reading from   Mastering Unreal Engine 4.X Master the art of building AAA games with Unreal Engine

Arrow left icon
Product type Paperback
Published in Jun 2016
Publisher Packt
ISBN-13 9781785883569
Length 384 pages
Edition 1st Edition
Languages
Tools
Arrow right icon
Author (1):
Arrow left icon
Muhammad A.Moniem Muhammad A.Moniem
Author Profile Icon Muhammad A.Moniem
Muhammad A.Moniem
Arrow right icon
View More author details
Toc

Table of Contents (22) Chapters Close

Mastering Unreal Engine 4.X
Credits
About the Author
Acknowledgments
About the Reviewer
www.PacktPub.com
Preface
1. Preparing for a Big Project FREE CHAPTER 2. Setting Up Your Warrior 3. Designing Your Playground 4. The Road to Thinkable AI 5. Adding Collectables 6. The Magic of Particles 7. Enhancing the Visual Quality 8. Cinematics and In-Game Cutscenes 9. Implementing the Game UI 10. Save the Game Progress 11. Controlling Gameplay via Data Tables 12. Ear Candy 13. Profiling the Game Performance 14. Packaging the Game Index

Building the blueprint


Now with everything done on the animation blueprint side, it is a very simple step to get it all together. First, hit Save on the animation blueprint and close it; we don't need it again.

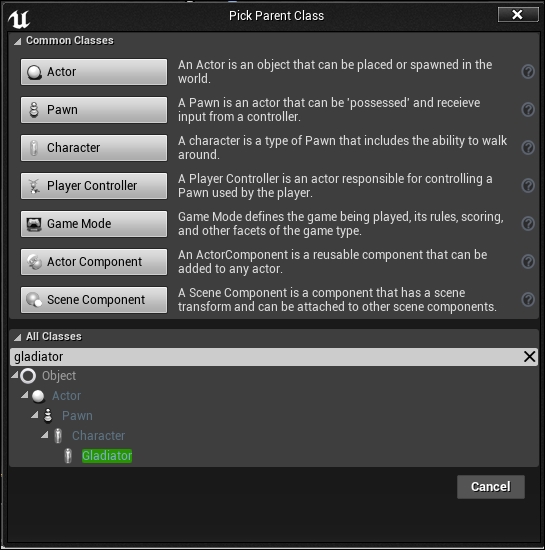
You can now right-click inside the content browser, and choose to create a blueprint. This will open the classes list to choose a base class for this blueprint. The ones on the top are the most popular ones, but we want to create one based on our Gladiator C++ class we made at the beginning of this chapter. So, you can look at the bottom section and type the class name in the search box and you will find it. Use it and create the blueprint. Give it a name and remember this name, as we are going to use it in the final step of this chapter in order to use it as the default pawn.
Once you have the blueprint, double-click on it in order to open it, and don't panic because it doesn't look like what you expect, or does not look like a normal blueprint based on an actor.

What you are seeing...

lock icon The rest of the chapter is locked
Register for a free Packt account to unlock a world of extra content!
A free Packt account unlocks extra newsletters, articles, discounted offers, and much more. Start advancing your knowledge today.
Unlock this book and the full library FREE for 7 days
Get unlimited access to 7000+ expert-authored eBooks and videos courses covering every tech area you can think of
Renews at $15.99/month. Cancel anytime
Visually different images