Search icon CANCEL
Subscription
0
Cart icon
Your Cart (0 item)
Close icon
You have no products in your basket yet
Save more on your purchases! discount-offer-chevron-icon
Savings automatically calculated. No voucher code required.
Arrow left icon
All Products
Best Sellers
New Releases
Books
Videos
Audiobooks
Learning Hub
Newsletter Hub
Free Learning
Arrow right icon
timer SALE ENDS IN
0 Days
:
00 Hours
:
00 Minutes
:
00 Seconds
Arrow up icon
GO TO TOP
vCenter Troubleshooting

You're reading from   vCenter Troubleshooting Resolve some of the most commonly faced vCenter problems with the use of this troubleshooting guide

Arrow left icon
Product type Paperback
Published in Apr 2015
Publisher
ISBN-13 9781783554034
Length 184 pages
Edition 1st Edition
Arrow right icon
Author (1):
Arrow left icon
Chuck Mills Chuck Mills
Author Profile Icon Chuck Mills
Chuck Mills
Arrow right icon
View More author details
Toc

Table of Contents (16) Chapters Close

vCenter Troubleshooting
Credits
About the Author
About the Reviewers
www.PacktPub.com
Preface
1. vCenter Upgrades and Migrations FREE CHAPTER 2. Working with the vCenter Database 3. Setting Access and Permissions 4. Monitoring and Performance Considerations 5. Working with Storage 6. Solving Some Not-so-common vCenter Issues 7. Backup and Recovery 8. Additional Support Methods and Tools 9. Troubleshooting Methods Index

Resolving low and no space problems


Running low or actually running completely out of space on the disk in the vCenter environment (Windows-based or appliance) can cause some big problems. Monitoring your system for your disk space amounts, along with many other resource items, will prevent major headaches.

Low space problems

If you find you are low on disk space and are using the embedded database in the VCSA, you can increase your disk space using these steps:

  1. Shutting down the VCSA is optional.

  2. Add the new hard disk with the size you think you need for the VCSA.

  3. Now, power on the VCSA.

  4. Log in to the VCSA using the console or SSH.

  5. The following command is used to list the disk:

    fdisk -lu
    

    You can see this command executed in the following screenshot:

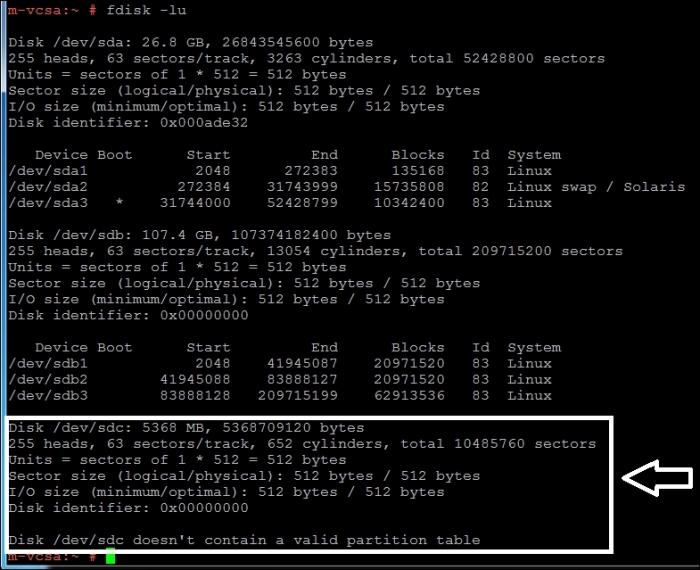
  6. Identify the new disk device ID.

  7. Access the new disk and the disk utility using the following command:

    fdisk /dev/sdc
    
  8. Pressing N and Enter creates a new partition.

  9. Press P and Enter to create the primary partition.

  10. Enter 1, which is the partition number...

lock icon The rest of the chapter is locked
Register for a free Packt account to unlock a world of extra content!
A free Packt account unlocks extra newsletters, articles, discounted offers, and much more. Start advancing your knowledge today.
Unlock this book and the full library FREE for 7 days
Get unlimited access to 7000+ expert-authored eBooks and videos courses covering every tech area you can think of
Renews at $15.99/month. Cancel anytime
Visually different images