Search icon CANCEL
Subscription
0
Cart icon
Your Cart (0 item)
Close icon
You have no products in your basket yet
Save more on your purchases! discount-offer-chevron-icon
Savings automatically calculated. No voucher code required.
Arrow left icon
All Products
Best Sellers
New Releases
Books
Videos
Audiobooks
Learning Hub
Newsletter Hub
Free Learning
Arrow right icon
timer SALE ENDS IN
0 Days
:
00 Hours
:
00 Minutes
:
00 Seconds
Arrow up icon
GO TO TOP
Unity Character Animation with Mecanim

You're reading from   Unity Character Animation with Mecanim A detailed guide to the complex new animation tools in Unity, packed with clear instructions and illustrated with original content in the context of a next generation zombie apocalypse adventure game

Arrow left icon
Product type Paperback
Published in Sep 2015
Publisher
ISBN-13 9781849696364
Length 290 pages
Edition 1st Edition
Tools
Concepts
Arrow right icon
Author (1):
Arrow left icon
Jamie Dean Jamie Dean
Author Profile Icon Jamie Dean
Jamie Dean
Arrow right icon
View More author details
Toc

Table of Contents (16) Chapters Close

Unity Character Animation with Mecanim
Credits
About the Author
About the Reviewers
www.PacktPub.com
Preface
1. The Zombie Attacks! FREE CHAPTER 2. Rigging Characters for Unity in 3ds Max and Maya 3. Interacting with the Environment 4. Working with Motion Capture Data 5. Retargeting Animation 6. Talking Heads 7. Controlling Player Animation with Blend Trees 8. Implementing Ragdoll Physics 9. Controlling Enemy Animation with AI and Triggers Index

Implementing the turn animation


In this case, there is a single animation sequence that will be played when the zombie is turning to the right or left.

The FBX file containing the animation has already been imported. The next step is to add the resulting motion clip to the animator controller in its own state.

Adding the turning state

The turn animation is a single looping sequence used for a left or right turn:

  1. Make sure that the Animator panel is visible and the base layer is active.

  2. In the Project panel, locate the PACKT_Animations folder and click on it once to view its contents in the Assets panel.

  3. Locate the zombie_turn asset and expand its hierarchy by clicking on the arrow next to its name.

  4. Drag the zombie_turn animation into a blank area of the Animator panel to create a new state containing the clip.

  5. In the Inspector panel, rename the state Turn:

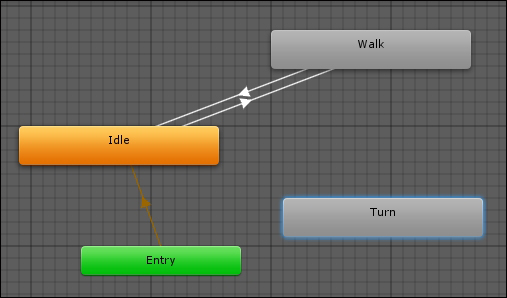
Next, we will set up an appropriate parameter and create transitions to and from our existing states.

Setting up the IsTurning parameter

We want...

lock icon The rest of the chapter is locked
Register for a free Packt account to unlock a world of extra content!
A free Packt account unlocks extra newsletters, articles, discounted offers, and much more. Start advancing your knowledge today.
Unlock this book and the full library FREE for 7 days
Get unlimited access to 7000+ expert-authored eBooks and videos courses covering every tech area you can think of
Renews at $15.99/month. Cancel anytime
Visually different images