Search icon CANCEL
Subscription
0
Cart icon
Your Cart (0 item)
Close icon
You have no products in your basket yet
Save more on your purchases! discount-offer-chevron-icon
Savings automatically calculated. No voucher code required.
Arrow left icon
All Products
Best Sellers
New Releases
Books
Videos
Audiobooks
Learning Hub
Newsletter Hub
Free Learning
Arrow right icon
timer SALE ENDS IN
0 Days
:
00 Hours
:
00 Minutes
:
00 Seconds
Arrow up icon
GO TO TOP
Mastering Unity 2D Game  Development

You're reading from   Mastering Unity 2D Game Development Using Unity 5 to develop a retro RPG

Arrow left icon
Product type Paperback
Published in Oct 2016
Publisher Packt
ISBN-13 9781786463456
Length 506 pages
Edition 2nd Edition
Languages
Tools
Arrow right icon
Authors (2):
Arrow left icon
Dr. Ashley Godbold Dr. Ashley Godbold
Author Profile Icon Dr. Ashley Godbold
Dr. Ashley Godbold
 Jackson Jackson
Author Profile Icon Jackson
Jackson
Arrow right icon
View More author details
Toc

Table of Contents (20) Chapters Close

Mastering Unity 2D Game Development - Second Edition
Credits
About the Authors
About the Reviewer
www.PacktPub.com
Preface
1. Overview FREE CHAPTER 2. Building Your Project and Character 3. Getting Animated 4. The Town View 5. Working with Unitys UI System 6. NPCs and Interactions 7. The World Map 8. Encountering Enemies and Running Away 9. Getting Ready to Fight 10. The Battle Begins 11. Shopping for Items 12. Sound and Music 13. Putting a Bow on It 14. Deployment and Beyond

Setting up our battle state manager


The most unique and important part of a turn-based battle system is the turns. Controlling the turns is incredibly important and we will need something to handle the logic behind the actual turns for us. We'll accomplish this by creating a battle state machine.

The battle state manager

Starting back in our BattleScene, we need to create a state machine using all of Mecanim's handy features. Although we will still only be using a fraction of the functionality with the RPG sample, I advise you to investigate and read more about its capabilities.

Navigate to the Assets\Animation\Controllers folder and create a new Animator Controller called BattleStateMachine, then we can begin putting together the battle state machine. The following screenshot shows you the states, transitions, and properties that we will need:

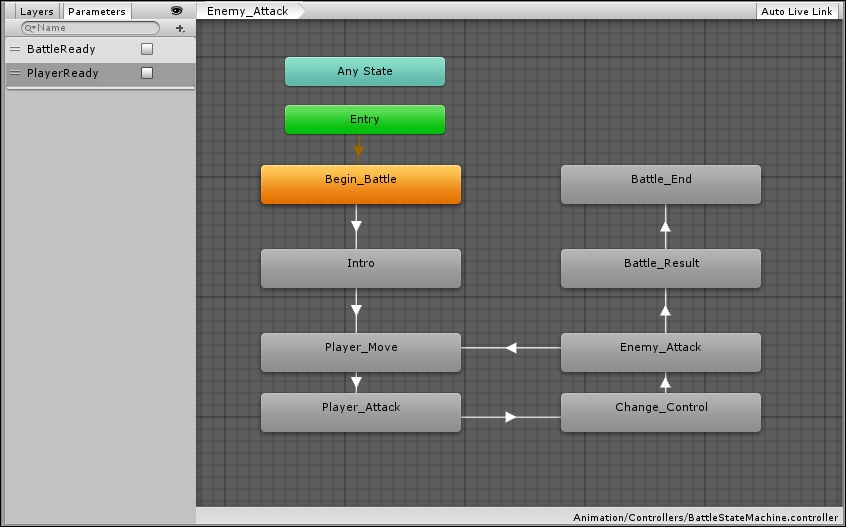
As shown in the preceding screenshot, we have created eight states to control the flow of a battle with two Boolean parameters to control its transition...

lock icon The rest of the chapter is locked
Register for a free Packt account to unlock a world of extra content!
A free Packt account unlocks extra newsletters, articles, discounted offers, and much more. Start advancing your knowledge today.
Unlock this book and the full library FREE for 7 days
Get unlimited access to 7000+ expert-authored eBooks and videos courses covering every tech area you can think of
Renews at $15.99/month. Cancel anytime
Visually different images