Enabling validation layers
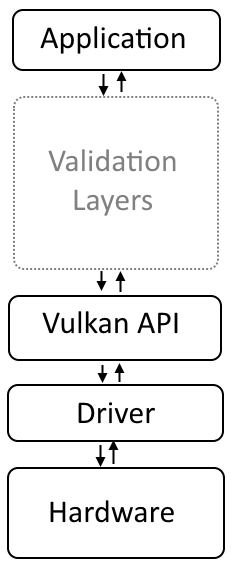
The Vulkan API was designed with performance in mind. One way to increase its performance is to lower state and error checking performed by the driver. This is one of the reasons Vulkan is called a "thin API" or "thin driver," it is a minimal abstraction of the hardware, which is required for the API to be portable across multiple hardware vendors and device types (high-performance desktop computers, mobile phones, and integrated and low-power embedded systems).
However, this approach makes creating applications with the Vulkan API much more difficult, compared to the traditional high-level APIs such as OpenGL. It's because very little feedback is given to developers by the driver, as it expects that programmers will correctly use the API and abide by rules defined in the Vulkan specification.
To mitigate this problem, Vulkan was also designed to be a layered API. The lowest layer, the core, is the Vulkan API itself, which communicates with the Driver, allowing us to program the Hardware (as seen in the preceding diagram). On top of it (between the Application and the Vulkan API), developers can enable additional layers, to ease the debugging process.
How to do it...
On the Windows operating system family:
- Go to the folder in which the SDK was installed and then open the
Configsub-directory. - Copy the
vk_layer_settings.txtfile into the directory of the executable you want to debug (into a folder of an application you want to execute). - Create an environment variable named
VK_INSTANCE_LAYERS:- Open the command-line console (Command Prompt/
cmd.exe). - Type the following:
- Open the command-line console (Command Prompt/
          setx VK_INSTANCE_LAYERS
              VK_LAYER_LUNARG_standard_validation
3. Close the console.
- Re-open the command prompt once again.
- Change the current directory to the folder of the application you want to execute.
- Run the application; potential warnings or errors will be displayed in the standard output of the command prompt.
On the Linux operating system family:
- Go to the folder in which the SDK was installed and then open the
Configsub-directory. - Copy the
vk_layer_settings.txtfile into the directory of the executable you want to debug (into a folder of an application you want to execute). - Create an environment variable named
VK_INSTANCE_LAYERS:- Open the Terminal window.
- Type the following:
          export
VK_INSTANCE_LAYERS=VK_LAYER_LUNARG_standard_validation- Run the application; potential warnings or errors will be displayed in the standard output of the Terminal window.
How it works...
Vulkan validation layers contain a set of libraries which help find potential problems in created applications. Their debugging capabilities include, but are not limited to, validating parameters passed to Vulkan functions, validating texture and render target formats, tracking Vulkan objects and their lifetime and usage, and checking for potential memory leaks or dumping (displaying/printing) Vulkan API function calls. These functionalities are enabled by different validation layers, but most of them are gathered into a single layer called VK_LAYER_LUNARG_standard_validation which is enabled in this recipe. Examples of names of other layers include VK_LAYER_LUNARG_swapchain, VK_LAYER_LUNARG_object_tracker, VK_LAYER_GOOGLE_threading, or VK_LAYER_LUNARG_api_dump, among others. Multiple layers can be enabled at the same time, in a similar way as presented here in the recipe. Just assign the names of the layers you want to activate to the VK_INSTANCE_LAYERS environment variable. If you are a Windows OS user, remember to separate them with a semicolon, as in the example:
setx VK_INSTANCE_LAYERS VK_LAYER_LUNARG_api_dump;VK_LAYER_LUNARG_core_validationIf you are a Linux OS user, separate them with a colon. Here is an example:
export VK_INSTANCE_LAYERS=VK_LAYER_LUNARG_api_dump:VK_LAYER_LUNARG _core_validationThe environment variable named VK_INSTANCE_LAYERS can be also set with other OS specific ways such as, advanced operating system settings on Windows or /etc/environment on Linux.
The preceding examples enable validation layers globally, for all applications, but they can also be enabled only for our own application, in its source code during Instance creation. However, this approach requires us to recompile the whole program every time we want to enable or disable different layers. So, it is easier to enable them using the preceding recipe. This way, we also won't forget to disable them when we want to ship the final version of our application. To disable validation layers, we just have to delete VK_INSTANCE_LAYERS environment variable.
Note
Validation layers should not be enabled in the released (shipped) version of the applications as they may drastically decrease performance.
For a full list of available validation layers, please refer to the documentation, which can be found in the Documentation sub-folder of the directory in which the Vulkan SDK was installed.
See also
The following recipes in this chapter:
- Downloading Vulkan's SDK
- Connecting with a Vulkan Loader library
- Releasing a Vulkan Loader library