Creating the meeting widget
Before we create our custom Virtual War Room page, let's create a widget that grabs meeting information, as well as a few other details from the Virtual War Room record.
Navigate to Service Portal | Widgets from the application navigator, to get to the widget list. Click the New button in the top-right corner to create a new widget record.
Let's name our widget War Room Meeting Details. Now that the widget's been created, scroll down to the Related Links section, and click Open in Widget Editor.
On the widget editor, let's start by adding a little HTML. In the HTML Template field, add:
<div>
  <div class="test">
    Hello, World!
  </div>
</div>
Now that we have some content, let's enable the widget preview. Click Save at the top right or hit Ctrl + S, and then click the hamburger menu next to the Save button.
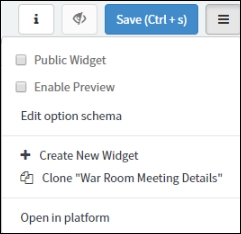
Click the checkbox next to Enable Preview, and click the eye icon next to Save.
Note
If the Server Script field is not currently visible...