The Blueprint Editor
The Blueprint editor is a sub-editor within the Unreal Engine editor specifically for Blueprint classes. Here, you'll be able to edit the properties and logic for your Blueprint classes, or those of their parent class, as well as their visual appearance.
When you open an Actor Blueprint class, you should see the Blueprint editor. This is the window that will allow you to edit your Blueprint classes in UE4. Let's learn about the windows that you're currently seeing:
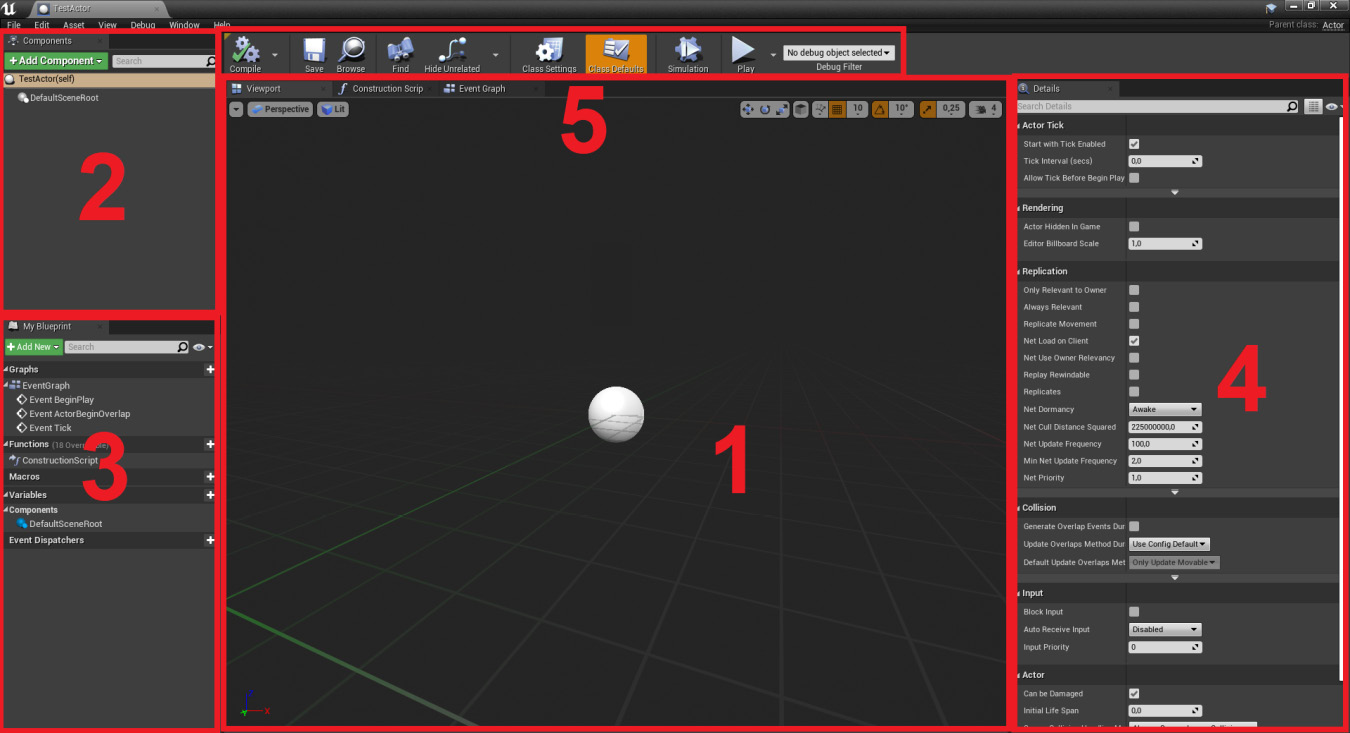
Figure 1.20: The Blueprint editor window is broken down into five parts
Viewport: Front and center in the editor you have theViewportwindow. This window, similar to theLevel Viewportwindow that we already learned about, will allow you to visualize your Actor and edit its components. Every actor can have several Actor Components, some of which have a visual representation, such as Mesh Components and Collision Components. We'll be talking about Actor Components in more depth in later chapters.Technically, this center window contains three tabs, only one of which is the
Viewportwindow, but we'll be talking about the other important tab, theEvent Graphafter we tackle this editor's interface. The third tab is theConstruction Scriptwindow, which we will not be covering in this book.Components: At the top left of the editor, you have theComponentswindow. As mentioned in the previous description, Actors can have several Actor Components, and this window is the one that will allow you to add and remove those Actor Components in your Blueprint class, as well as to access Actor Components defined in the C++ classes it inherits from.My Blueprint: At the bottom left of the editor, you have theMy Blueprintwindow. This will allow you to browse, add, and remove variables and functions defined in both this Blueprint class and the C++ class it inherits from. Keep in mind that Blueprints have a special kind of function, called an event, which is used to represent an event that happened in the game. You should see three of them in this window:BeginPlay,ActorBeginOverlap, andTick. We'll be talking about these in a few paragraphs.Details: At the right of the editor, you have theDetailswindow. Similar to the editor'sDetailswindow, this window will show you the properties of the currently selected Actor Component, function, variable, event, or any other individual element of this Blueprint class. If you currently have no elements selected, this window will be empty.Toolbar: At the top center of the editor you have theToolbarwindow. This window will allow you to compile the code you wrote in this Blueprint class, save it, locate it inContent Browser, and access this class's settings, among other things.
You can see the parent class of a Blueprint class by looking at the top-right corner of the Blueprint editor. If you click the name of the parent class, you'll be taken to either the corresponding Blueprint class, through the Unreal Engine editor, or the C++ class, through Visual Studio.
Additionally, you can change a Blueprint class's parent class by clicking on the File tab at the top left of the Blueprint editor and selecting the Reparent Blueprint option, which will allow you to specify the new parent class of this Blueprint class.
Now that we've learned about the basics of the Blueprint editor, let's take a look at its Event Graph.