Introduction
The Windows Presentation Foundation (WPF) provides developers with a unified programming model to build dynamic, data-driven desktop applications for Windows. It was first released in 2006 along with .NET 3.0. It is part of the .NET Framework itself.
WPF is a graphical subsystem, for rendering rich user interfaces (UIs), and is a resolution-independent framework that uses a vector-based rendering engine in the Extensible Application Markup Language (XAML) to create stunning user interfaces. It supports a broad set of features that includes application models, controls, layouts, graphics, resources, security, and more.
The runtime libraries for it to execute have been included with Windows since Windows Vista and Windows Server 2008. If you are using Windows XP with SP2/SP3 and Windows Server 2003, you can optionally install the necessary libraries.
To begin learning the different recipes of WPF, you should have a clear understanding of the basic foundations. In this chapter, we will start with the architecture and syntaxes, and will guide you in creating a building block.
The WPF Architecture
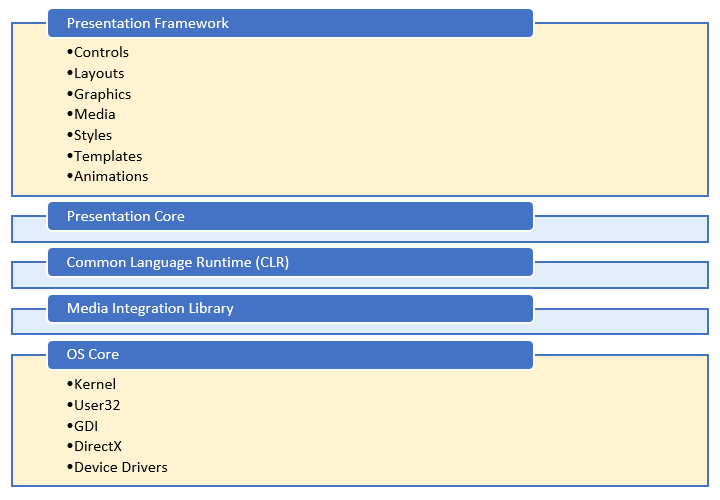
WPF uses a layered architecture that includes managed, unmanaged, and the core APIs in five different layers called Presentation Framework, Presentation Core, Common Language Runtime, Media Integration Library, and OS Core. The programming model is exposed through the managed code.
In the following diagram, you can see a clear picture of the architecture:
Presentation Framework
The Presentation Framework, which is part of presentationframework.dll, provides the basic required components (such as controls, layouts, graphics, media, styles, templates, animations, and more) to start building the UIs of your WPF applications. It is part of the managed layer.
Presentation Core
The Presentation Core layer, part of presentationcore.dll, provides you with the wrapper around the Media Integration Library (MIL). It present you with the public interfaces to access the MIL Core and the Visual System to develop the Visual Tree. It contains visual elements and rendering instructions to build applications for Windows using the XAML tools. This is also part of the managed code.
Common Language Runtime
Common Language Runtime, commonly known as the CLR and part of the managed layer, provides you with several features to build robust applications covering common type system (CTS), error handling, memory management, and more.
Media Integration Library
The Media Integration Library (MIL), which resides in milcore.dll, is part of the unmanaged layer used to display all graphics rendered through the DirectX engine. It provides you with basic support for 2D and 3D surfaces, and allows you to access the unmanaged components to enable tight integrations with DirectX. It also enables you to gain performance while rendering instructions from the Visual System to the Common Language Runtime (CLR).
OS Core
Just after the MIL, the next layer is the OS Core, which provides you with access to the low-level APIs to handle the core components of the operating system. This layer includes Kernel, User32, DirectX, GDI, and device drivers.
Types of WPF applications
Though WPF is mainly used for desktop applications, you can also create web-based applications. Thus, WPF applications can be of two types:
- Desktop-based executables (EXE)
- Web-based applications (XBAP)
The desktop applications are the normal .exe executables, which you normally run on any of your Windows-based systems, whereas the web-based applications are the .xbap files that can be deployed in web servers and can run inside any supported browser. The .NET Framework is mandatory to run any of these application types.
When you run a WPF application, it starts in two threads. The UI thread uses the System.Threading.DispatcherObject to create the messaging system and that maintains the UI operations queue. Just like the Win32 message pumping, it performs the UI operation based on the priority set for it.
The other thread is the background thread, which is used to handle the rendering engine being managed by WPF. It picks up a copy of the visual tree and performs actions to show the visual components in the Direct3D surface. Then it calls the UI elements to determine the size and arranges the child elements by their parents.
The XAML overview
XAML stands for Extensible Application Markup Language. It is an XML-based markup language that is used to declaratively create the UI of any XAML-based application, such as Windows Platform Foundation (WPF), Universal Windows Platform (UWP), and Xamarin.Forms. You can create visible UI elements in a declarative XAML syntax to design the rich UI and then write the code behind to perform a runtime logic.
Note
Microsoft recently introduced XAML Standards, which is a specification that defines a standard XAML vocabulary, which will allow the supported frameworks to share common XAML-based UI definitions. You can learn more about this specification by visiting GitHub here:http://aka.ms/xamlstandard.
Though it is not mandatory to use the XAML markup to create a UI, it has been widely accepted as the smart option for the creation of the entire application's UI, as it makes things easier to create. You can create the UI by writing C# or VB.NET code too, but that makes it more difficult and tougher to maintain. Also, that makes it difficult for the designers to work independently.
Designing an application UI using XAML is as easy as writing an XML node with a few optional attributes. Attributes are used to set additional styles, behaviors, and properties. To create a simple button in the UI, you can just write <Button /> in your XAML file. Similarly, you can just write <TextBox /> to create a user-input box.
Additionally, you can add more details to the controls. For example, to add a label to a button, use its Content property, and to set its dimension, use the Height and Width property, as shown in the following code:
<Button Content="Click Here" />
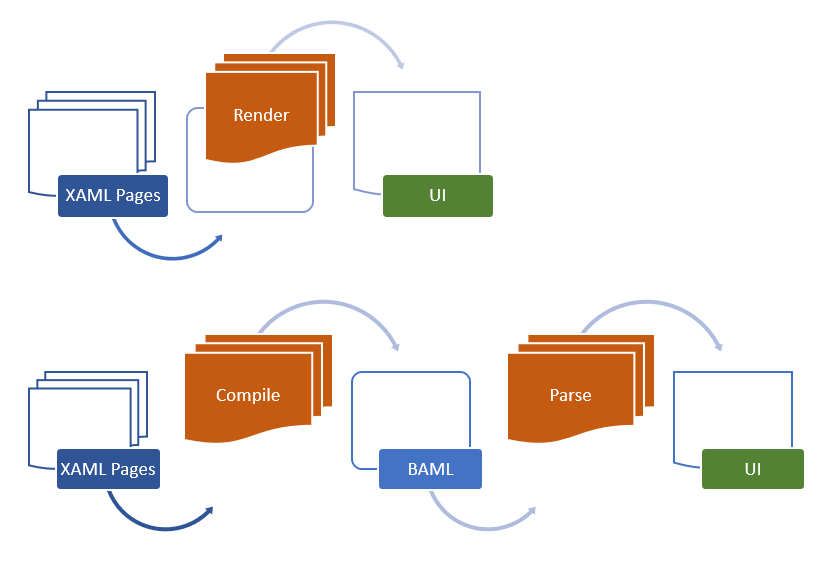
<Button Height="36" Width="120" /> In general, when you add XAML pages to your WPF application project, it compiles along with the project and produces a binary file in what is known as Binary Application Markup Language (BAML). The final output of the project (that is, the assembly file) contains this BAML file as a resource. When the application loads into the memory, the BAML is then parsed at runtime.
You can also load an XAML into memory and directly render it on the UI. But, in this case, if it has any XAML syntax errors, it will throw those in runtime. If you compare the performance with the first process, the latter is slower, as it renders the entire XAML syntax onto UI.
Here's a flow diagram, that demonstrates the ways to load and render/parse the XAML UI:
XAML syntax terminologies
XAML uses some syntax terminologies to define an element in the UI and create the instance of it. Before you start working on it, you must understand the different terminologies that it offers. Let's have a look at a few of them.
Object element syntax
Each instance of a type is defined using proper XAML syntax to create an object element in the UI. Each of these object elements starts with a left angular bracket (<) and defines the name of the element. You can optionally prefix the namespace when it is defined outside the default scope. You can use a self-closing angular bracket (/>) or a right angular bracket (>) to close the object element definition. If the object element does not have any child elements, the self-closing angular bracket is used. For example, (<Button Content="Click Here" />) uses a self-closing angular bracket. If you write the same with a child element, it closes with an end tag (<Button>Click Here</Button>,) as shown.
When you define the object element in an XAML page, the instruction to create the instance of the element gets generated and it creates the instance by calling the constructor of the element when you load it in memory.
Property Attribute syntax
You can define one or more properties to an element. These are done by writing an attribute called Property Attribute syntax to the element. It starts with the name of the property and an assignment operator (=), followed by the value within quotes. The following example demonstrates how easy it is to define a button element to have a label as its content, and how to set its dimension in UI:
<Button Content="Click Here" />
<Button Content="Click Here" Width="120" Height="30" />
Property Element syntax
This is another type of XAML syntax that allows you to define the property as an element. This is often used when you cannot assign the value of the property within quotes. If we take the previous example, the text Click Here can be assigned to the button content easily. But, when you have another element or a composite property value, you cannot write those within the quotes. For this, XAML introduces Property Element syntax to help you to define the property value easily.
It starts with <element.PropertyName> and ends with </element.PropertyName>. The following example demonstrates how to assign a color to a button background with a SolidColorBrush object:
    <Button>
      <Button.Background>
         <SolidColorBrush Color="Red" />
      </Button.Background>
    </Button>
Content syntax
This is another type of XAML syntax that is used to set the content of a UI element. It can be set as the value of child elements. The following example demonstrates how to set the text content property of a Border control to hold a Button control as its child element:
    <Border>
      <Border.Child>
        <Button Content="Click Here" />
      </Border.Child>
    </Border>
While using Content syntax, you should remember the following points:
- The value of a
Contentproperty must be contiguous - You cannot define an XAML
Contentproperty twice within a single instance
Thus, the following is invalid as it will throw XAML error:
    <Border>
        <Border.Child>
            <Button Content="Button One" />
        </Border.Child>
        <Border.Child>
            <Button Content="Button Two" />
        </Border.Child>
    </Border>
Collection syntax
When you need to define a collection of elements to the parent root, the Collection syntax is used to make it easy to read. For example, to add elements inside StackPanel, we use its Children property, as shown in the following code:
    <StackPanel>
      <StackPanel.Children>
         <Button Content="Button One" />
         <Button Content="Button Two" />
      </StackPanel.Children>
    </StackPanel>
This can be also written as follows, and the parser knows how to create and assign the elements to StackPanel:
    <StackPanel>
      <Button Content="Button One" />
      <Button Content="Button Two" />
    </StackPanel>
Event Attribute syntax
When you add a button, you need to associate an event listener to it, to perform some operation. The same is applicable for adding other controls and UI layouts. The XAML allows you to use the Event Attribute syntax to define events for a specific XAML object element.
The syntax looks like a property attribute, but it is used to associate the event listener to the element. The following example demonstrates how to assign the click event to a button control:
<Button Content="Click Here" Click="OnButtonClicked" />
The associated event gets generated from the code behind the XAML page, where you can perform the real action. Here is the code snippet for the event implementation of the preceding button-click event:
    void OnButtonClicked (object sender, RoutedEventArgs e)
    {
        // event implementation
    }