
Creating WPF applications
The WPF development platform supports a broad set of features that includes UI controls, layouts, resources, graphics, data binding, application model, and more. Before using each of those features, you need to create the WPF project using Visual Studio.
The goal of this recipe is to create a WPF project and learn the basic project structure and components. Let's start building our first WPF application using the XAML tools.
Getting ready
To get started with the WPF application development, you must have Visual Studio running on your system with the required components already installed on it.
How to do it...
Follow these steps to create your first WPF application:
- Inside your Visual Studio IDE, navigate to the
File|New|Project...menu as shown in the following screenshot: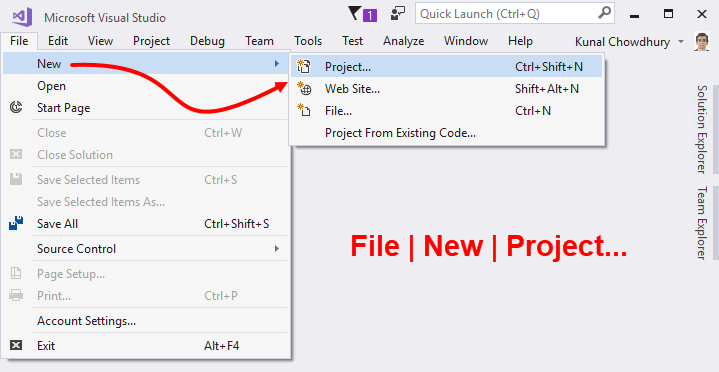
- This will open the
New Projectdialog on the screen. You can alternatively open it by pressing the keyboard shortcut Ctrl + Shift + N. - In the
New Projectdialog, navigate toInstalled|Templates|Visual C#|Windows Classic Desktop, as shown in the left-hand side of the following screenshot:
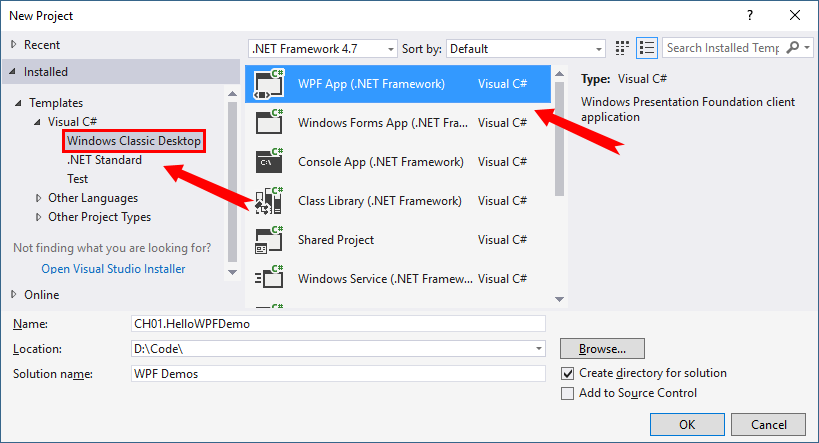
- In the right-hand side panel, first select the
.NET Frameworkthat you want your application to target. We have selected.NET Framework 4.7here. - Then select
WPF App (.NET Framework), from the available list of templates. - Give a name (in our case, it is
CH01.HelloWPFDemo) to the project. - Optionally, select the location of the project, where you want to create it.
- Optionally, you can also provide a different name for the
Solution. - When you are ready, click on the
OKbutton to let Visual Studio create the project based on the template that you have selected.
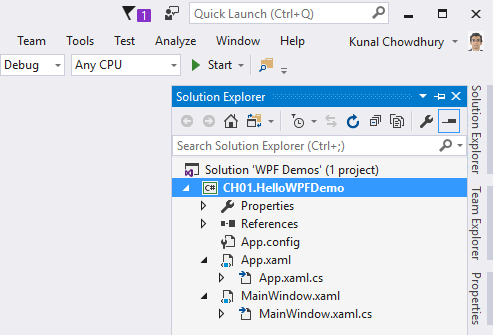
Once the project has been created, Visual Studio will open the Solution Explorer, which lists the project with all the default files created on it. The project structure will look like the following screenshot:
There's more...
Each WPF application project created by Visual Studio using the default template consists of the following files:
App.config: This is the configuration file of your WPF application. By default, it contains the following lines that describe the supported runtime version for the application to run. This contains exactly the same runtime version that we selected during the project creation:
    <?xml version="1.0" encoding="utf-8" ?>
      <configuration>
        <startup>
          <supportedRuntime
           version="v4.0"sku=".NETFramework,Version=v4.7" />
        </startup>
      </configuration>
The config file can also contain application settings and other configuration settings that you want to use/refer in your application.
App.xaml: Visual Studio automatically creates theApp.xamlfile when you create a WPF project. It is the declarative starting point of your application. The root element of this file is theApplicationinstance, which defines application specific properties and events:
    <Application x:Class="CH01.HelloWPFDemo.App"

      xmlns="http://schemas.microsoft.com/winfx
      /2006/xaml/presentation"
      xmlns:x="http://schemas.microsoft.com/winfx/2006/xaml"
      xmlns:local="clr-namespace:CH01.HelloWPFDemo"
      StartupUri="MainWindow.xaml">

    <Application.Resources>

    </Application.Resources>
    </Application>
The instance of the Application class defines the Window or a Page that's going to be the startup UI, and is registered with the StartupUri property. In the preceding code, (StartupUri="MainWindow.xaml") states that the MainWindow.xaml page will get loaded, once you run the application.
The application instance can also hold global/application-level resources (such as, Style, Template, and Converter) that can be used globally throughout the application.
App.xaml.cs: This is the code-behind class file of theApp.xamland extends theApplicationclass of the framework to write application-specific code. You can use this file to subscribe to the events such asStartup,UnhandledExceptionto perform common operations:
namespace CH01.HelloWPFDemo
{
    /// <summary>
    /// Interaction logic for App.xaml
    /// </summary>
    public partial class App : Application
    {
    }
}
This class is often used to manipulate command-line parameters and load different XAML pages based on that.
MainWindow.xaml: This is the default UI page that Visual Studio generates on creation of the WPF project. It is the page that gets registered as theStartupUriinApp.xaml. The root element of this page isWindowand it contains aGridlayout by default. Here is the default code snippet:
<Window x:Class="CH01.HelloWPFDemo.MainWindow"
  xmlns=
   "http://schemas.microsoft.com/winfx/2006/xaml/presentation"
   xmlns:x="http://schemas.microsoft.com/winfx/2006/xaml"
   Title="MainWindow" Height="350" Width="525">
  <Grid>

  </Grid>
</Window>
The x:Class attribute defines the associated partial class where the UI logic is being written. You can modify this XAML to provide a fresh look to your application start page. Various UI controls and layouts are going to be covered in the later chapters of this book.
MainWindow.xaml.cs: This is the code-behind class ofMainWindow.xamland contains the logic related to UI operations. In general, developers write implementations of various UI operations in this class.
Whenever you add any UI elements to an XAML page, the control gets registered internally in a partial class file that has .g.i.cs as the extension. For example, if you add a control in the MainWindow.xaml file, it gets registered in the MainWindow.g.i.cs residing in the obj folder. If you open the file, you can observe the entire loading process inside the InitializeComponent() method.