


Unity Interface
The interface for Unity is separated into several major components. We will go over the scene (Figure 1.11, Red) and the items within it’s interface as well as how to manipulate their properties in the Inspector (Figure 1.11, Orange). Then we will go into items which aren’t active in the scene, but available to add in the project window (Figure 1.11, Yellow). Finally, we will go over game view (Figure 1.11, Green) and the package manager (separate from the image below):
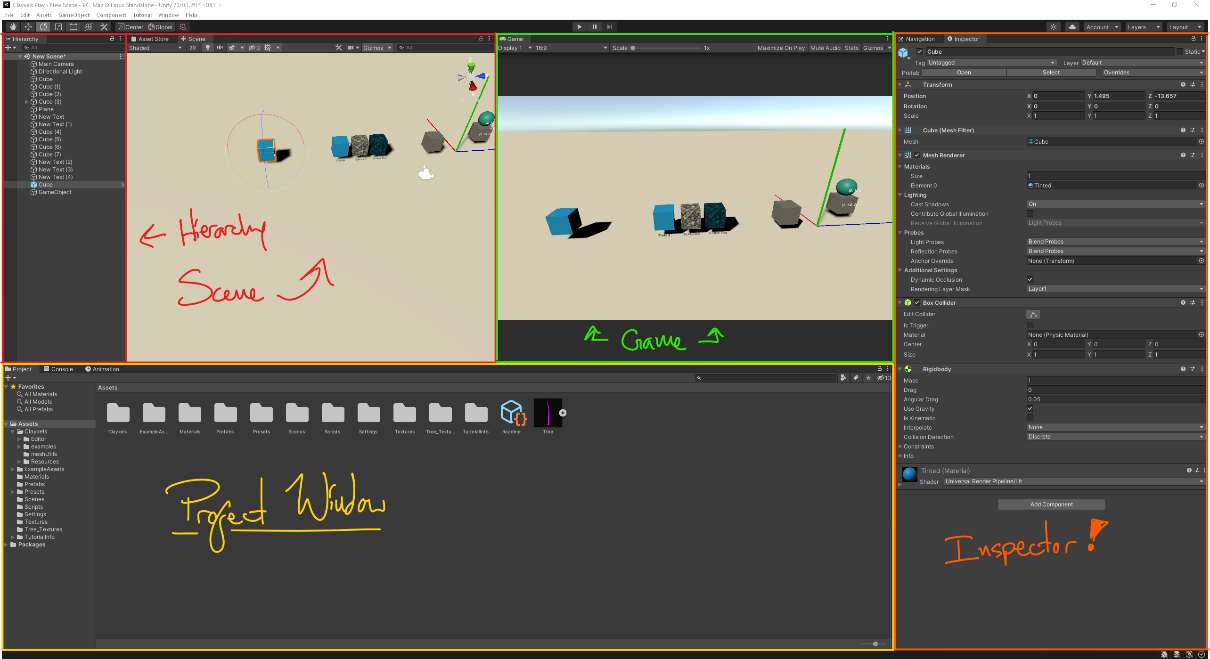
Scene View and Hierarchy
Scene view and hierarchy work in tandem. The hierarchy is how the scene will be rendering when the game plays. The scene view allows you to manipulate the game objects and their values in real time:

In Figure 1.12 above, there is a lot of information that can be seen right away. On the left, the hierarchy, you can see that there are objects in the scene. These Objects all have a transform which places them in the world. If you double click on an item or click on an item, put your mouse in the scene view then press ‘f’, you will then focus on that game object which puts the item centered on the scene’s viewport.
When you have an item selected, you can see at the object’s pivot point, usually center of the object, there is a tool showing colored arrows. The tool allows you to position the gameobject in space. You can also position the object on a plane by selecting the little square in between to axis.
In the upper right of Figure 1.12, you will see a camera gizmo, this little gizmo will allow you easily orient the viewport camera in to the front, sides, top, bottom, or change to an isometric camera or perspective with a single click.
Now that you have seen the item in scene, selected by left clicking in the scene or the hierarchy, you may want to change some properties or add components to that gameobject. This is where the inspector comes into play.
Inspector
To manipulate those game object’s value, when you select the game object in the scene or hierarchy the inspector will update to show you the viable options to change per game object:
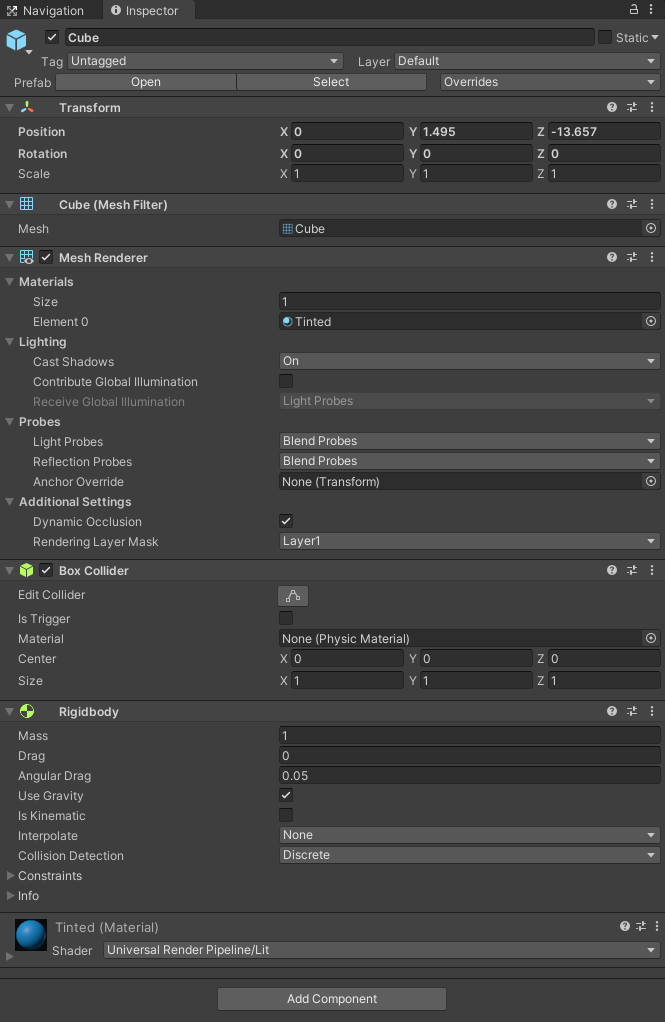
The inspector window in Figure 1.13 shows a good amount of this item that has been chosen. From the top, the name is Cube and the blue cube to the left denotes a prefab data type. You are able to make changes to the prefab itself by pressing the open button just below the name. This will create a new scene view which shows the prefab only. When you make changes to the prefab it will make a change to all instanced prefabs in any scene that is referencing it.
The transform component is showing position, rotate, and scale of the prefab in the scene.
The mesh filter is the makeup of the vertices, edges, and faces that make up that polygon.
Below that is the mesh renderer. This component will allow the rendering of the mesh filter. We can set the material here and other options that pretain to this items specific lighting and probes which we will cover in lighting section of this book.
Now below this is a collider and a rigid body. These work in tandem and are helping this object to react to physics in real time to the settings available on the components.
We’ve talked a lot about items in the scene and their properties, but where are they housed outside of the scene if their only referenced items? The project window will answer this question.
Project Window
Here you will find assets that will be instanced in the scene or used as a component to fully realize the game you are building:
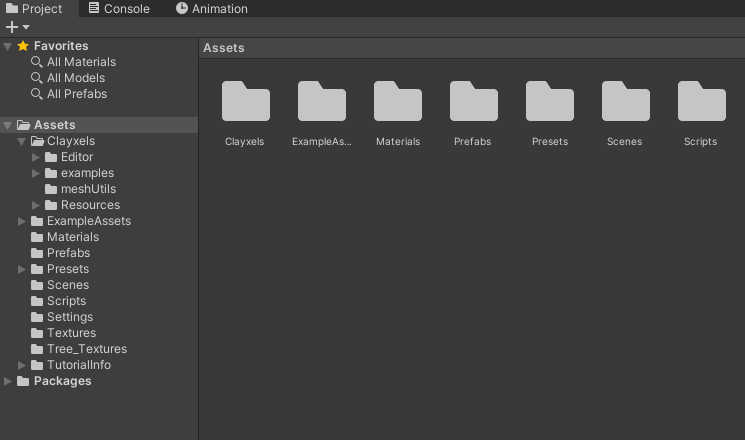
This window is the physical representation of the game objects that are referenced from. All of the items are in the assets folder seen in Figure 1.14 are physically on your hard drive. Unity makes meta files that are housing all of the properties of the items.
The interesting thing about having the raw files in the project window is that you can make changes to the items and when you focus on the Unity project (click on unity app), it will readjust the meta files and reload the items in the scene. This makes it so that way you can iterate on scripts and art faster!
We’ve look at the gameobjects in scene, placed them by manipulating the transforms, and know where the game object was referenced from. Now we should look at the game view to know how the game itself looks.
Game View
The Game View is similar to the scene view, however it’s following the rules that are build in scene view. The game will automatically look through the Main camera in the scene or else wise defined:
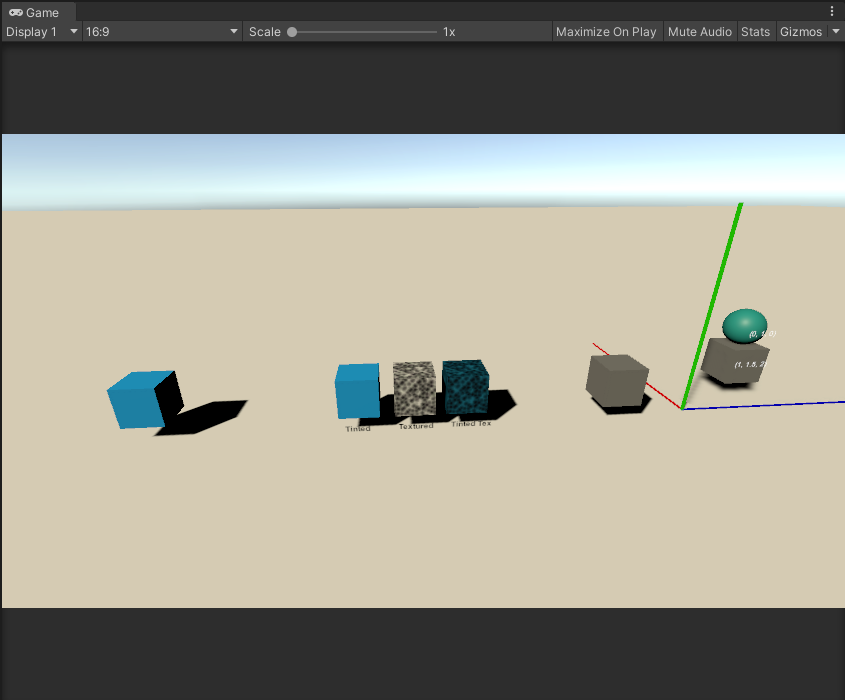
You can see that this looks very similar to the scene window, but the top has different options. On the top left we can see the Display drop down. This allows us to change cameras if we have multiple in the scene. The ratio is to the right of that, which is helpful to look at so you can target certain devices. Scale, to the right of the screen ratio, is helpful to quickly make the window larger or zoom in for debugging.
Maximize on play will maximize the screen on play to take advantage of full screen. Mute audio means to mute the games audio.
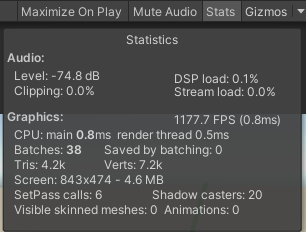
Stats will give a small overview of the stats in the game view. Later on during optimization we will go through profiling to get a much more in depth way to look at what may be causing issues within the gameplay for memory usage and other optimization opportunities:
Continuing on to the right is gizmos. This is a set of items that are showing in the game view in Figure 1.16 which you might now want to see. In this menu, you are able to turn them off or on depending on your needs.
Package Manager
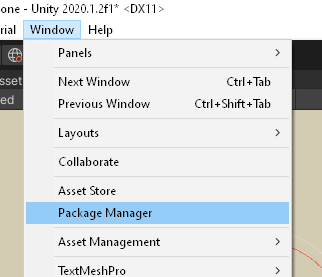
Your Unity ID will house the packages you’ve bought from the Unity Asset store as well as the packages you may have on your hard drive or GitHub! You can use the package manager to import the packages into your project. You can get to this packages under Window → Package Manager as seen on Figure 1.17 below:
After you open the package manager, you will initially be shown what packages are in the project. You can change the top left dropdown to see what is standard in Unity or what packages you have bought in the asset store:
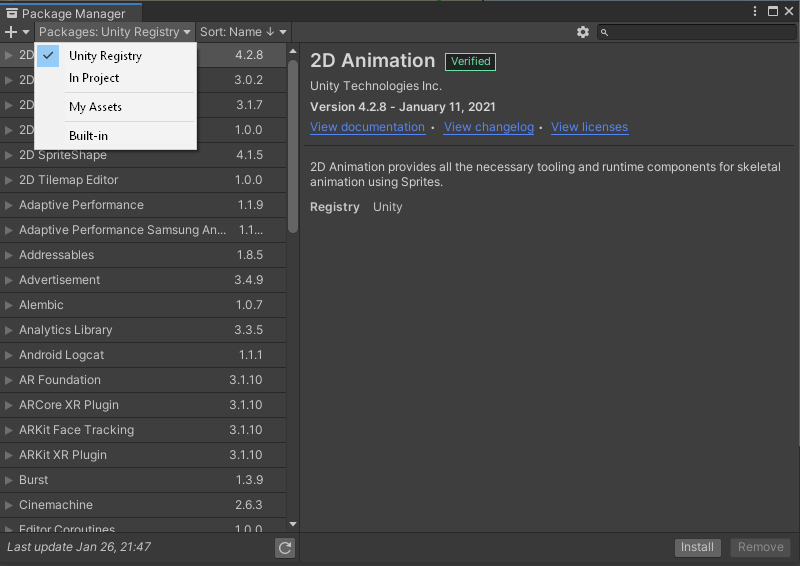
By choosing Unity Registry, this is a list of the Unity tested packages that come free and are part of the Unity platform available if you need them. You can read up on every package in the documents that are provided by the link in the right hand side, labeled View documentation when you click on a package on the left.
If you select the In Project, if will show you what packages are already installed with the current project that is loaded. This is helpful when you want to possible uninstall a package that may not be needed.
My Assets are the assets that you’ve bought or the project you are on and associated to your Unity ID has paid for previously.
Built in are standard with any project. You may need to enable or disable a built in package depending on what your needs will be. Explore them and disable what is not needed! Tidy projects now leads to less optimizations later!

