Working with generators in Angular-CLI
We can build many parts of our Angular application using the Angular-CLI utility. Components, views, routes, controllers, and services can all be generated in this manner. Scaffolding out new functionality using a CLI helps us to save time when building our application by automatically creating the required boilerplate content and putting it exactly where we want it in our project.
We will use Angular-CLI as the preferred method for scaffolding out a new Angular functionality through the rest of the book.
How to do it...
Let's follow the steps below to create a new button component in our Angular application using Angular-CLI generate:
- Angular-CLI's scaffolding command is
ng generate, or the aliasng g. Thegeneratecommand's function is to create stubs of ready-to-customize content for our application from blueprints within Angular-CLI.
ng g component my-button- After running generate, the command line will show an output of what content has been added to our project:
installing component
create src/app/my-button/my-button.component.css
create src/app/my-button/my-button.component.html
create src/app/my-button/my-button.component.spec.ts
create src/app/my-button/my-button.component.ts
update src/app/app.module.ts
How it works...
If we look at our project, we can see that Angular-CLI has automatically scaffolded out a my-button directory that contains stubs for all of the files that make up our button component. This includes its class boilerplate, my-button.component.ts, its template, my-button.component.html, its style sheet, my-button.component.ts, and its test file, my-button.component.spec.ts:
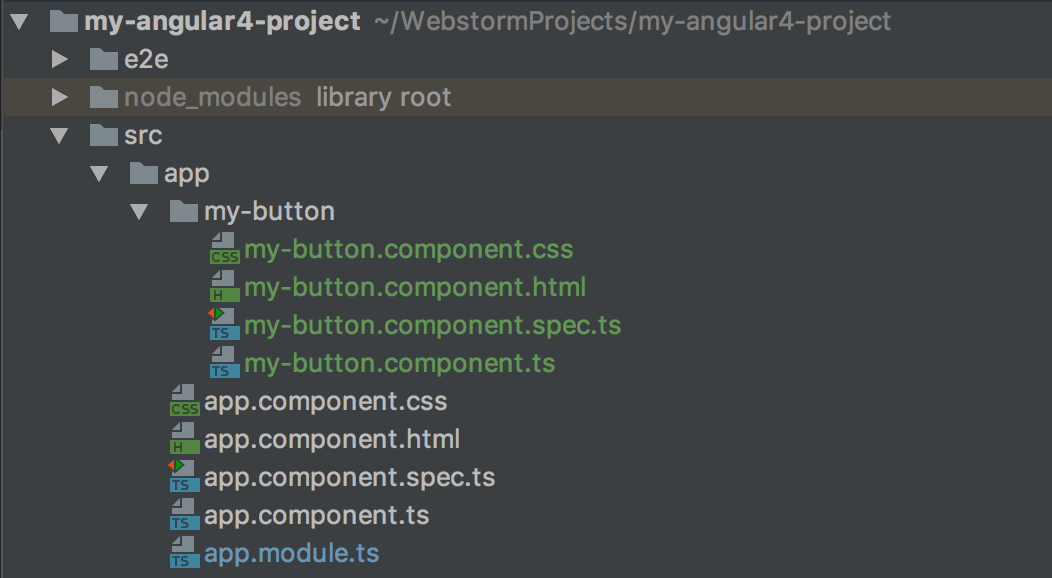
These stub files are very generic, but they cover virtually all the boilerplate code involved in creating a new component in Angular. Another detail handled for us is the actual importing of the component into our application through app.module.ts:
...
import { MyButtonComponent } from './my-button/my-button.component';

@NgModule({
...
  declarations: [
    AppComponent,
MyButtonComponent
  ],
...
})
export class AppModule { }
The module declarations section here has automatically been updated for us by the generate command, so all that we need to do is invoke the component within a template of our application:
<app-my-button></app-my-button>If we look back at our application, we will see the words my-button works printed out from wherever in our app we have invoked the component.
Note
Generating content into specific locations: Angular-CLI's generate command can accept a file path along with a name in order to control where your content will be generated. For instance, if I had an admin module in my Angular application where I organized all the functionalities that are unique to my administrator user experience, I might want to nest an admin unique component there with ng g component admin/dashboard. This will create all my component files in a directory under src/app/admin/dashboard instead of in my root module space.
We can create many types of content using the generate command. The syntax for scaffolding out a new piece of content is always the same, as follows:
ng generate <blueprint> <name>You can find a complete list of all the available blueprints and examples of their usage in the following table:
Blueprint | Angular-CLI |
Component |
|
Directive |
|
Pipe |
|
Service |
|
Class |
|
Guard |
|
Interface |
|
Enum |
|
Module |
|
Many of these generated blueprint types create simple boilerplate files in the root of our app module directory. However, Component, Directive, Pipe, Service, and Guard also scaffold out additional useful files.
Note
Angular-CLI add-ons: The future of Angular-CLI and its convention-oriented approach to Angular development is evolving very rapidly. One feature on the future roadmap for Angular-CLI that will greatly shape the usage of it by the community is add-ons. Add-ons will allow developers to plug in functionality to Angular-CLI through shared modules to enhance their Angular applications. For example, custom blueprints for Angular-CLI could be created through an add-on, and allow developers to scaffold out custom content using the generate command.
There's more...
There are many types of content you can scaffold out with Angular-CLI's generators. Let's take a look at how we can generate new services in our Angular application using Angular-CLI's generate command.
Generating new services with Angular-CLI is very similar to generating components, but with the following few key differences:
ng g service my-store
installing service
create src/app/my-store.service.spec.ts
create src/app/my-store.service.ts
WARNING Service is generated but not provided, it must be provided to be used
Scaffolding a new service generates fewer files than a component and also nests the service at the root of our application directory by default instead of nesting it in its own namespace. The warning that is presented after creating our service stub files notifies us that, unlike components, services have to be manually provided to our application. Unlike components that are naturally isolated from each other, services can have explicit dependencies and load order requirements that Angular-CLI is unable to predict. In general, adding these services to your application is easily done by importing and adding the service to the provider list:
...
import { MyStoreService } from './my-store.service';

@NgModule({
  ...
  providers: [
    MyStoreService
  ]
  ...
})
export class AppModule { }
With the service provided to your application, it is now available for use.
Note
Generating guards: Guards generated with Angular-CLI also show the warning that they are not provided by default. Adding a generated guard to your application is identical to adding a service.