
BeginPlay and Tick
Let's now take a look at two of the most important events in UE4: BeginPlay and Tick.
As mentioned previously, events will usually be called from outside the Blueprint class. In the case of the BeginPlay event, this event gets called either when an instance of this Blueprint class is placed in the level and the level starts being played, or when an instance of this Blueprint class is spawned dynamically while the game is being played. You can think of the BeginPlay event as the first event that will be called on an instance of this Blueprint, which you can use for initialization.
The other important event to know about in UE4 is the Tick event. As you may know, games run at a certain frame rate, the most frequent being either 30 FPS (frames per second) or 60 FPS: this means that the game will render an updated image of the game 30 or 60 times every second. The Tick event will get called every time the game does this, which means that if the game is running at 30 FPS, the Tick event will get called 30 times every second.
Go to your Blueprint class's Event Graph window and delete the three grayed-out events by selecting all of them and clicking the Delete key, which should cause the Event Graph window to become empty. After that, right-click inside the Event Graph window, type in BeginPlay, and select the Event BeginPlay node by either clicking the Enter key or by clicking on that option in the Blueprint Actions menu. This should cause that event to be added to the Event Graph window:

Figure 1.37: The BeginPlay event being added to the Event Graph window through the Blueprint Actions menu
Right-click inside the Event Graph window, type in Tick, and select the Event Tick node. This should cause that event to be added to the Event Graph window:

Figure 1.38: The Tick event
Unlike the BeginPlay event, the Tick event will be called with a parameter, DeltaTime. This parameter is a float that indicates the amount of time that passed since the last frame was rendered. If your game is running at 30 FPS, this means that the interval between each of the frames being rendered (the delta time) is going to be, on average, 1/30 seconds, which is around 0.033 seconds (33.33 milliseconds). If frame 1 is rendered and then frame 2 is rendered 0.2 seconds after that, then frame 2's delta time will be 0.2 seconds. If frame 3 gets rendered 0.1 seconds after frame 2, frame 3's delta time will be 0.1 seconds, and so forth.
But why is the DeltaTime parameter so important? Let's take a look at the following scenario: you have a Blueprint class that increases its position on the Z axis by 1 unit every time a frame is rendered using the Tick event. However, you are faced with a problem: there's the possibility that players will run your game at different frame rates, such as 30 FPS and 60 FPS. The player who's running the game at 60 FPS will cause the Tick event to be called twice as much as the player who's running the game at 30 FPS, and the Blueprint class will end up moving twice as fast because of that. This is where the delta time comes into play: because the game that's running at 60 FPS will have the Tick event called with a lower delta time value (the interval between the frames being rendered is much smaller), you can use that value to change the position on the Z axis. Although the Tick event is being called twice as much on the game running at 60 FPS, its delta time is half the value, so it all balances out. This will cause two players playing the game with different frame rates to have the same result.
Note
If you want a Blueprint that is using the delta time to move, you can make it move faster or slower by multiplying the delta time by the number of units you want it to move per second (for example, if you want a Blueprint to move 3 units per second on the Z axis, you can tell it to move 3 * DeltaTime units every frame).
Let's now try another exercise, which will consist of working with Blueprint nodes and pins.
Exercise 1.06: Offsetting the TestActor Class on the Z Axis
In this exercise, you'll be using the BeginPlay event to offset (move) the TestActor on the Z axis when the game starts being played.
The following steps will help you complete this exercise:
- Open the
TestActorBlueprint class. - Using the
Blueprint Actionsmenu, add theEvent BeginPlaynode to the graph, if it's not already there. - Add the
AddActorWorldOffsetfunction and connect theBeginPlayevent's output execution pin to this function's input execution pin. This function is responsible for moving an Actor in the intended axes (X, Y, and Z) and it receives the following parameters:Target: The Actor that this function should be called on, which will be the Actor calling this function. The default behavior is to call this function on the Actor calling this function, which is exactly what we want and is shown using theselfproperty.DeltaLocation: The amount that we want to offset this Actor by in each of the three axes: X, Y, and Z.- We won't be getting into the other two parameters,
SweepandTeleport, so you can leave them as is. They are both Boolean types and should be left asfalse: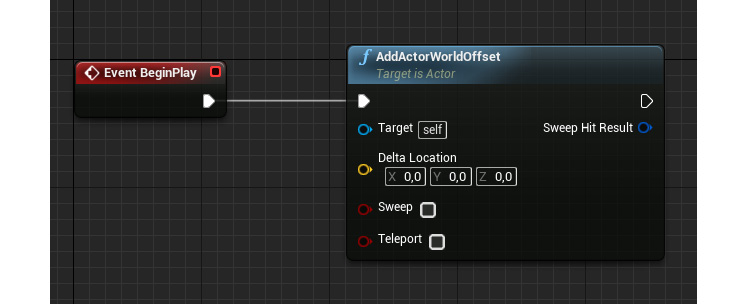
Figure 1.39: The BeginPlay event calling the AddActorWorldOffset function
- Split the
Delta Locationinput pin, which will cause thisVectorproperty to be split into three float properties. You can do this to any variable type that is comprised of one or more subtypes (you wouldn't be able to do this to the float type because it's not comprised of any variable subtypes) by right-clicking on them and selectingSplit Struct Pin: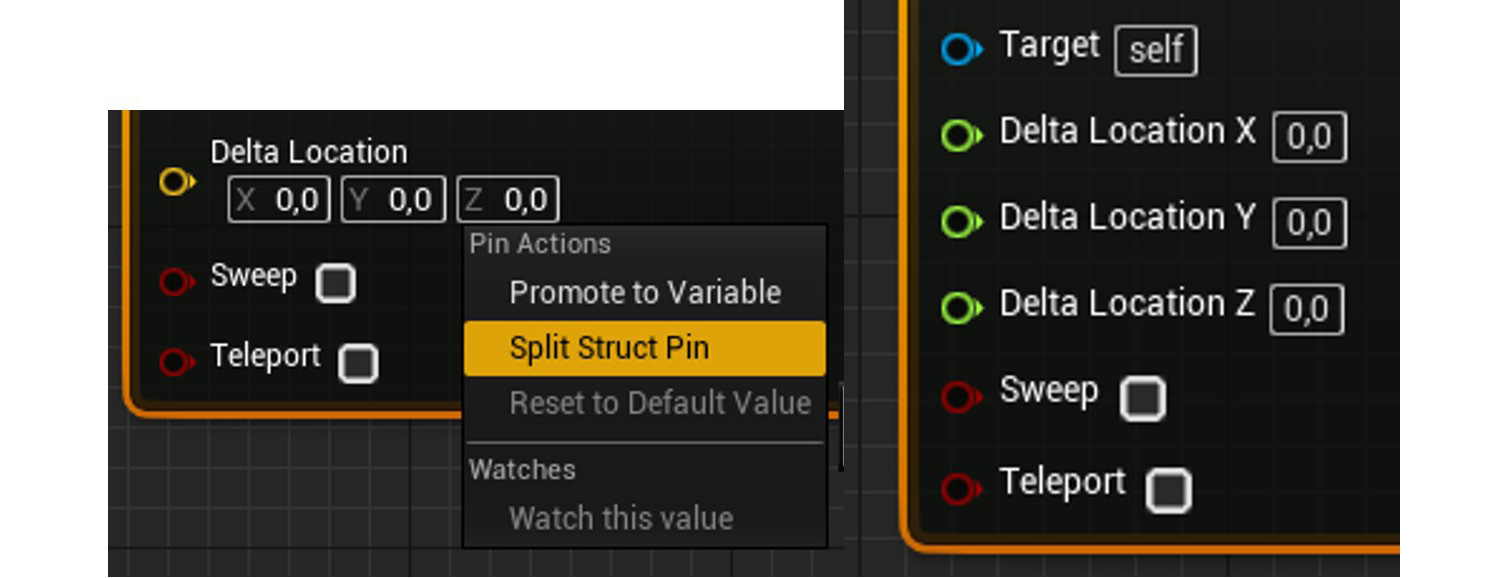
Figure 1.40: The Delta Location parameter being split from a vector into three floats
- Set the
Zproperty ofDelta Locationto100units by clicking with the left mouse button, typing that number, and then pressing the Enter key. This will cause ourTestActorto move up on the Z axis by100units when the game starts. - Add a cube shape to your
TestActor, using theComponentswindow, so that we can see our Actor. You can do this by clicking the+ Add Componentbutton, typingCube, and then selecting the first option under theBasic Shapessection: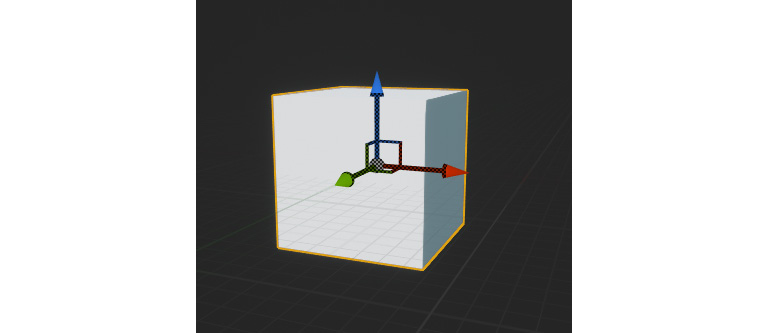
Figure 1.41: Adding a cube shape
- Compile and save your Blueprint class by clicking the
Compilebutton. - Go back to the level's
Viewportwindow and place an instance of yourTestActorBlueprint class inside the level, if you haven't done so already: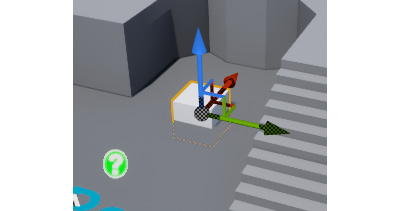
Figure 1.42: Adding an instance of TestActor to the level
- When you play the level, you should notice that the
TestActorwe added to the level is in a more elevated position:
Figure 1.43: The TestActor increasing its position on the Z axis when the game starts
- After making these modifications, save the changes made to our level by either pressing Ctrl + S or by clicking the
Save Currentbutton on the editorToolbar.
In this exercise, you've learned how to create your first Actor Blueprint class with your own Blueprint scripting logic.
Note
Both the TestActor blueprint asset and the Map asset with the final result of this exercise can be found here: https://packt.live/3lfYOa9.
Now that we've done this, let's learn a bit more about the ThirdPersonCharacter Blueprint class.