Manipulating Materials in UE4
In this section, we'll be taking a look at how materials work in UE4.
Go back to your Level Viewport window and select this Cube object:
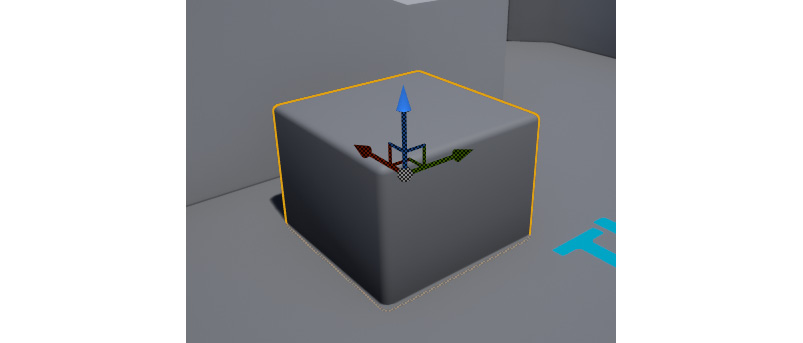
Figure 1.46: The Cube object, next to the text saying Third Person on the floor
Take a look at the Details window, where you'll be able to see both the mesh and material associated with this object's Static Mesh component:
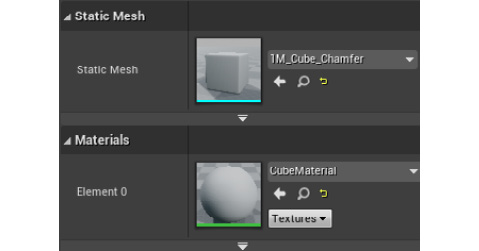
Figure 1.47: The Static Mesh and Materials (Element 0) properties of the Cube object's Static Mesh component
Note
Keep in mind that meshes can have more than one material, but must have at least one.
Click the looking glass icon next to the Material property to be taken to that material's location in Content Browser. This icon works with any reference to any asset inside the editor, so you can do the same thing with the asset referenced as the cube object's Static Mesh:
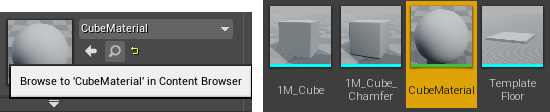
Figure 1.48: The looking glass icon (left), which takes you to that asset's location in Content Browser (right)
Double-click that asset with the left mouse button to open that asset in the Material editor. Let's break down the windows present in Material editor:
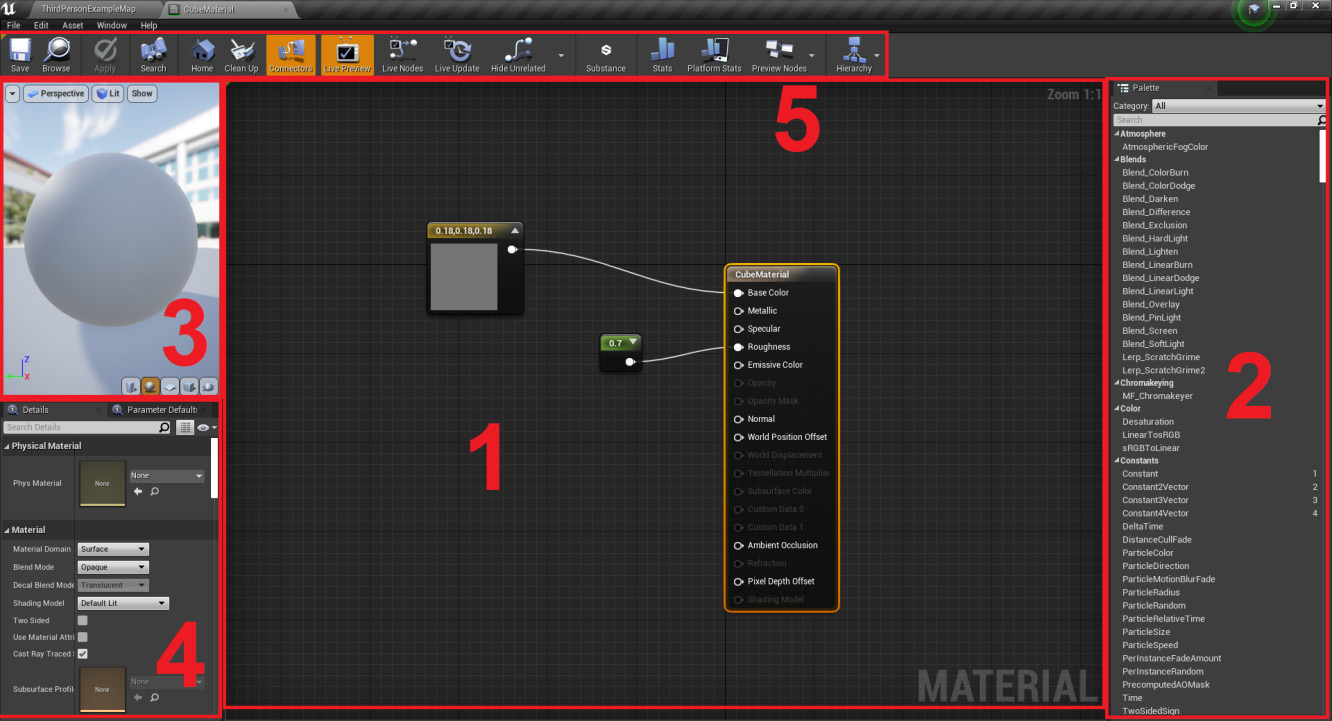
Figure 1.49: The Material editor window broken down into five parts
Graph: Front and center in the editor, you have theGraphwindow. Similar to the Blueprint editor'sEvent Graphwindow, theMaterialeditor's graph is also node-based, where you'll also find nodes connected by pins, although here you won't find execution pins, only input and output pins.Palette: At the right edge of the screen, you'll see thePalettewindow, where you'll be able to search all the nodes that you can add to theGraphwindow. You can also do this the same way as in the Blueprint editor'sEvent Graphwindow by right-clicking inside theGraphwindow and typing the node you wish to add.Viewport: At the top-left corner of the screen, you'll see theViewportwindow. Here, you'll be able to preview the result of your material and how it will appear on some basic shapes such as spheres, cubes, and planes.Details: At the bottom-left corner of the screen, you'll see theDetailswindow where, similar to the Blueprint editor, you'll be able to see the details of either thisMaterialasset or those of the currently selected node in theGraphwindow.Toolbar: At the top edge of the screen, you'll see theToolbarwindow, where you'll be able to apply and save the changes made to your material, as well as to perform several actions related to theGraphwindow.
In every single Material editor inside UE4, you'll find a node with the name of that Material asset, where you'll be able to specify several parameters related to it by plugging that node's pins to other nodes.
In this case, you can see that there's a node called 0.7 being plugged into the Roughness pin. This node is a Constant node, which allows you to specify a number associated with it – in this case, 0.7. You can create constant nodes of a single number, a 2 vector (for example, (1, 0.5)), a 3 vector (for example, (1, 0.5, 4)), and a 4 vector (for example, (1,0.5, 4, 0)). To create these nodes, you can press the Graph window with the left mouse button while holding the 1, 2, 3, or 4 number keys, respectively.
Materials have several input parameters, so let's go through some of the most important ones:
BaseColor: This parameter is simply the color of the material. Generally, constants or texture samples are used to connect to this pin, to either have an object be a certain color or to map to a certain texture.Metallic: This parameter will dictate how much your object will look like a metal surface. You can do this by connecting a constant single number node that ranges from 0 (not metallic) to 1 (very metallic).Specular: This parameter will dictate how much your object will reflect light. You can do this by connecting a constant single number node that ranges from 0 (doesn't reflect any light) to 1 (reflects all the light). If your object is already very metallic, you will see little to no difference.Roughness: This parameter will dictate how much the light that your object reflects will be scattered (the more the light scatters, the less clear this object will reflect what's around it). You can do this by connecting a constant single number node that ranges from 0 (the object essentially becomes a mirror) to 1 (the reflection on this object is blurry and unclear).Note
To learn more about
materialinputs like the ones above, go to https://docs.unrealengine.com/en-US/Engine/Rendering/Materials/MaterialInputs.
UE4 also allows you to import images (.jpeg, .png) as Texture assets, which can then be referenced in a material using Texture Sample nodes:

Figure 1.50: The Texture Sample node, which allows you to specify a texture and use it or its individual color channels as pins
Note
We will be taking a look at how to import files into UE4 in the next chapter.
In order to create a new Material asset, you can do so by right-clicking on the directory inside Content Browser where you want to create the new asset, which will allow you to choose which asset to create, and then select Material.
Now you know how to create and manipulate materials in UE4.
Let's now jump into this chapter's activity, which will be the first activity of this book.
Activity 1.01: Propelling TestActor on the Z Axis Indefinitely
In this activity, you will use the Tick event of TestActor to move it on the Z axis indefinitely, instead of doing this only once when the game starts.
The following steps will help you complete this activity:
- Open the
TestActorBlueprint class. - Add the
Event Ticknode to the Blueprint'sEvent Graphwindow. - Add the
AddActorWorldOffsetfunction, split itsDeltaLocationpin, and connect theTickevent's output execution pin to this function's input execution pin, similar to what we did in Exercise 1.01, Creating an Unreal Engine 4 Project. - Add a Float Multiplication node to
Event Graphwindow. - Connect the
Tickevent'sDelta Secondsoutput pin to the first input pin of the Float Multiplication node. - Create a new variable of the
floattype, call itVerticalSpeed,and set its default value to25. - Add a getter to the
VerticalSpeedvariable to theEvent Graphwindow and connect its pin to the second input pin of the Float Multiplication node. After that, connect the Float Multiplication node's output pin to theDelta Location Zpin of theAddActorWorldOffsetfunction. - Delete the
BeginPlayevent and theAddActorWorldOffsetfunction connected to it, both of which we created in Exercise 1.01, Creating an Unreal Engine 4 Project. - Play the level and notice our
TestActorrising from the ground and up into the air over time: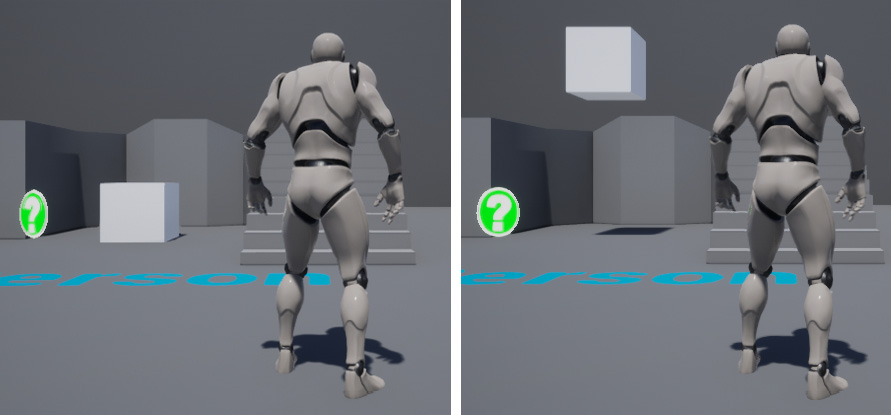
Figure 1.51: The TestActor propelling itself vertically
And with those steps completed, we conclude this activity – the first of many in this book. We've now consolidated adding and removing nodes to and from the Blueprint editor's Event Graph window, as well as using the Tick event and its DeltaSeconds property to create game logic that maintains consistency across different frame rates.
Note
The solution to this activity can be found at: https://packt.live/338jEBx.
The TestActor blueprint asset can be found here: https://packt.live/2U8pAVZ.