Search icon CANCEL
Subscription
0
Cart icon
Your Cart (0 item)
Close icon
You have no products in your basket yet
Save more on your purchases! discount-offer-chevron-icon
Savings automatically calculated. No voucher code required.
Arrow left icon
All Products
Best Sellers
New Releases
Books
Videos
Audiobooks
Learning Hub
Newsletter Hub
Free Learning
Arrow right icon
timer SALE ENDS IN
0 Days
:
00 Hours
:
00 Minutes
:
00 Seconds
Arrow up icon
GO TO TOP
Swift Data Structure and Algorithms

You're reading from   Swift Data Structure and Algorithms Implement Swift structures and algorithms natively

Arrow left icon
Product type Paperback
Published in Nov 2016
Publisher Packt
ISBN-13 9781785884504
Length 286 pages
Edition 1st Edition
Languages
Tools
Arrow right icon
Author (1):
Arrow left icon
 Alebicto Alebicto
Author Profile Icon Alebicto
Alebicto
Arrow right icon
View More author details
Toc

Table of Contents (15) Chapters Close

Swift Data Structure and Algorithms
Credits
About the Authors
About the Reviewers
www.PacktPub.com
Preface
1. Walking Across the Playground FREE CHAPTER 2. Working with Commonly Used Data Structures 3. Standing on the Shoulders of Giants 4. Sorting Algorithms 5. Seeing the Forest through the Tree 6. Advanced Searching Methods 7. Graph Algorithms 8. Performance and Algorithm Efficiency 9. Choosing the Perfect Algorithm

Rotations


Now, let's see the process that helps the red-black tree to balance (and therefore to maintain some of its color conditions): tree rotations.

Tree rotation is a mechanism that moves nodes of the tree to a different place in order to change the height of some of the nodes (and make it uniform among all the children). Let's see two different scenarios that we are going to use later in the insertion process: right rotation and left rotation.

Right rotation

We use a rotation to the right in the following scenario:

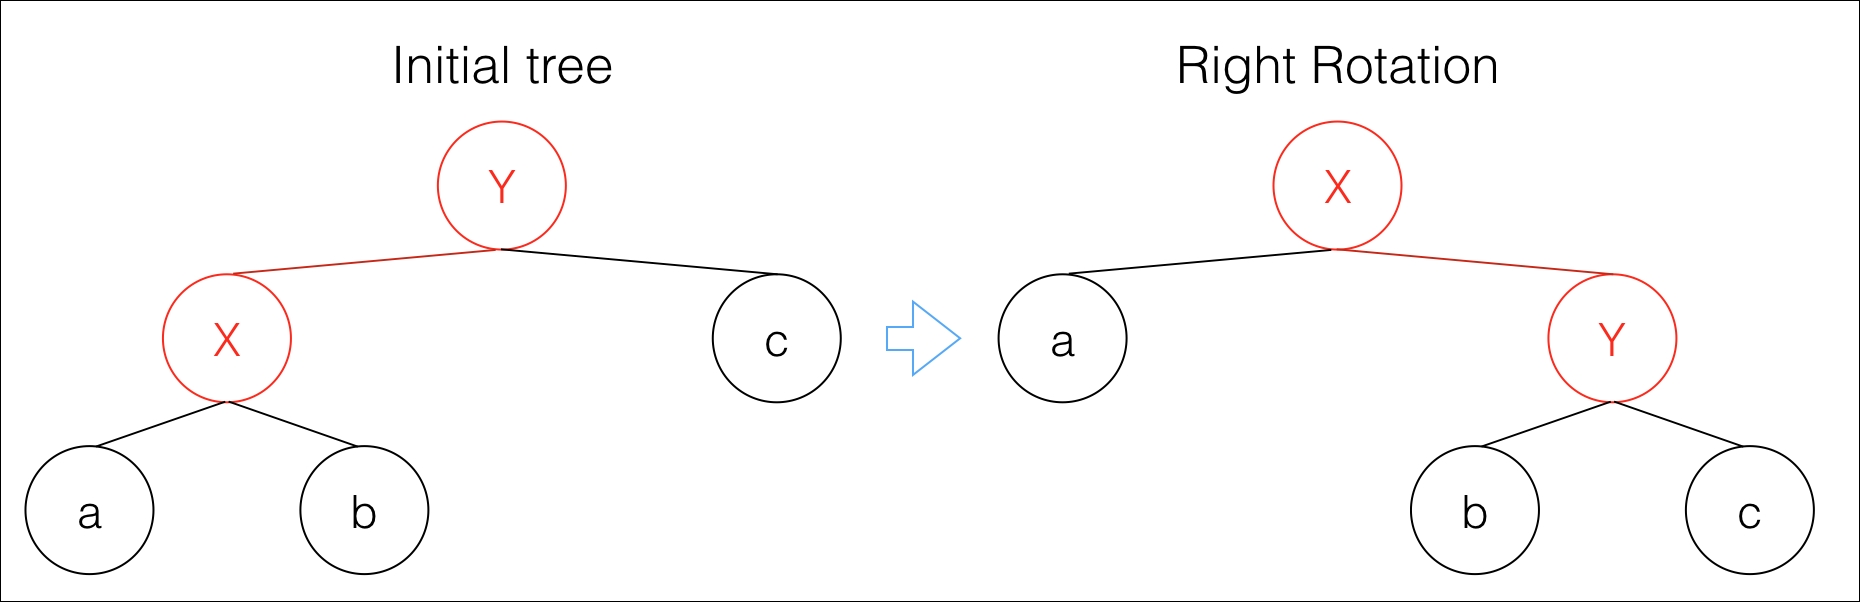
Right rotation in red-black trees

Here are the steps for right rotation:

  1. Node X goes up to become the root of the new tree after the rotation (on the right side of the figure). Node Y, which was the parent of X, is now the right child (its value is greater, so it must be on the right subtree).

  2. If node Y had a parent, we now assign that parent to node X.

  3. The right child of node X is now the left child of its child node, Y.

Now, let's see how to implement this in Swift. Add a new...

lock icon The rest of the chapter is locked
Register for a free Packt account to unlock a world of extra content!
A free Packt account unlocks extra newsletters, articles, discounted offers, and much more. Start advancing your knowledge today.
Unlock this book and the full library FREE for 7 days
Get unlimited access to 7000+ expert-authored eBooks and videos courses covering every tech area you can think of
Renews at £13.99/month. Cancel anytime
Visually different images