Search icon CANCEL
Subscription
0
Cart icon
Your Cart (0 item)
Close icon
You have no products in your basket yet
Save more on your purchases! discount-offer-chevron-icon
Savings automatically calculated. No voucher code required.
Arrow left icon
All Products
Best Sellers
New Releases
Books
Videos
Audiobooks
Learning Hub
Newsletter Hub
Free Learning
Arrow right icon
timer SALE ENDS IN
0 Days
:
00 Hours
:
00 Minutes
:
00 Seconds
Arrow up icon
GO TO TOP
ESP8266 Internet of Things Cookbook

You're reading from   ESP8266 Internet of Things Cookbook Over 50 recipes to help you master the ESP8266's functionality

Arrow left icon
Product type Paperback
Published in Apr 2017
Publisher Packt
ISBN-13 9781787288102
Length 268 pages
Edition 1st Edition
Tools
Concepts
Arrow right icon
Author (1):
Arrow left icon
Marco Schwartz Marco Schwartz
Author Profile Icon Marco Schwartz
Marco Schwartz
Arrow right icon
View More author details
Toc

Table of Contents (15) Chapters Close

ESP8266 Internet of Things Cookbook
Credits
About the Author
About the Reviewer
www.PacktPub.com
Customer Feedback
Preface
1. Configuring the ESP8266 FREE CHAPTER 2. Your First ESP8266 Projects 3. More ESP8266 Functions 4. Using MicroPython on the ESP8266 5. Cloud Data Monitoring 6. Interacting with Web Services 7. Machine to Machine Interactions Index

Controlling an OLED screen


To make your ESP8266 projects more interactive, you have to use more comprehensive ways of displaying data and information. This can be achieved with an OLED screen. Using it, you will be able to display writing and images, enabling one to know the current state of the project and to monitor its operations. In this recipe, you will learn how to control an OLED screen to display information on an ESP8266 project.

Getting ready

You will need an ESP8266 board, a USB cable, and a few other components, which include:

The monochrome 1.3" 128x64 OLED graphics display pin configuration is shown in the following diagram:

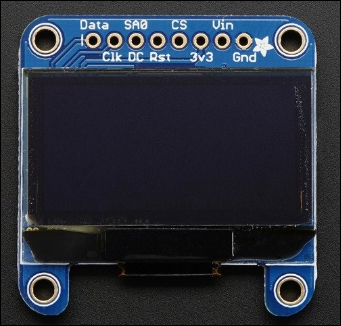
The display has two interfaces that you can use to communicate with the ESP8266 board. They are i2C and SPI interface. When using the i2C interface, the pin connections should be as follows:

  • GND of the display goes to GND of the ESP8266 board

  • Vin of the display...

lock icon The rest of the chapter is locked
Register for a free Packt account to unlock a world of extra content!
A free Packt account unlocks extra newsletters, articles, discounted offers, and much more. Start advancing your knowledge today.
Unlock this book and the full library FREE for 7 days
Get unlimited access to 7000+ expert-authored eBooks and videos courses covering every tech area you can think of
Renews at £13.99/month. Cancel anytime
Visually different images