Search icon CANCEL
Subscription
0
Cart icon
Your Cart (0 item)
Close icon
You have no products in your basket yet
Save more on your purchases! discount-offer-chevron-icon
Savings automatically calculated. No voucher code required.
Arrow left icon
All Products
Best Sellers
New Releases
Books
Videos
Audiobooks
Learning Hub
Newsletter Hub
Free Learning
Arrow right icon
timer SALE ENDS IN
0 Days
:
00 Hours
:
00 Minutes
:
00 Seconds
Arrow up icon
GO TO TOP
ESP8266 Internet of Things Cookbook

You're reading from   ESP8266 Internet of Things Cookbook Over 50 recipes to help you master the ESP8266's functionality

Arrow left icon
Product type Paperback
Published in Apr 2017
Publisher Packt
ISBN-13 9781787288102
Length 268 pages
Edition 1st Edition
Tools
Concepts
Arrow right icon
Author (1):
Arrow left icon
Marco Schwartz Marco Schwartz
Author Profile Icon Marco Schwartz
Marco Schwartz
Arrow right icon
View More author details
Toc

Table of Contents (15) Chapters Close

ESP8266 Internet of Things Cookbook
Credits
About the Author
About the Reviewer
www.PacktPub.com
Customer Feedback
Preface
1. Configuring the ESP8266 FREE CHAPTER 2. Your First ESP8266 Projects 3. More ESP8266 Functions 4. Using MicroPython on the ESP8266 5. Cloud Data Monitoring 6. Interacting with Web Services 7. Machine to Machine Interactions Index

Programming your ESP8266 OTA


This recipe is going to demonstrate how to upload a sketch to an ESP8266 board over the air. We will upload a simple LED blinking program onto our ESP8266 board using OTA and implement some OTA routines to ensure safety during the upload.

Getting ready

In this recipe, we will need the following components:

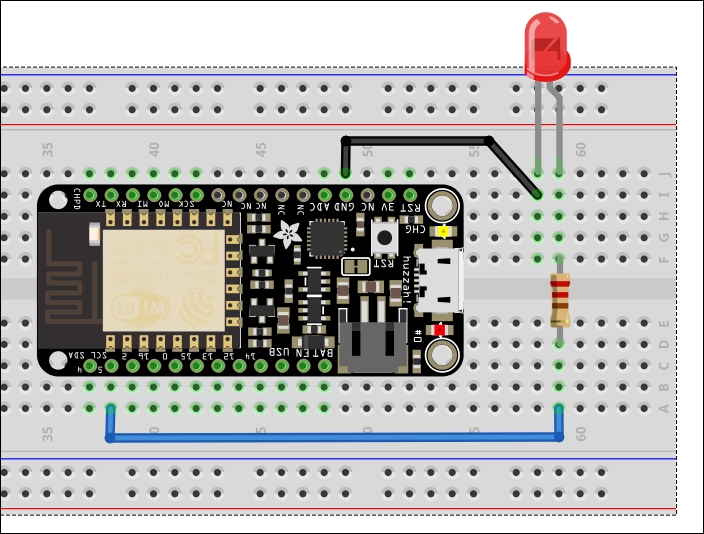
Start by mounting the LED onto the breadboard. Connect one end of the 220 Ω resistor to the positive leg of the LED (the positive leg of an LED is usually the taller one of the two legs). Connect the other end of the resistor to pin 5 of the ESP8266 board. Then use a jumper wire to connect the negative leg of the LED to the GND pin of the ESP8266.

The setup is shown in the following diagram:

How to do it…

The first thing you need to do is set up your Arduino IDE for OTA updates. You will require the following things:

  • Python...

lock icon The rest of the chapter is locked
Register for a free Packt account to unlock a world of extra content!
A free Packt account unlocks extra newsletters, articles, discounted offers, and much more. Start advancing your knowledge today.
Unlock this book and the full library FREE for 7 days
Get unlimited access to 7000+ expert-authored eBooks and videos courses covering every tech area you can think of
Renews at £13.99/month. Cancel anytime
Visually different images