Search icon CANCEL
Subscription
0
Cart icon
Your Cart (0 item)
Close icon
You have no products in your basket yet
Save more on your purchases! discount-offer-chevron-icon
Savings automatically calculated. No voucher code required.
Arrow left icon
All Products
Best Sellers
New Releases
Books
Videos
Audiobooks
Learning Hub
Newsletter Hub
Free Learning
Arrow right icon
timer SALE ENDS IN
0 Days
:
00 Hours
:
00 Minutes
:
00 Seconds
Arrow up icon
GO TO TOP
Blender 3D Basics Beginner's Guide Second Edition

You're reading from   Blender 3D Basics Beginner's Guide Second Edition A quick and easy-to-use guide to create 3D modeling and animation using Blender 2.7

Arrow left icon
Product type Paperback
Published in Aug 2014
Publisher Packt
ISBN-13 9781783984909
Length 526 pages
Edition 1st Edition
Tools
Arrow right icon
Author (1):
Arrow left icon
Gordon Fisher Gordon Fisher
Author Profile Icon Gordon Fisher
Gordon Fisher
Arrow right icon
View More author details
Toc

Table of Contents (20) Chapters Close

Blender 3D Basics Beginner's Guide Second Edition
Credits
About the Author
About the Reviewers
www.PacktPub.com
Preface
1. Introducing Blender and Animation FREE CHAPTER 2. Getting Comfortable Using the 3D View 3. Controlling the Lamp, the Camera, and Animating Objects 4. Modeling with Vertices, Edges, and Faces 5. Building a Simple Boat 6. Making and Moving the Oars 7. Planning Your Work, Working Your Plan 8. Making the Sloop 9. Finishing Your Sloop 10. Modeling Organic Forms, Sea, and Terrain 11. Improving Your Lighting and Camera Work 12. Rendering and Compositing Pop Quiz Answers Index

Time for action – grouping vertices


Grouping is pretty simple. Once you have selected the vertices, you go to the Properties window, create a group, and assign the vertices to the group:

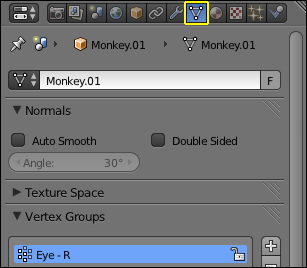
  1. Select the Object Data button on the Properties window header. It's outlined and has a triangle with vertices and edges, as shown in the following screenshot.

  2. Use the LMB to click on the plus sign in the Vertex Groups subpanel. This creates a vertex group named Group.

  3. Click the LMB over the word Group in the button, and when the background turns black, change the word Group to Eye - R and press Enter.

  4. Now, left-click on Assign to assign the vertices you selected in the previous Time for Action section, to the Eye - R group.

  5. Save the file with a unique name.

What just happened?

You opened up the Object Data panel in the Properties window and created a group to save the information about which vertices are in Suzanne's eye. By saving the group, you won't have to select it again while modeling. For this reason...

lock icon The rest of the chapter is locked
Register for a free Packt account to unlock a world of extra content!
A free Packt account unlocks extra newsletters, articles, discounted offers, and much more. Start advancing your knowledge today.
Unlock this book and the full library FREE for 7 days
Get unlimited access to 7000+ expert-authored eBooks and videos courses covering every tech area you can think of
Renews at £13.99/month. Cancel anytime
Visually different images