Displaying a welcome message
In this recipe, the user will be prompted to enter his/her name followed by clicking a push button. On clicking the button, a welcome message will appear, "Hello," followed by the name entered by the user. For this recipe, we need to make use of three widgets, Label, Line Edit, and Push Button. Let's understand these widgets one by one.
Understanding the Label widget
The Label widget is an instance of theQLabelclass and is used for displaying messages and images. Because the Label widgets simply display results of computations and don't take any input, they are simply used for supplying information on the screen.
Methods
The following are the methods provided by the QLabel class:
setText(): This method assigns text to theLabelwidgetsetPixmap(): This method assignspixmap, an instance of theQPixmapclass, to theLabelwidgetsetNum(): This method assigns an integer or double value to theLabelwidgetclear(): This method clears text from theLabelwidget
The default text of QLabel is TextLabel. That is, when you add a QLabel class to a form by dragging a Label widget and dropping it on the form, it will display TextLabel. Besides using setText(), you can also assign text to a selected QLabel object by setting its text property in the Property Editor window.
Understanding the Line Edit widget
The Line Edit widget is that is popularly used for entering single-line data. The Line Edit widget is an instance of the QLineEdit class, and you can not only enter, but also edit the data too. Besides entering data, you can undo, redo, cut, and paste data in the Line Edit widget.
Methods
The following are the methods provided by the QLineEdit class:
setEchoMode(): It sets the echo mode of theLine Editwidget. That is, it determines how the contents of theLine Editwidget are to be displayed. The available options are as follows:Normal: This is the default mode and it displays characters the way they are enteredNoEcho: It switches off theLine Editecho, that is, it doesn't display anythingPassword: This option is used for password fields, no text will be displayed; instead, asterisks appear for the text entered by the userPasswordEchoOnEdit: It displays the actual text while editing the password fields, otherwise it will display the asterisks for the textmaxLength(): This method is used to specify the maximum length of text that can be entered in theLine Editwidget.setText(): This method is used for assigning text to theLine Editwidget.text(): This method accesses the text entered in theLine Editwidget.clear(): This method clears or deletes the complete content of theLine Editwidget.setReadOnly(): When the Boolean value true is passed to this method, it will make theLine Editwidget read-only, that is, non-editable. The user cannot make any changes to the contents displayed through theLine Editwidget, but can only copy.isReadOnly(): This method returns the Boolean value true if theLine Editwidget is in read-only mode, otherwise it returns false.setEnabled(): By default, theLine Editwidget is enabled, that is, the user can make changes to it. But if the Boolean value false is passed to this method, it will disable theLine Editwidget so the user cannot edit its content, but can only assign text via thesetText()method.setFocus(): This method positions the cursor on the specifiedLine Editwidget.
Understanding the Push Button widget
To display a push button in an application, you need to create an instance of the QPushButton class. When assigning text to buttons, you can create shortcut keys by preceding any character in the text with an ampersand. For example, if the text assigned to a push button is Click Me, the character C will be underlined to indicate that it is a shortcut key, and the user can select the button by pressing Alt + C. The button emits the clicked() signal if it is activated. Besides text, an icon can also be displayed in the push button. The methods for displaying text and an icon in a push button are as follows:
setText(): This method is used to assign text to the push buttonsetIcon(): This method is used to assign an icon to the push button
How to do it...
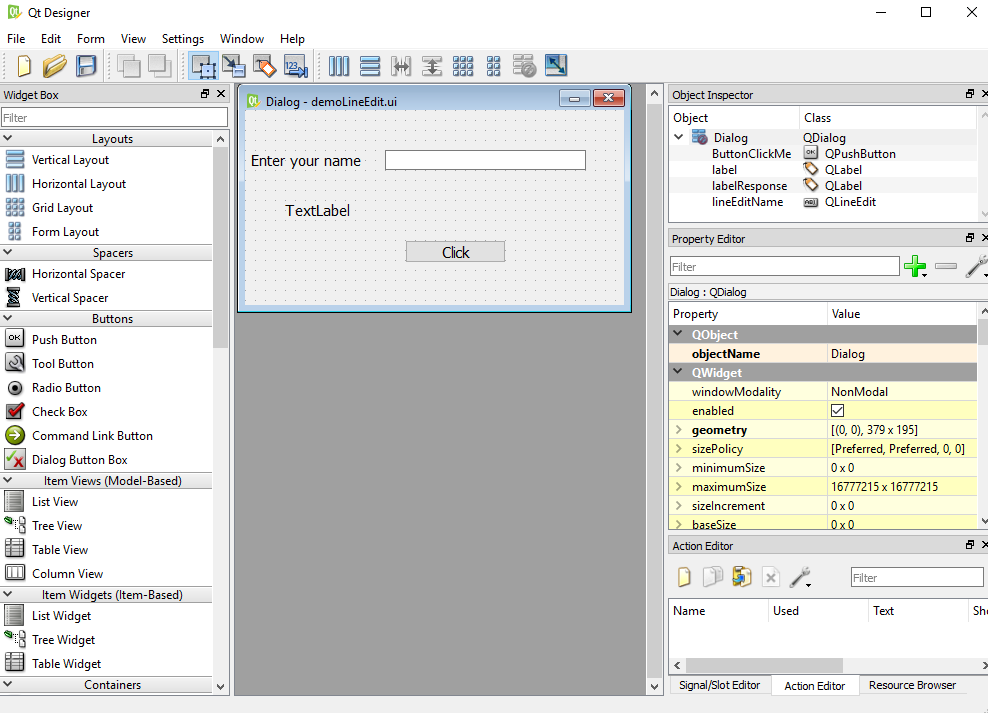
Let's create a new application based on the Dialog without Buttons template. As said earlier, this application will prompt the user to enter a name and, on clicking the push button after entering a name, the application with display a hello message along with the entered name. Here are the steps to create this application:
- Drag a
Labelwidget from theDisplay Widgetscategory and drop it on the form. Set itstextproperty toEnter your name. Set theobjectNameproperty of theLabelwidget tolabelResponse. - Drag one more
Labelwidget from theDisplay Widgetscategory and drop it on the form. Do not change thetextproperty of thisLabelwidget and leave itstextproperty to its default value,TextLabel. This is because thetextproperty of thisLabelwidget will be set through code, that is, it will be used to display the hello message to the user. - Drag one
Line Editfrom theInput Widgetscategory and drop it on the form. Set itsobjectNamepropertytolineEditName. - Drag one
Push Buttonwidget from theButtonscategory and drop it onto the form. Set itstextproperty toClick. You can change thetextproperty of thePush Buttonwidget through any of three ways: by double-clicking thePush Buttonwidget and overwriting the default text, by right-clicking thePush Buttonwidget and selecting theChange text...option from the context menu that pops up, or by selecting thetextproperty from theProperty Editorwindow and overwriting the default text. - Set the
objectNameproperty of thePush Buttonwidget toButtonClickMe.
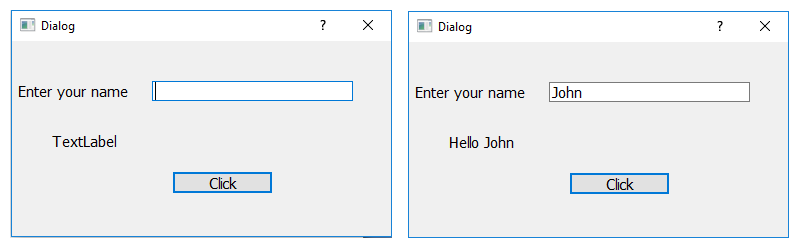
- Save the application with the name
demoLineEdit.ui. Now the form will appear, as shown in the following screenshot:
The user interface that you create with Qt Designer is stored in a .ui file that includes all the form's information: its widgets, layout, and so on. The .ui file is an XML file, and you need to convert it to Python code. That way, you can maintain a clear separation between the visual interface and the behavior implemented in code.
- To use the
.uifile, you first need to convert it into a Python script. The command utility that you will use for converting a.uifile into a Python script ispyuic5. In Windows, thepyuic5utility is bundled with PyQt. To do the conversion, you need to open a Command Prompt window and navigate to the folder where the file is saved and issue the following command:
C:\Pythonbook\PyQt5>pyuic5 demoLineEdit.ui -o demoLineEdit.pyLet's assume that we saved the form at this location: C:\Pythonbook\PyQt5>. The preceding command shows the conversion of the demoLineEdit.ui file into a Python script, demoLineEdit.py.
Note
The Python code generated by this method should not be modified manually, as any changes will be overwritten the next time you run the pyuic5 command.
The code of the generated Python script file, demoLineEdit.py, can be seen in the source code bundle of this book.
- Treat the code in the
demoLineEdit.pyfile as a header file, and import it to the file from which you will invoke its user interface design.
Note
The header file is a term referred to those files which are imported into the current file. The command to import such files is usually written at the top in the script, hence named as header files.
- Let's create another Python file with the name
callLineEdit.pyand import thedemoLineEdit.pycode into it as follows:
import sys
from PyQt5.QtWidgets import QDialog, QApplication
from demoLineEdit import *
class MyForm(QDialog):
    def __init__(self):
        super().__init__()
        self.ui = Ui_Dialog()
        self.ui.setupUi(self)
        self.ui.ButtonClickMe.clicked.connect(self.dispmessage)
        self.show()
    def dispmessage(self):
        self.ui.labelResponse.setText("Hello "
        +self.ui.lineEditName.text())
if __name__=="__main__":
    app = QApplication(sys.argv)
    w = MyForm()
    w.show()
    sys.exit(app.exec_())
How it works...
The demoLineEdit.py file is very easy to understand. A class with the name of the top-level object is created, with Ui_ prepended. Since the top-level object used in our application is Dialog, the Ui_Dialog class is created and stores the interface elements of our widget. That class has two methods, setupUi() and retranslateUi(). The setupUi() method sets up the widgets; it creates the widgets that you use while defining the user interface in Qt Designer. The method creates the widgets one by one and also sets their properties. The setupUi() method takes a single argument, which is the top-level widget in which the user interface (child widgets) is created. In our application, it is an instance of QDialog. The retranslateUi() method translates the interface.
Let's understand what callLineEdit.py does statement-wise:
- It imports the necessary modules.
QWidgetis the base class of all user interface objects in PyQt5. - It creates a new
MyFormclass that inherits from the base class,QDialog. - It provides the default constructor for
QDialog. The default constructor has no parent, and a widget with no parent is known as a window. - Event handling in PyQt5 uses signals and slots. A signal is an event, and a slot is a method that is executed on the occurrence of a signal. For example, when you click a push button, a
clicked()event, also known as a signal, occurs. Theconnect()method connects signals with slots. In this case, the slot is a method:dispmessage(). That is, when the user clicks the push button, thedispmessage()method will be invoked.clicked()is an event here and an event handling loop waits for an event to occur and then dispatches it to perform some task. The event handling loop continues to work until either theexit()method is called or the main widget is destroyed. - It creates an application object with the name
appthrough theQApplication()method. Every PyQt5 application must createsys.argvapplication object which contains a list of arguments from the command line, and it is passed to the method while creating the application object. Thesys.argvparameter helps in passing and controlling the startup attributes of a script.
- An instance of the
MyFormclass is created with the namew. - The
show()method will display the widget on the screen. - The
dispmessage()method performs event handling for the push button. It displays theHellotext, along with the name entered in theLine Editwidget. - The
sys.exit()method ensures a clean exit, releasing memory resources.
Note
The exec_() method has an underscore because exec is a Python keyword.
On executing the preceding program, you get a window with the Line Edit and Push Button widgets, as shown in the following screenshot. When the push button is selected, the displmessage() method will be executed, displaying the Hello message along with the user's name that is entered in the Line Edit widget: