


Running Docker containers with Vagrant
The first thing we'll investigate is how to run and develop simple Docker containers using Vagrant. In recent versions, Vagrant ships with a Docker provider that allows Vagrant users a simple environment to start and run containers.
Before we can start, however, we need to note that Docker builds on top of Linux containers. As such, a Docker container only runs on Linux operating systems. There are two main approaches to run Docker containers on development workstations:
Developing Docker containers natively on a Linux platform: This is the approach used in a number of development books and guides, including The Docker Book by James Turnbull. Developing with Linux requires either a native Linux installation or perhaps a Linux desktop virtual machine, such as a Linux distribution running on a VMware virtual machine.
Developing Docker containers using the boot2docker environment (http://boot2docker.io). boot2docker is a Linux VM designed to host Docker containers on OS X or Windows operating systems. boot2docker has a package installer that will guide users in the use of the environment.
Note
We'll take some care to note that there are two projects that we refer to in this appendix. One is the official boot2docker project (http://boot2docker.io), and the other is Mitchell Hashimoto's boot2docker-vagrant-box (https://github.com/mitchellh/boot2docker-vagrant-box). These environments are only necessary to use Docker on a Windows or OS X machine. As Docker is built on top of Linux Containers, Docker will run natively on Linux desktop or server machines.
The Vagrant Docker provider can support either one of these approaches: managing containers natively on Linux or managing containers through the boot2docker environment. Vagrant can even manage the installation and operation of the boot2docker environment on Windows and OS X, which can make it simpler for users to get started.
This appendix will focus on using Vagrant on OS X (with the aid of the Docker provider) to create a simple Docker development environment. In particular, we'll launch a MySQL database that uses a container provided by the MySQL project, and use a simple Dockerfile to package a simple web application.
How to do it...
In this section, we'll learn how to install a Docker image from a repository and build a Docker image with Vagrant.
Installing a Docker image from a repository
We'll start with a simple case: installing a Docker container from a repository (a MySQL container) and connecting it to an external tool for development (the MySQL Workbench or a client tool of your choice). We'll need to initialize the boot2docker environment and use some Vagrant tools to interact with the environment and the deployed containers.
Before we can start, we'll need to find a suitable Docker image to launch. One of the unique advantages to use Docker as a development environment is its ability to select a base Docker image, then add successive build steps on top of the base image. In this simple example, we can find a base MySQL image on the Docker Hub registry (https://registry.hub.docker.com). The MySQL project provides an official Docker image that we can build from.
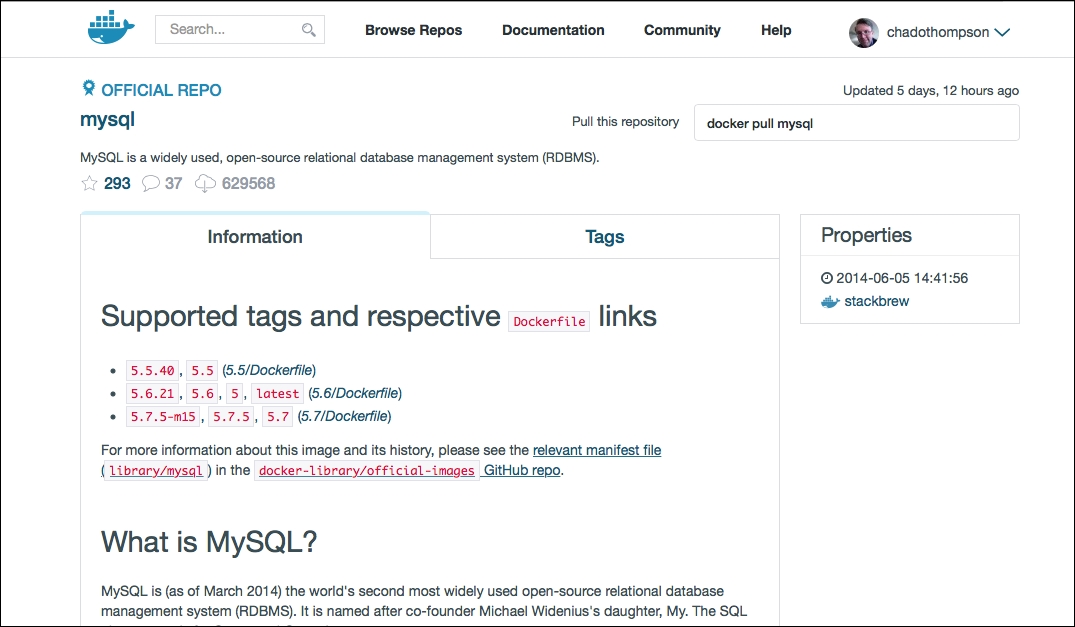
We'll note from the repository the command to use the image: docker pull mysqlmysql and note that the image name is mysql.
Start with a Vagrantfile that defines the Docker:
# -*- mode: ruby -*-
# vi: set ft=ruby :

VAGRANTFILE_API_VERSION = "2"
  ENV['VAGRANT_DEFAULT_PROVIDER'] = 'vmware_fusion'
  Vagrant.configure(VAGRANTFILE_API_VERSION) do |config|
  config.vm.define"database" do |db|
    db.vm.provider"docker"do |d|
      d.image="mysql"
    end
  end
end
An important thing to note immediately is that when we define the database machine and the provider with the Docker provider, we do not specify a box file. The Docker provider will start and launch containers into a boot2docker environment, negating the need for a Vagrant box or virtual machine definition. This will introduce a bit of a complication in interacting with the Vagrant environment in later steps.
Also note the
mysqlimage name taken from the Docker Hub registry.We'll need to launch the image with a few basic parameters. Add the following code to the Docker provider block:
    db.vm.provider "docker" do |d|
      d.image="mysql"
      d.env = {
        :MYSQL_ROOT_PASSWORD => ""root",
        :MYSQL_DATABASE      => ""dockertest",
        :MYSQL_USER          => ""dockertest",
        :MYSQL_PASSWORD      => ""d0cker"
      }
      d.ports =["3306:3306"]
      d.remains_running = "true"
    end
The environment variables (
d.env) are taken from the documentation on the MySQL Docker image page (https://registry.hub.docker.com/_/mysql/). This is how the image expects to set certain parameters. In this case, our parameters will set the database root password (for therootuser) and create a database with a new user that has full permissions to this database.The
d.portsparameter is an array of port listings that will be forwarded from the container (the default MySQL port of3306) to the host operating system, in this case also3306. The contained application will, thus, behave like a natively installed MySQL installation.Note
The port forwarding here is from the container to the operating system that hosts the container (in this case, the container host is our boot2docker image). If we are developing and hosting containers natively with Vagrant on a Linux distribution, the port forwarding will be to localhost, but boot2docker introduces something of a wrinkle in doing Docker development on Windows or OS X. We'll either need to refer to our software installation by the IP of the boot2docker container or configure a second port forwarding configuration that allows a Docker contained application to be available to the host operating system as localhost.
The final parameter (
d.remains_running = true) is a flag for Vagrant to note that the Vagrant run should mark as failed if the Docker container exits on start. In the case of software that runs as a daemon process (such as the MySQL database), a Docker container that exits immediately is an error condition.Start the container using the
vagrant up –provider=dockercommand. A few things will happen here:If this is the first time you have started the project, you'll see some messages about booting a box named
mitchellh/boot2docker. This is a Vagrant-packaged version of the boot2docker project. Once the machine boots, it becomes a host for all Docker containers managed with Vagrant.Note
Keep in mind that boot2doocker is necessary only for nonLinux operating systems that are running Docker through a virtual machine. On a Linux system running Docker natively, you will not see information about boot2docker.
After the container is booted (or if it is already running), Vagrant will display notifications about rsyncing a folder (if we are using boot2docker) and launching the image:
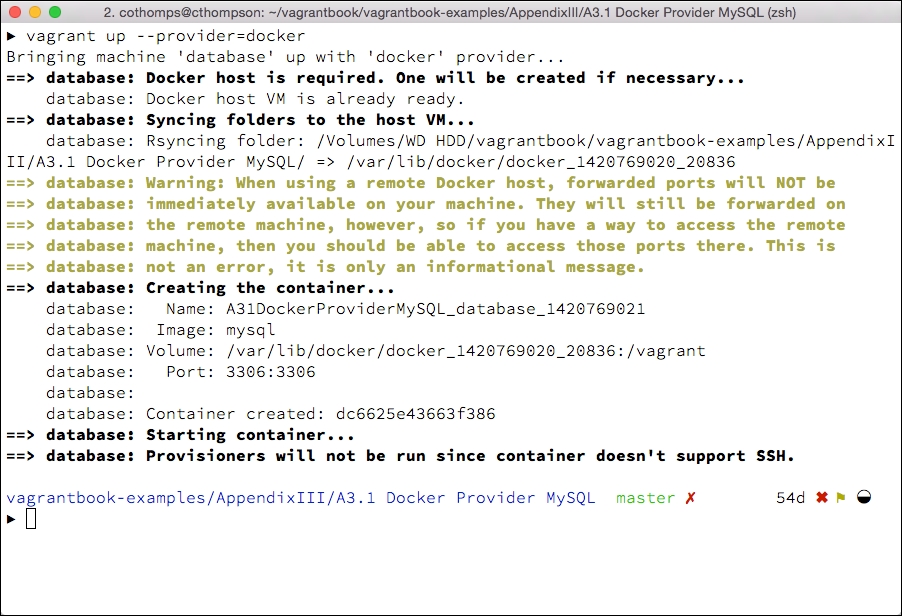
Docker generates unique identifiers for containers and notes any port mapping information.
Let's take a look at some details on the containers that are running in the Docker host. We'll need to find a way to gain access to the Vagrant boot2docker image (and only if we are using boot2docker and not a native Linux environment), which is not quite as straightforward as a vagrant
ssh; we'll need to identify the Vagrant container to access.First, identify the Docker Vagrant machine from the global Vagrant status. Vagrant keeps track of running instances that can be accessed from Vagrant itself. In this case, we are only interested in the Vagrant instance named
docker-host. The instance we're interested in can be found with thevagrant global-statuscommand: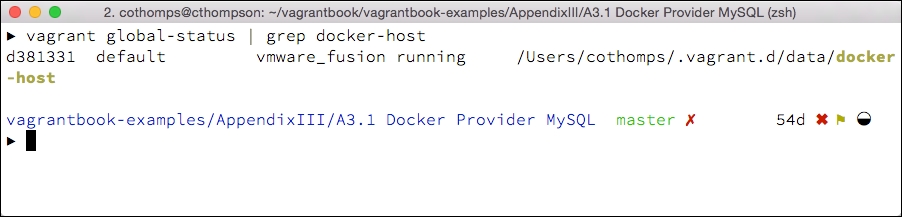
In this case, Vagrant identifies the instance as
d381331(a unique value for every Vagrant machine launched). We can access this instance with avagrant sshcommand:vagrant ssh d381331This will display an ASCII-art boot2docker logo and a command prompt for the boot2docker instance. Let's take a look at the Docker containers running on the system with the
docker pspscommand: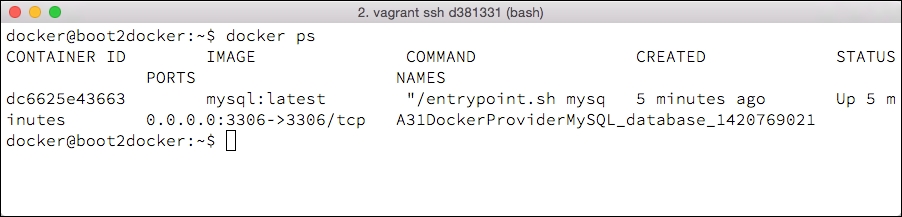
The
docker pspscommand will provide information about the running Docker containers on the system; in this case, the unique ID of the container (output during the Vagrant startup) and other information about the container.Find the IP address of boot2docker (only if we're using boot2docker) to connect to the MySQL instance. In this case, execute the
ifconfigcommand:docker@boot2docker:~$ ifconfigThis will output information about the network interfaces on the machine; we are interested in the
eth0entry. In particular, we can note the IP address of the machine on theeth0interface: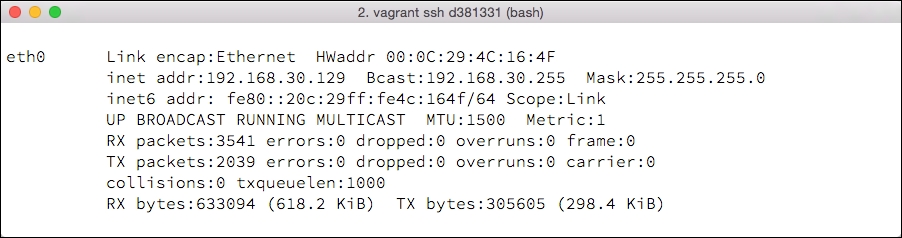
Make a note of the IP address noted as the
inet addraddr; in this case,192.168.30.129.Connect a MySQL client to the running Docker container. In this case, we'll need to note some information to the connection:
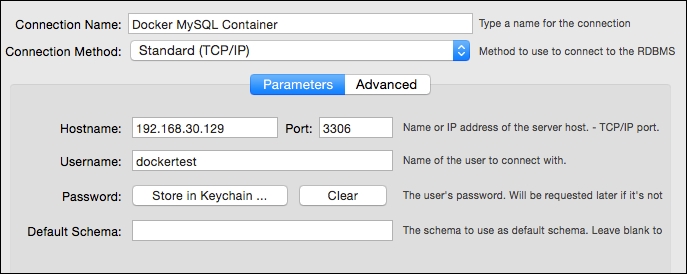
The IP address of the boot2docker virtual machine (if using boot2docker). In this case, we'll note
192.168.30.129.The port that the MySQL instance will respond to on the Docker host. In this case, the Docker container is forwarding port
3306in the container to port3306on the host.Information noted in the Vagrantfile for the username or password on the MySQL instance.
With this information in hand, we can configure a MySQL client. The MySQL project provides a supported GUI client named MySQL Workbench (http://www.mysql.com/products/workbench/). With the client installed on our host operating system, we can create a new connection in the Workbench client (consult the documentation for your version of Workbench, or use a MySQL client of your choice).
In this case, we're connecting to the boot2docker instance. If you are running Docker natively on a Linux instance, the connection should simply forward to localhost. If the connection is successful, the Workbench client once connected will display an empty database:
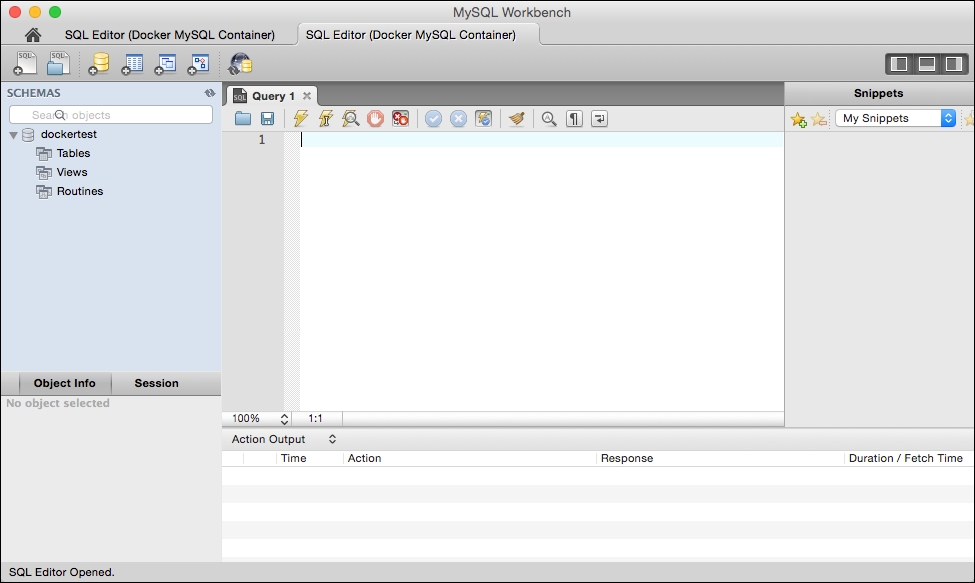
Once we've connected, we can use the MySQL database as we would for any other MySQL instance that is hosted this time in a Docker container without having to install and configure the MySQL package itself.
Building a Docker image with Vagrant
While launching packaged Docker, applications can be useful (particularly in the case where launching a Docker container is simpler than native installation steps), Vagrant becomes even more useful when used to launch containers that are being developed. On OS X and Windows machines, the use of Vagrant can make managing the container deployment somewhat simpler through the boot2docker containers, while on Linux, using the native Docker tools could be somewhat simpler. In this example, we'll use a simple Dockerfile to modify a base image.
First, start with a simple Vagrantfile. In this case, we'll specify a build directory rather than a image file:
# -*- mode: ruby -*-
# vi: set ft=ruby :

# Vagrantfile API/syntax version. Don't touch unless you know what you're doing!
VAGRANTFILE_API_VERSION = "2"
ENV['VAGRANT_DEFAULT_PROVIDER'] = 'vmware_fusion'

Vagrant.configure(VAGRANTFILE_API_VERSION) do |config|
  config.vm.define "nginx" do |nginx|
    nginx.vm.provider "docker" do |d|
      d.build_dir = "build"
      d.ports = ["49153:80"]
    end
  end
end
This Vagrantfile specifies a build directory as well as the ports forwarded to the host from the container. In this case, the standard HTTP port (
80) forwards to port49153on the host machine, which in this case is the boot2docker instance.Create our build directory in the same directory as the Vagrantfile.
In the build directory, create a Dockerfile. A Dockerfile is a set of instructions on how to build a Docker container. See https://docs.docker.com/reference/builder/ or James Turnbull's The Docker Book for more information on how to construct a Dockerfile. In this example, we'll use a simple Dockerfile to copy a working HTML directory to a base NGINX image:
FROM nginx
COPY content /usr/share/nginx/html
Create a directory in our build directory named content. In the directory, place a simple
index.htmlfile that will be served from the new container:<html> <body> <div style="text-align:center;padding-top:40px;border:dashed 2px;"> This is an NGINX build. </div> </body> </html>Once all the pieces are in place, our working directory will have the following structure:
.
├── Vagrantfile
└── build
├── Dockerfile
    └── content
        └── index.html
Start the container in the working directory with the command:
vagrant up nginx --provider=dockerThis will start the container build and deploy process.
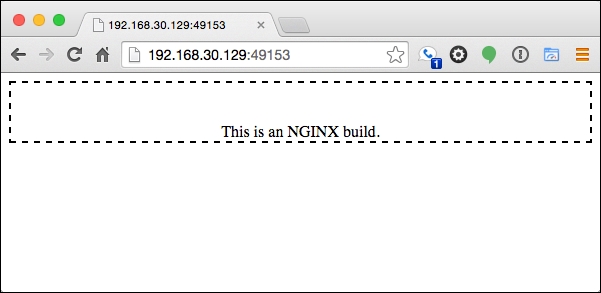
Once the container is launched, the web server can be accessed using the IP address of the boot2docker instance (see the previous section for more information on obtaining this address) and the forwarded port.
One other item to note, especially, if you have completed both steps in this section without halting or destroying the Vagrant project is that when using the Docker provider, containers are deployed to a single shared virtual machine. If the boot2docker instance is accessed and the docker ps command is executed, it can be noted that two separate Vagrant projects deploy containers to a single host.
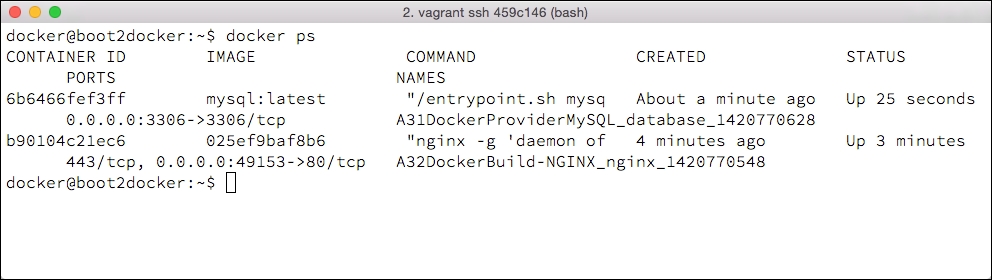
When using the Docker provider, the single instance has a few effects:
The single virtual machine can use fewer resources on your development workstation
Deploying and rebuilding containers is a process that is much faster than booting and shutting down entire operating systems
Docker development with the Docker provider can be a useful technique to create and test Docker containers, although Vagrant might not be of particular help in packaging and distributing Docker containers. If you wish to publish containers, consult the documentation or The Docker Book on getting started with packaging and distributing Docker containers.
See also
Docker: http://docker.io
boot2docker: http://boot2docker.io
The Docker Book: http://www.dockerbook.com
The Docker repository: https://registry.hub.docker.com


