Search icon CANCEL
Subscription
0
Cart icon
Your Cart (0 item)
Close icon
You have no products in your basket yet
Save more on your purchases! discount-offer-chevron-icon
Savings automatically calculated. No voucher code required.
Arrow left icon
All Products
Best Sellers
New Releases
Books
Videos
Audiobooks
Learning Hub
Newsletter Hub
Free Learning
Arrow right icon
timer SALE ENDS IN
0 Days
:
00 Hours
:
00 Minutes
:
00 Seconds
Arrow up icon
GO TO TOP
Raspberry Pi Robotic Blueprints

You're reading from   Raspberry Pi Robotic Blueprints Utilize the powerful ingredients of Raspberry Pi to bring to life your amazing robots that can act, draw, and have fun with laser tags

Arrow left icon
Product type Paperback
Published in Oct 2015
Publisher
ISBN-13 9781784396282
Length 198 pages
Edition 1st Edition
Concepts
Arrow right icon
Author (1):
Arrow left icon
Richard Grimmett Richard Grimmett
Author Profile Icon Richard Grimmett
Richard Grimmett
Arrow right icon
View More author details
Toc

Table of Contents (14) Chapters Close

Raspberry Pi Robotic Blueprints
Credits
About the Author
About the Reviewers
www.PacktPub.com
Preface
1. Adding Raspberry Pi to an RC Vehicle FREE CHAPTER 2. Adding Raspberry Pi to a Humanoid Robot 3. Building a Tracked Vehicle That Can Plan Its Own Path 4. Building a Robot That Can Play Laser Tag 5. A Robot That Can Draw 6. A Robot That Can Play Air Hockey 7. A Robot That Can Fly Index

Accessing the compass programmatically


Now that the device is connected, you'll need to configure access via the software. Following are the steps:

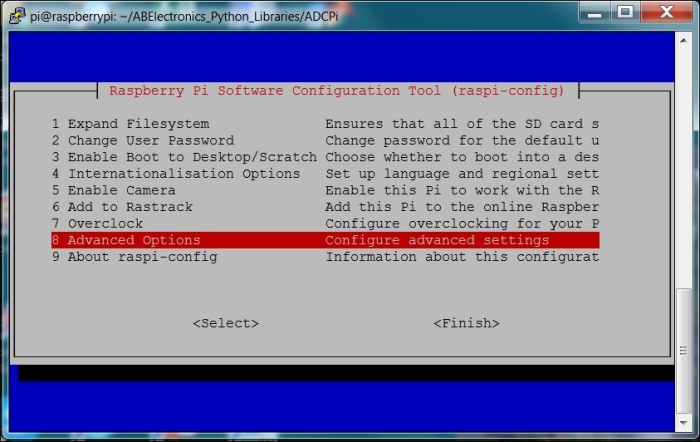
  1. In order to access the compass capability, you'll need to enable the I2C library on Raspberry. The first step in enabling the analog-to-digital converter (ADC) is to enable the I2C interface. The I2C interface is a synchronous serial interface and provides more performance than an asynchronous Rx/Tx serial interface. The SCL data line provides a clock while the data flows on the SDA line. The bus also provides addressing so that more than one device can be connected to the master device at the same time. To enable this bus, run sudo raspi-config and select the 8 Advanced Options, as follows:
  2. Then go to the A7 I2C selection and enable the I2C, as shown in the following:
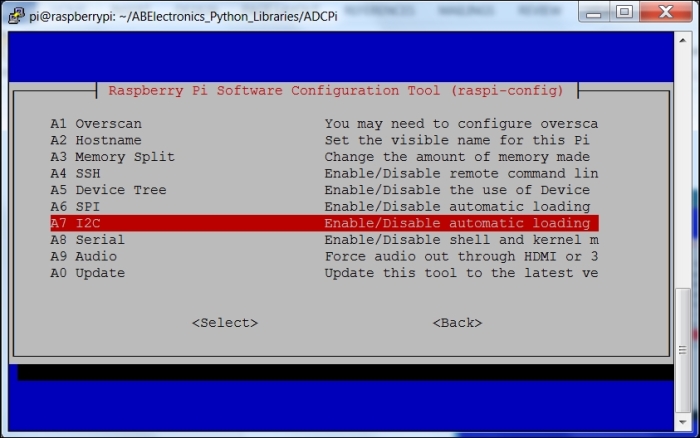
  3. Make all the selections to enable the I2C interface and load the library, and then reboot Raspberry Pi.

  4. You'll also need to edit the /etc/modules file and add the following two...

lock icon The rest of the chapter is locked
Register for a free Packt account to unlock a world of extra content!
A free Packt account unlocks extra newsletters, articles, discounted offers, and much more. Start advancing your knowledge today.
Unlock this book and the full library FREE for 7 days
Get unlimited access to 7000+ expert-authored eBooks and videos courses covering every tech area you can think of
Renews at $15.99/month. Cancel anytime
Visually different images