Making changes to Selenium
We had a look at the various things that you can do to help the Selenium project. The big one is obviously adding code to Selenium itself. The first thing that you will need to do is fork the Selenium project and check it out locally. It's exactly the same process as before.
Once we have the code checked out, the first challenge is to build it. Selenium has lots of moving parts, and it's not always clear what you need to run. The two targets that will probably be useful for somebody working with Java are as follows:
./go test_java_webdriver -trace./go test_firefox --trace
What you want to build will depend on which part of the code you are working on. There is a Rakefile in the root of the project, and if you look through this, you will see the various targets that are available to you.
Note
One thing that I always try to do is run a ./go command and then expect everything to work. If it won't, there is code in Selenium for multiple operating systems, and you will not be able to run everything on your machine. Focus on the bits that you are changing, and trust CI to catch anything else.
If you get stuck and have any questions, the best way to get them answered is to go to the #selenium IRC channel on irc.freenode.net and have a chat with various people from the Selenium community. They are all very helpful and will probably have seen your problem before.
Now that we have got Selenium building projects locally, let's do something useful. Let's add something that is missing and then submit a pull request. The Selenium team has created a document to aid people who want to contribute to the project. It's available at https://github.com/SeleniumHQ/selenium/blob/master/CONTRIBUTING.md. The most important thing to do is sign the CLA (Contributor License Agreement). If you don't sign this, your code cannot be accepted in the project. Once this has been signed, we can get on with making a pull request.
Selenium has a support class to convert colors from one format to another. It also has a predefined list of colors, as specified at http://www.w3.org/TR/css3-color/#html4. Since this list was created, an additional color has been added to the W3C spec, rebeccapurple. So, we are going to add this color to the Colors enum inside the support package.
The first thing that we are going to do is create a new local branch. This means that when we make changes and raise a pull request, we can switch to another branch and make more changes without affecting the pull request. Creating a branch is simple. You just use the following command:
git checkout -b rebeccapurpleNormally, when adding a change to the Selenium code base, we would start off by writing a failing test that uses the functionality that we are about to implement. However, in this case, the change is just the addition of a constant to an enum. It's a simple code change. So. we don't expect it to have any side effects, and we don't really need to add any more tests. Let's start with the additional code that we are going to add:
POWDERBLUE(new Color(176, 224, 230, 1d)),
PURPLE(new Color(128, 0, 128, 1d)),
REBECCAPURPLE(new Color(102, 51, 153, 1d)),
RED(new Color(255, 0, 0, 1d)),
ROSYBROWN(new Color(188, 143, 143, 1d)),
Everything else is currently there. So, the only color that we are adding is rebeccapurple. Now that we have added our change, we need to run tests to make sure that we didn't break anything. It would be a big surprise if our change did break something, but always run the tests anyway:
./go test_java_webdriver -trace
Now, we need to commit the change, as follows:
git commit -m "Add rebeccapurple to the Colors enum"We are now ready to raise our pull request, but we have a bit more work to do. We need to make sure that our fork is up to date with the main Selenium repository. To do this, we need to add a remote and then pull in all the changes that have happened since we pulled down our copy of the Selenium repository. Let's add the remote first:
git remote add upstream https://github.com/SeleniumHQ/selenium.gitThen, pull down the latest code from the main Selenium repository and add it to our branch, as follows:
git fetch upstreamgit rebase upstream/master
We now have the latest code on our local branch as well as the change. We need to push all of this up to our fork on GitHub, as follows:
git push origin rebeccapurpleWe are now ready to make the pull request. Load your fork in GitHub with a browser, and you should see a big green button called Compare & pull request:
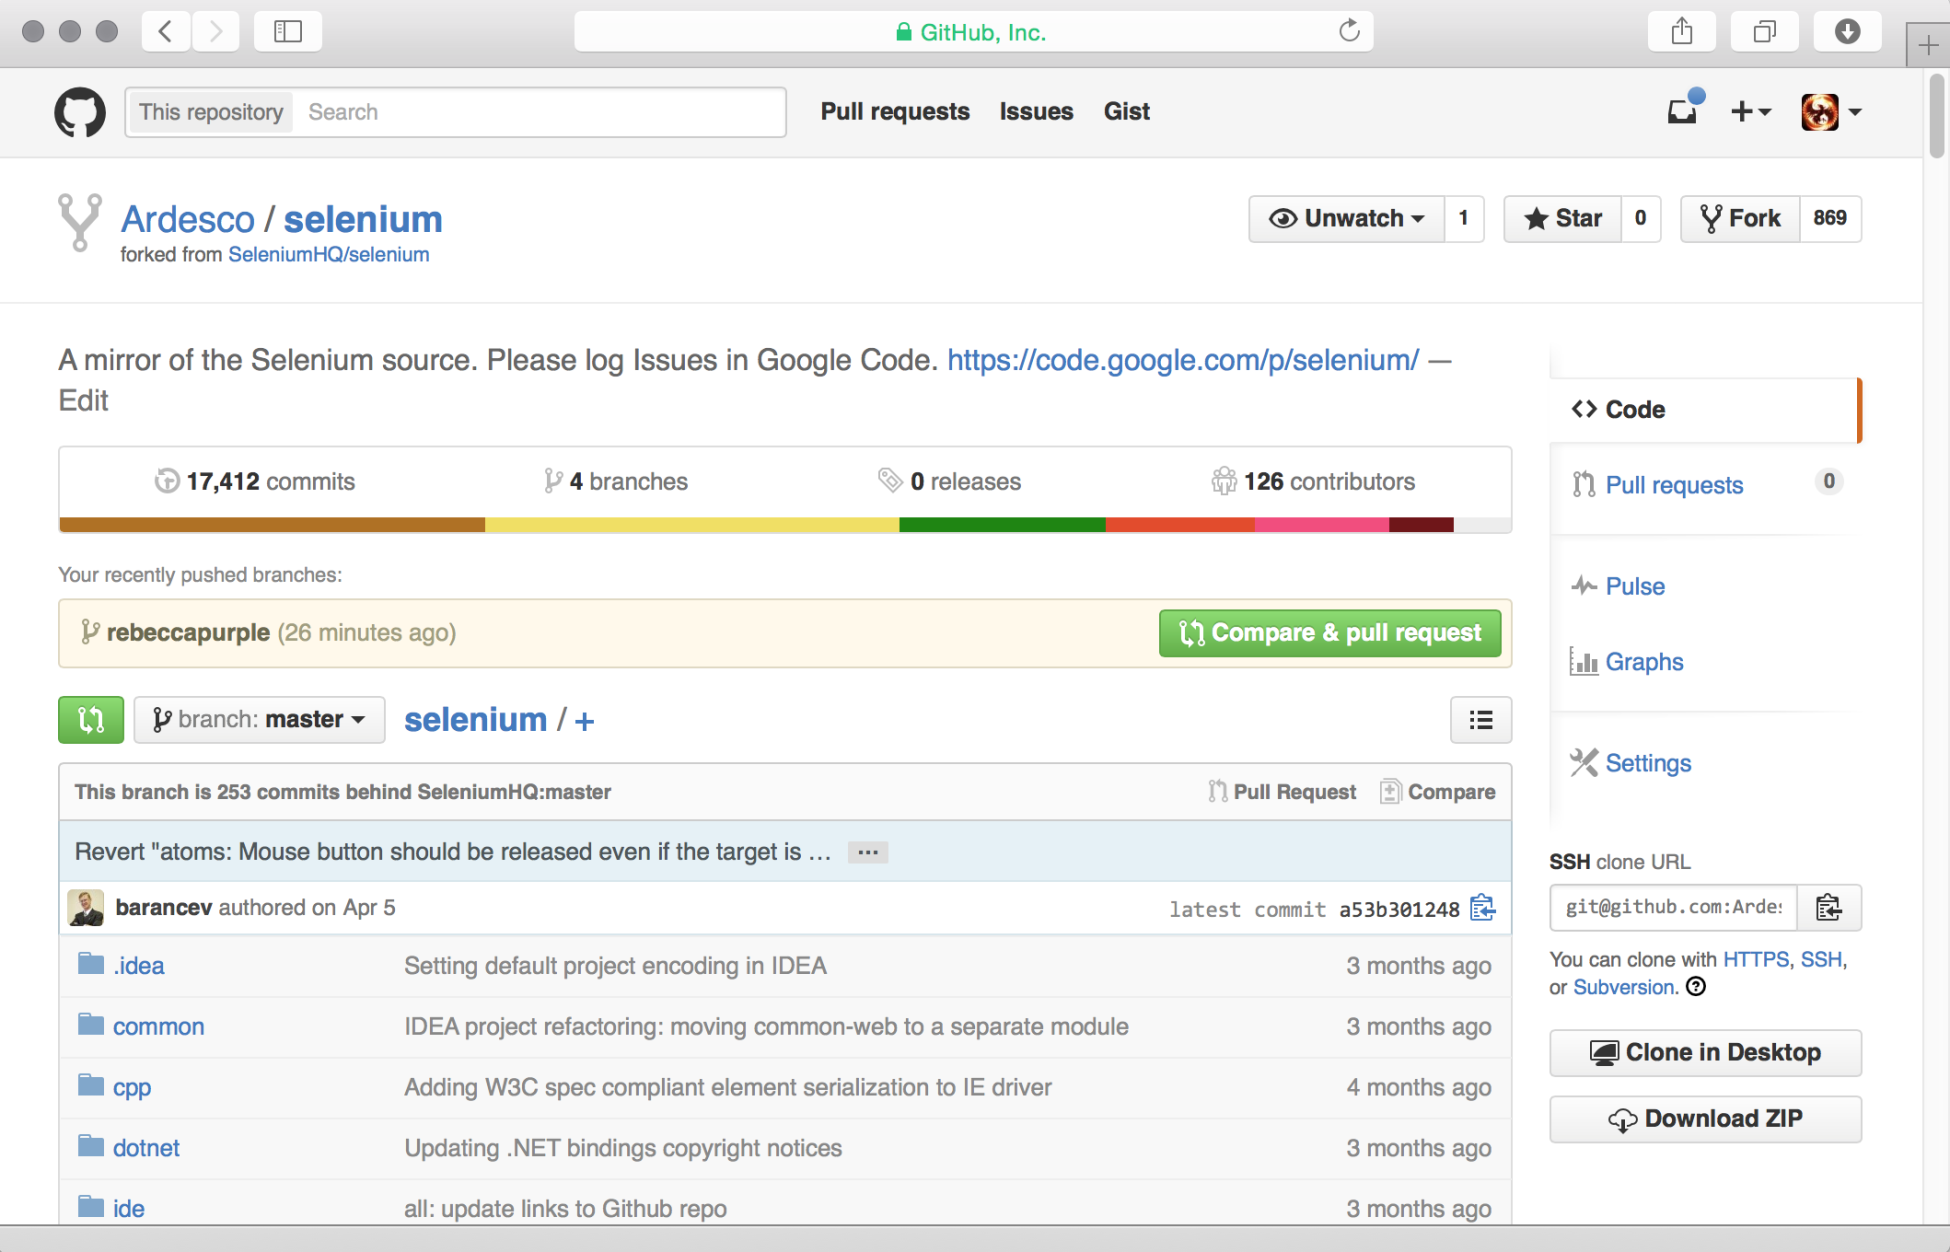
It's as simple as clicking the button. You will then be asked to confirm the branch that you want to generate the pull request with and the fork that you want to send it to:
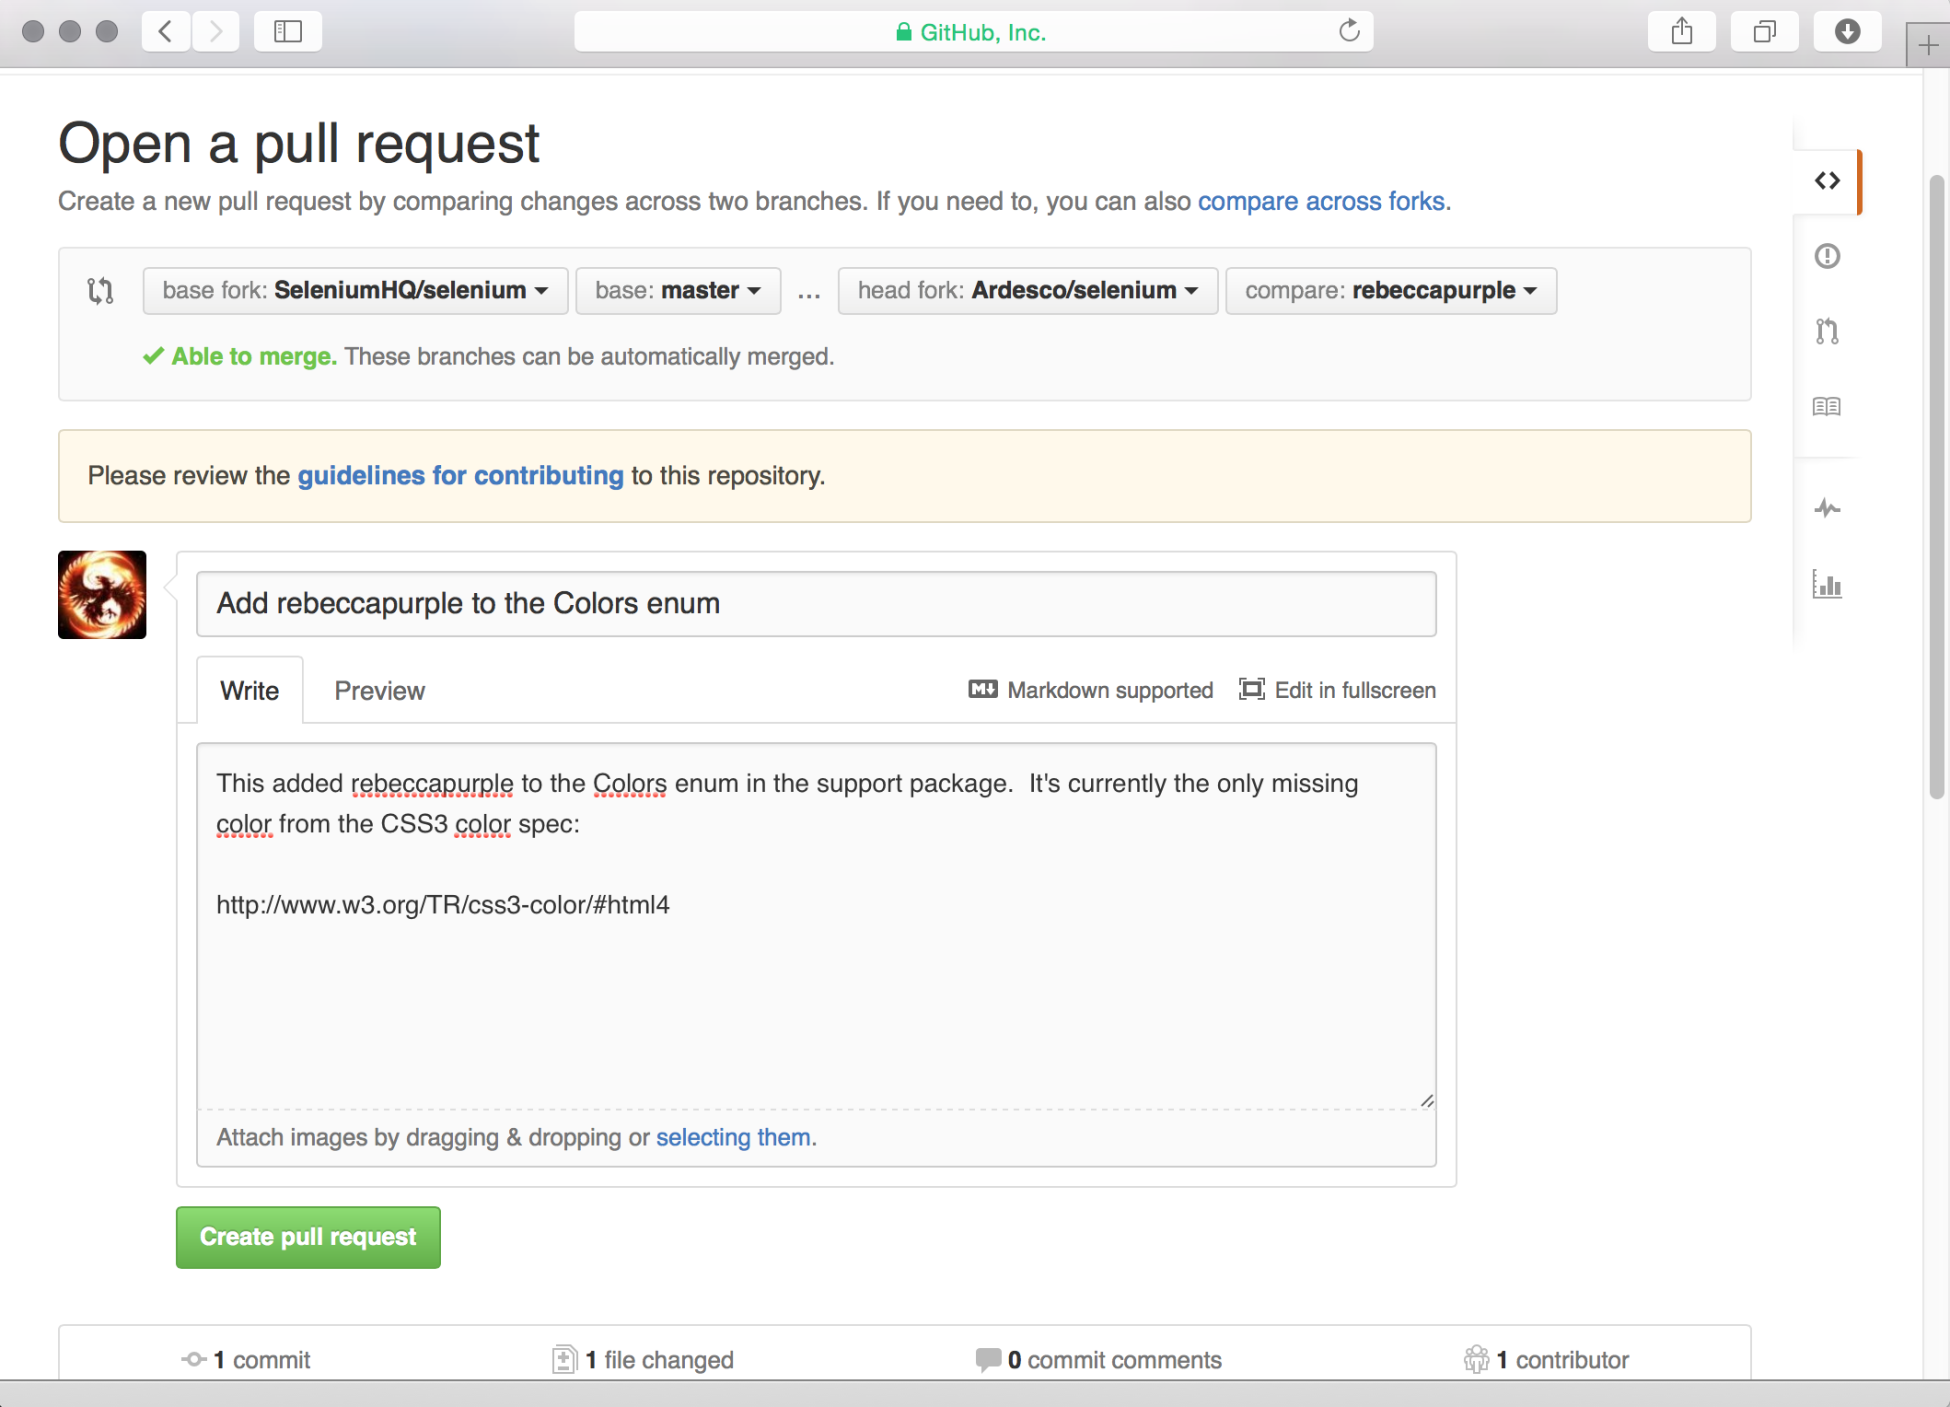
Creating a pull request
When you are happy, click on Create pull request, and your pull request will be generated for you. You will get a summary that tells you the state of your pull request, and a Travis CI build will be triggered:
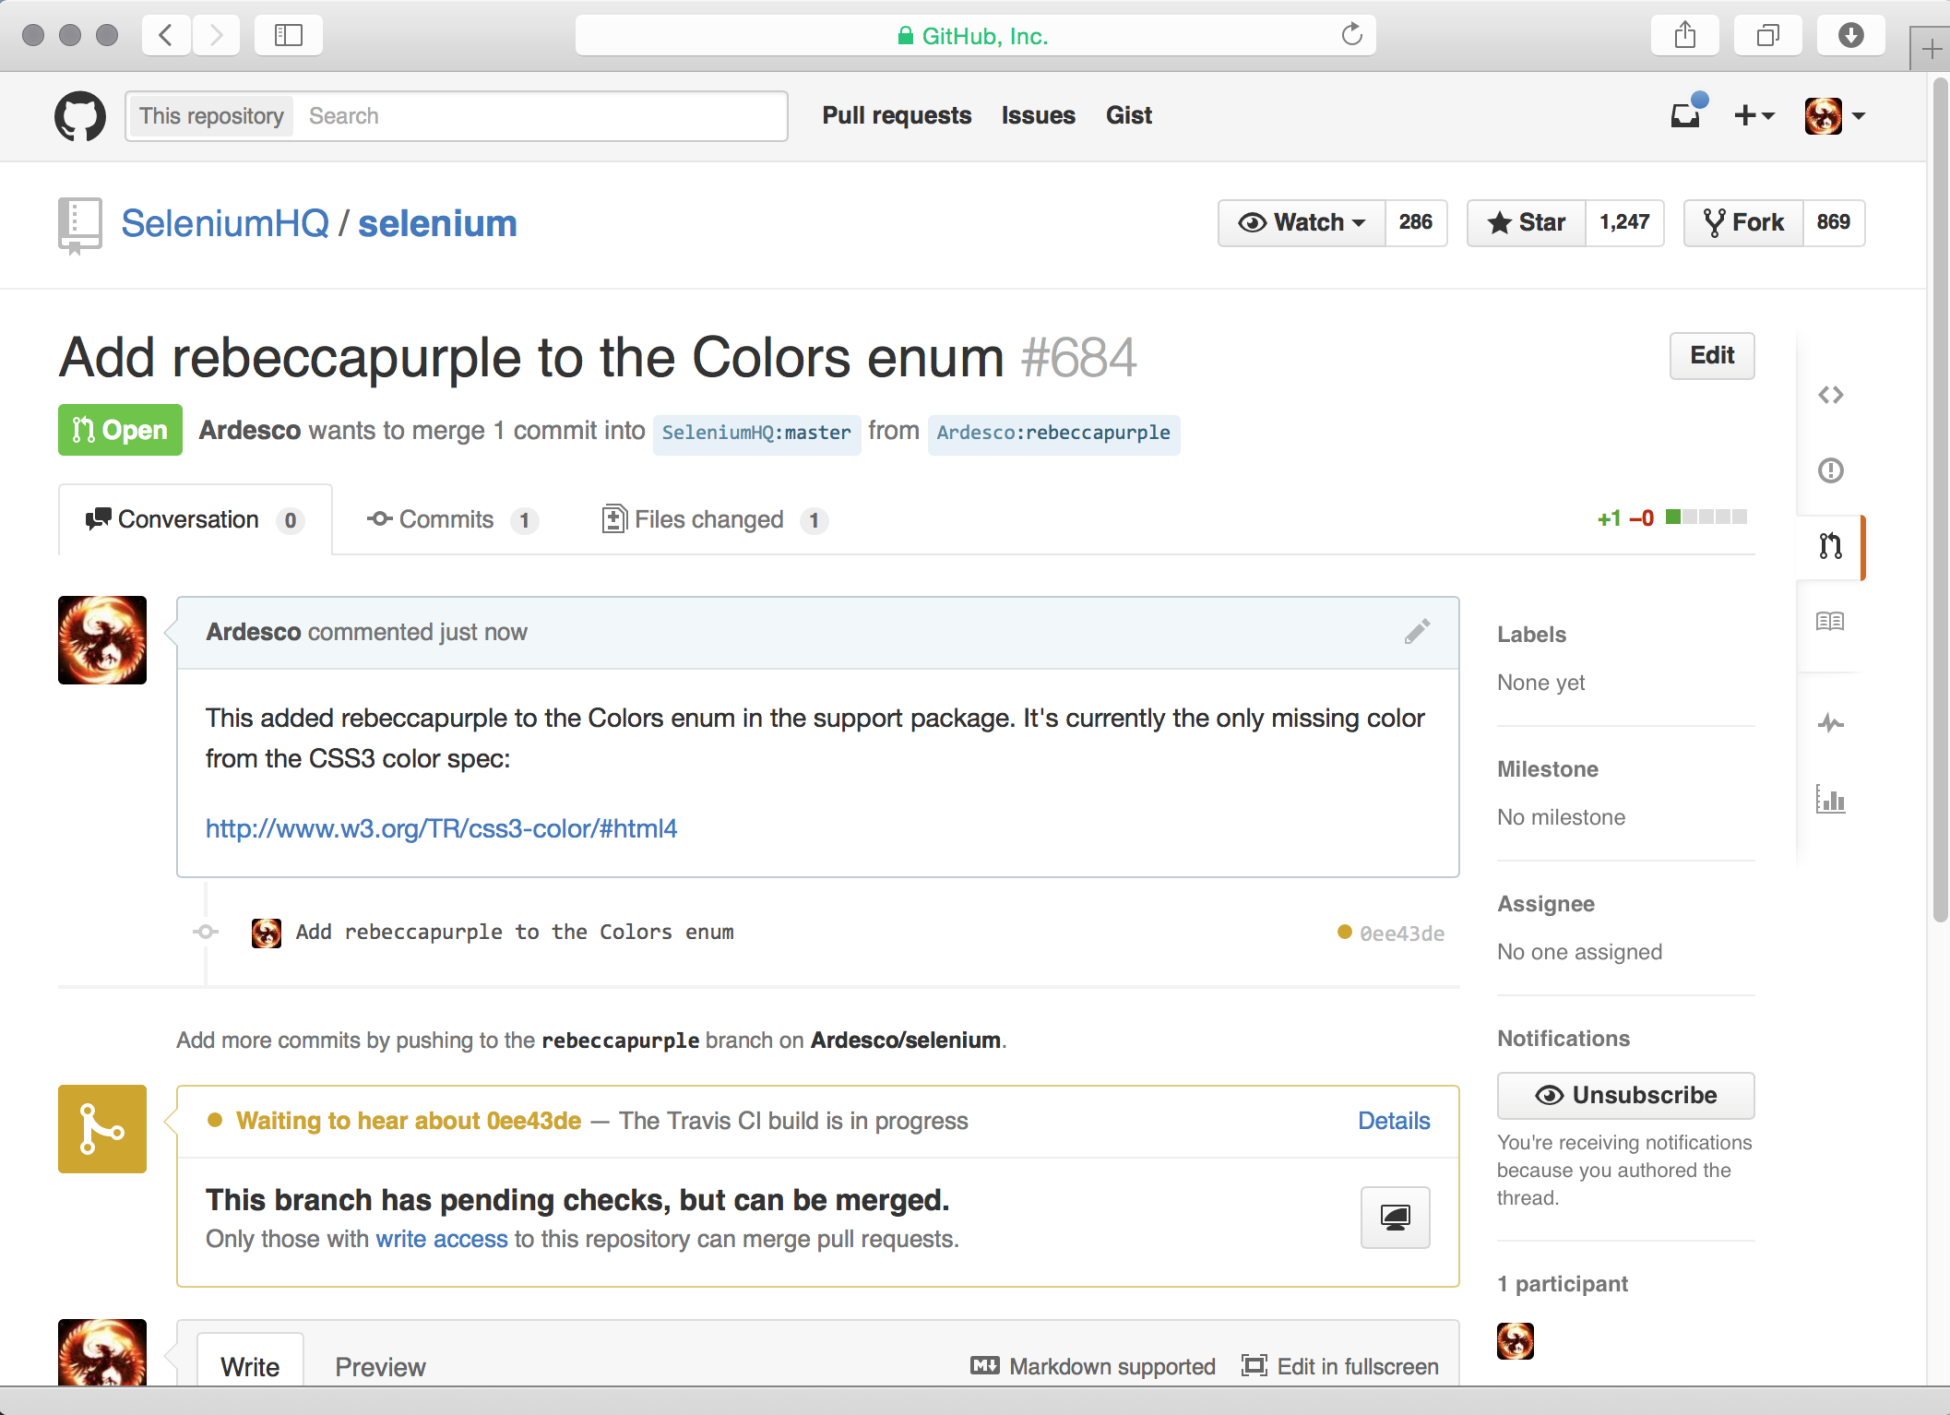
When this is complete, it's all ready to be merged. You can sit back and wait, or jump into the #selenium IRC channel and check whether you can find a core committer.
Keeping your history clean
Selenium is a large project with lots of contributors. Due to this, there are lots of commits happening all the time. To keep the commit history clean, the developers try to ensure that each pull request that they merge into the main branch is just a single commit. We didn't have a problem with our change, because it was very simple. However, if you have made some quite far-reaching changes and have many commits, you will probably find out that you have some tidying up to do.
First of all, don't worry. It's not a big problem. GIT has the ability to squash these multiple commits into one change. Let's have a look at how we can do this. We will start off with a project that has four commits that we want to squash into one:
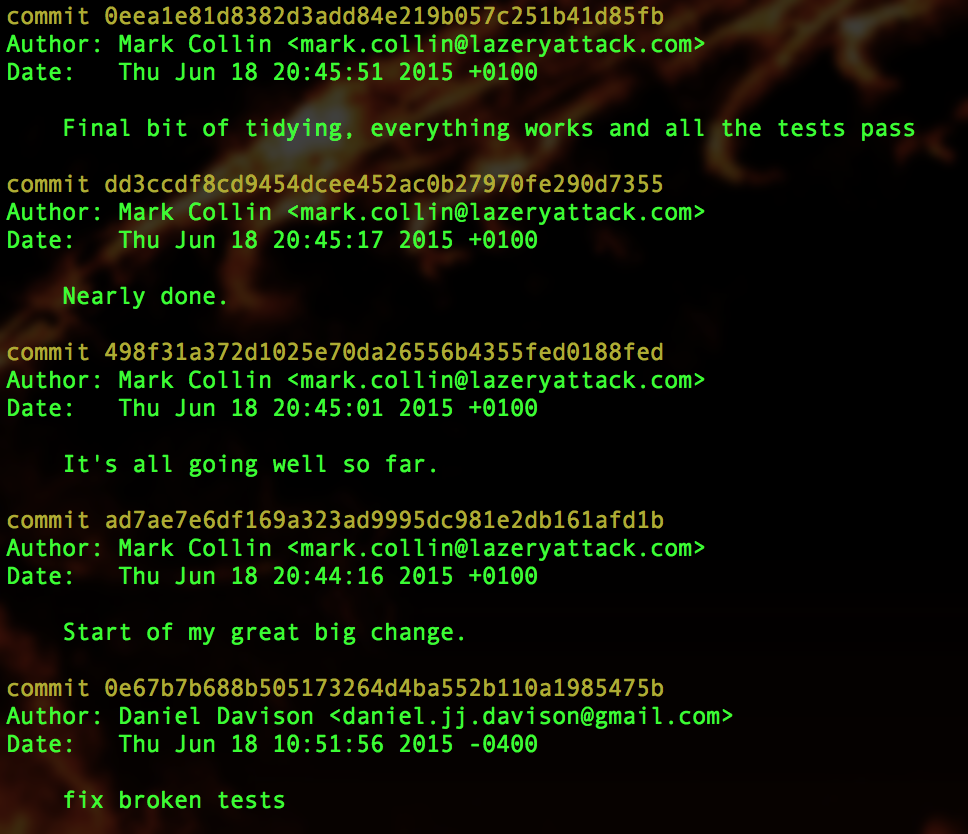
Our four initial commits
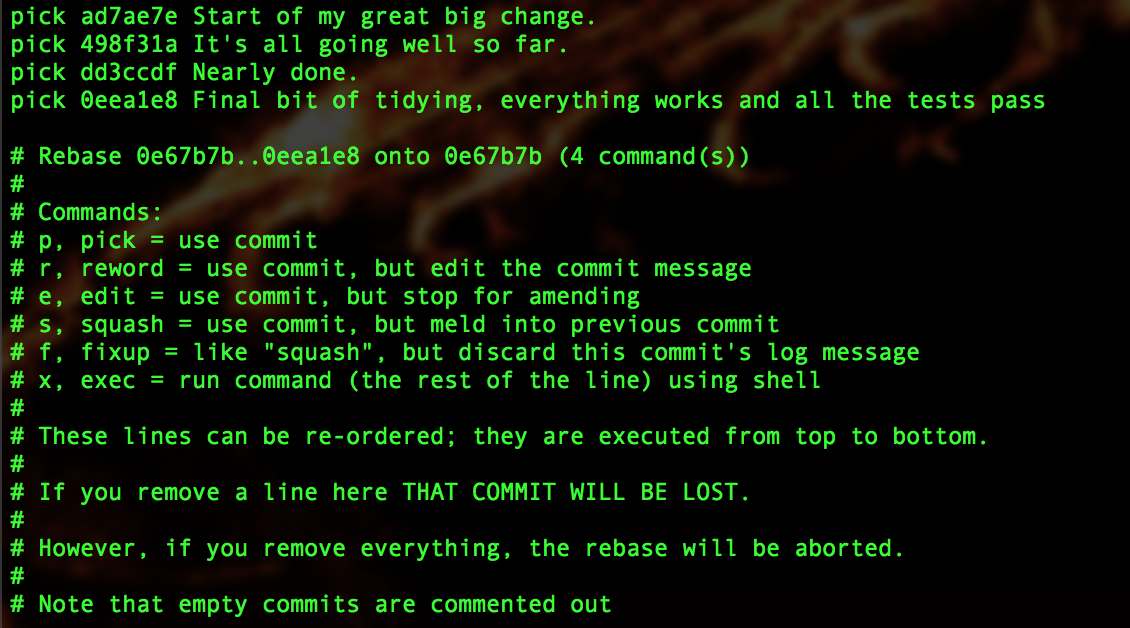
We know that we have four commits. So, we are going to use the rebase command to interactively change these four commits and squash them into one, as follows:
git rebase -i HEAD~4When you use the rebase command, Git will take the commits that you are interested in, show a screen that lists the commits, and ask what you want to do with them.
Note
You may want to get hold of a VI cheat sheet from the internet at this point. If you are not used to VI, it can be quite frustrating. A reasonably good one is available at http://www.viemu.com/vi-vim-cheat-sheet.gif.
We now need to tell Git to squash all the commits into just one commit. The commit at the top of the file was the original one. So, this is the one that we are going to leave as it is. The other commits will be squashed into this original commit:
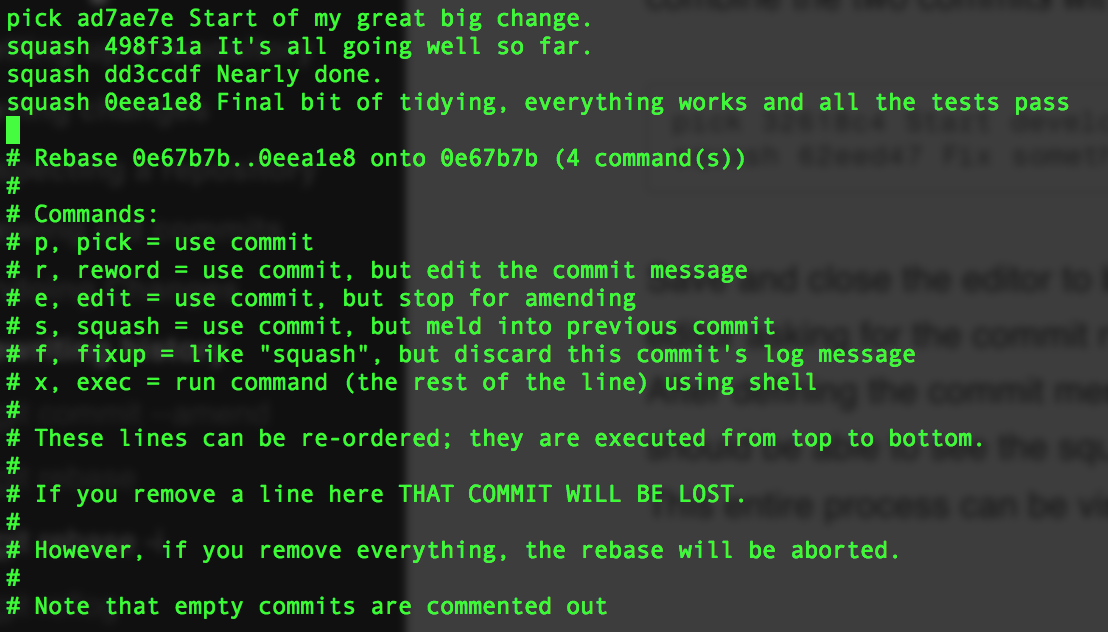
Now, we just need to save our changes. The easiest way to do this is by holding down Shift and pressing Z twice. You will then be presented with a screen asking you to specify a commit message for your newly squashed commit. You can either join together all the old commit messages, or you can use a completely new one:
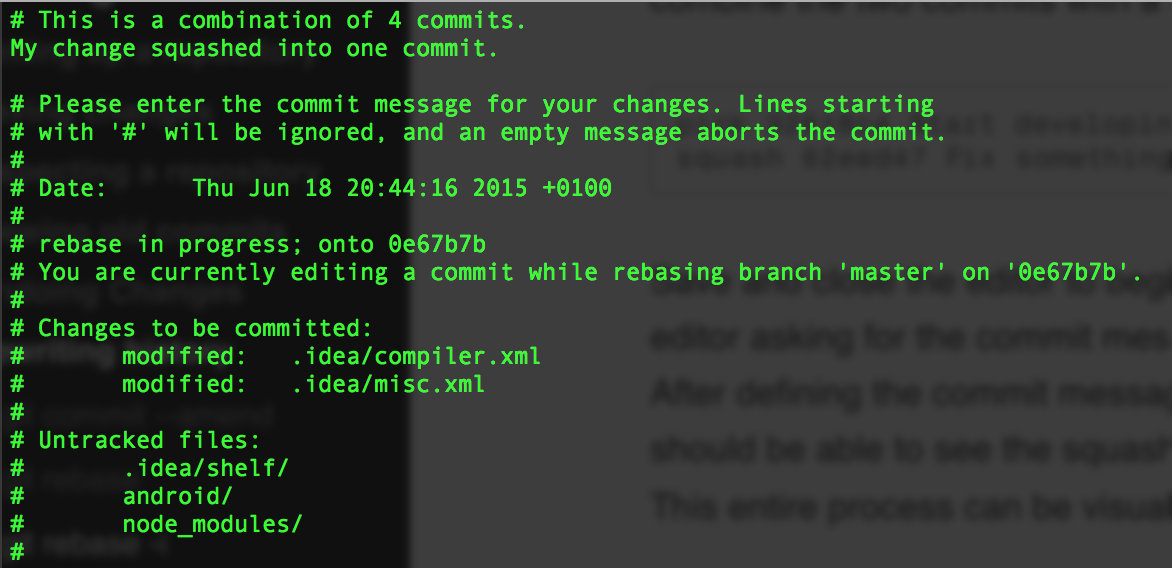
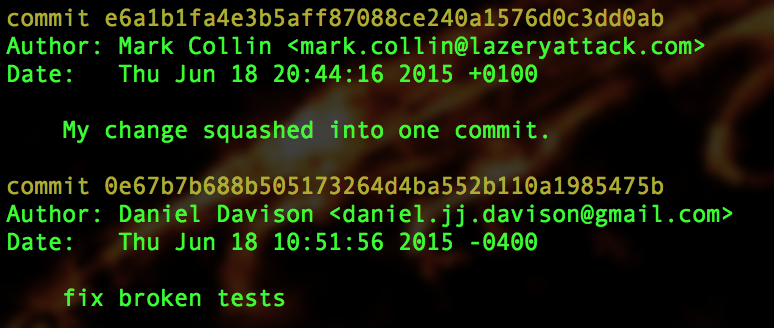
Again, we need to save our changes. Hold down Shift and press Z twice again. We have now squashed all the changes into one commit. We can check whether the whole process worked by checking out git log again:
Now that we have just the one change, let's push this to GitHub so that we can make our pull request, as follows:
git pushIf you pushed the four commits to GitHub before you squashed your history, the push was probably rejected. It was rejected because rewriting the history for your code base can cause problems if somebody else is also using your repository and they have already pulled the latest revision of code.
In our case, we don't have to worry about this problem because nobody else is using our branch. To get the code pushed up to GitHub, we will force push, as follows:
git push -fNow that our code has been pushed up to our fork on GitHub, we are ready to raise another pull request.
Now it's your turn
All in all, the commit process is quite simple. So, why don't you make some changes and submit a pull request right now? The Selenium developers have added a filter to the bug tracker on GitHub to identify the bugs that look like they may be quite simple.
These bugs are good candidates for people who want to work on the Selenium code base but aren't sure where to start. Have a look at https://github.com/SeleniumHQ/selenium/issues?q=is%3Aopen+is%3Aissue+label%3AE-easy.