Search icon CANCEL
Subscription
0
Cart icon
Your Cart (0 item)
Close icon
You have no products in your basket yet
Save more on your purchases! discount-offer-chevron-icon
Savings automatically calculated. No voucher code required.
Arrow left icon
All Products
Best Sellers
New Releases
Books
Videos
Audiobooks
Learning Hub
Newsletter Hub
Free Learning
Arrow right icon
timer SALE ENDS IN
0 Days
:
00 Hours
:
00 Minutes
:
00 Seconds
Arrow up icon
GO TO TOP
Learning Lego Mindstorms EV3

You're reading from   Learning Lego Mindstorms EV3 Build and create interactive, sensor-based robots using your LEGO MINDSTORMS EV3 kit

Arrow left icon
Product type Paperback
Published in Jan 2015
Publisher
ISBN-13 9781783985029
Length 284 pages
Edition 1st Edition
Arrow right icon
Author (1):
Arrow left icon
 Garber Garber
Author Profile Icon Garber
Garber
Arrow right icon
View More author details
Toc

Table of Contents (19) Chapters Close

Learning LEGO MINDSTORMS EV3
Credits
About the Author
About the Reviewers
www.PacktPub.com
Preface
1. Engineering Notebook FREE CHAPTER 2. Mechanical Design 3. Drive Train and Chassis 4. Sensors and Control 5. Interacting with EV3 6. Output from EV3 7. Advanced Programming 8. Advanced Programming and Control 9. Experiment Software and Data Logging 10. Other Programming Languages 11. Communication between Robots 12. Advanced Robot – Gyro Boy Index

Tread-bot with the Educational kit


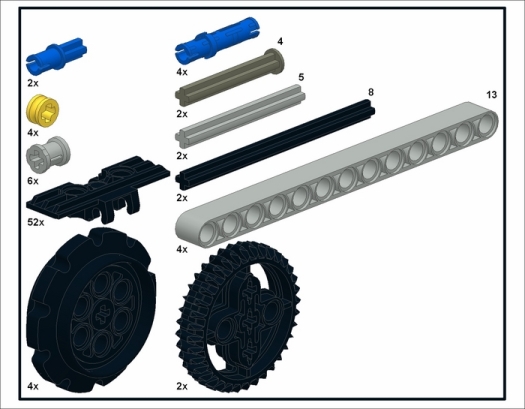
Conversely, the treads with the Educational Edition of the Kit are multiple pieces that are linked together. Thus, you can make tank treads of different lengths. In addition to the hubs and pins seen in the Bill of Materials, you will need almost all of the links in your EV3 kit to make this tread-bot. For each tread assembly, you will need 26 links for a total of 52 links.

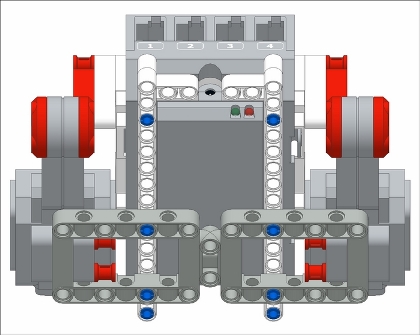
Start by flipping your chassis upside down:

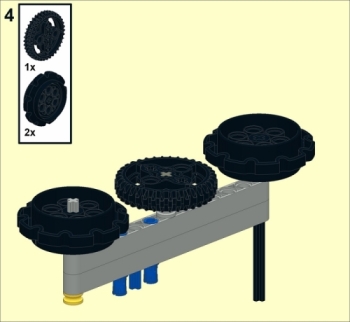
You will need to make two of the following submodels. You will need to build one tread assembly for each side of the robot. Insert axles and pins into the 13-mod beams and secure them into place using bushings, as shown in the following screenshot:

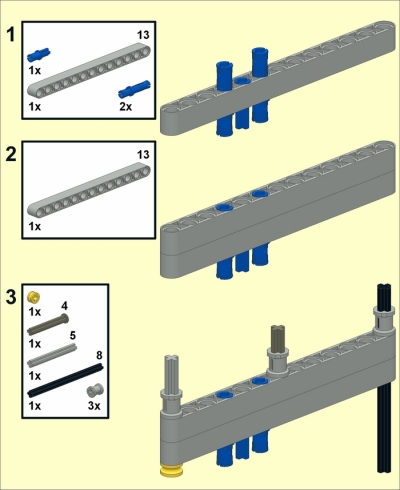
Next, attach the chain hubs to the outer axles and the double-bevel gear to the central axles. The gear is about the same size as the hubs, so the treads will be level.

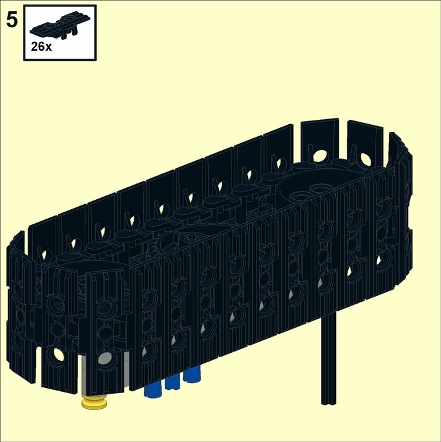
To finish each submodel, add 26-tread links onto each tread assembly:

Now, you can attach the tread assemblies onto the chassis. The...

lock icon The rest of the chapter is locked
Register for a free Packt account to unlock a world of extra content!
A free Packt account unlocks extra newsletters, articles, discounted offers, and much more. Start advancing your knowledge today.
Unlock this book and the full library FREE for 7 days
Get unlimited access to 7000+ expert-authored eBooks and videos courses covering every tech area you can think of
Renews at $15.99/month. Cancel anytime
Visually different images