Search icon CANCEL
Subscription
0
Cart icon
Your Cart (0 item)
Close icon
You have no products in your basket yet
Save more on your purchases! discount-offer-chevron-icon
Savings automatically calculated. No voucher code required.
Arrow left icon
All Products
Best Sellers
New Releases
Books
Videos
Audiobooks
Learning Hub
Newsletter Hub
Free Learning
Arrow right icon
timer SALE ENDS IN
0 Days
:
00 Hours
:
00 Minutes
:
00 Seconds
Arrow up icon
GO TO TOP
Learning Jupyter

You're reading from   Learning Jupyter Select, Share, Interact and Integrate with Jupyter Notebook

Arrow left icon
Product type Paperback
Published in Nov 2016
Publisher Packt
ISBN-13 9781785884870
Length 238 pages
Edition 1st Edition
Languages
Tools
Arrow right icon
Author (1):
Arrow left icon
 Toomey Toomey
Author Profile Icon Toomey
Toomey
Arrow right icon
View More author details
Toc

Table of Contents (16) Chapters Close

Learning Jupyter
Credits
About the Author
About the Reviewer
www.PacktPub.com
Preface
1. Introduction to Jupyter FREE CHAPTER 2. Jupyter Python Scripting 3. Jupyter R Scripting 4. Jupyter Julia Scripting 5. Jupyter JavaScript Coding 6. Interactive Widgets 7. Sharing and Converting Jupyter Notebooks 8. Multiuser Jupyter Notebooks 9. Jupyter Scala 10. Jupyter and Big Data

Installing the Scala kernel


There is currently no process for installing the Scala kernel in a Windows environment. I'm not sure why. I expect this to change over time.

The steps for Mac OS/X are given here (taken from https://developer.ibm.com/hadoop/2016/05/04/install-jupyter-notebook-spark):

  1. Install GIT using this:

    yum install git
    
  2. Copy the Scala package locally:

    git clone https://github.com/alexarchambault/jupyter-scala.git
    
  3. Install the sbt build tool by running this:

    sudo yum install sbt
    
  4. Move to the Scala package directory:

    cd jupyter-scala
    
  5. Build the package:

    sbt cli/packArchive
    
  6. To launch the Scala shell, use this command:

    ./jupyter-scala
    
  7. Check the kernels installed by running this command: (you should see Scala in the list now):

     jupyter kernelspec list
    
  8. Launch the Jupyter Notebook:

    jupyter notebook
    
  9. You can now choose to use a Scala 2.11 shell.

    At this point, if you start Jupyter, you will see the choice for Scala listed:

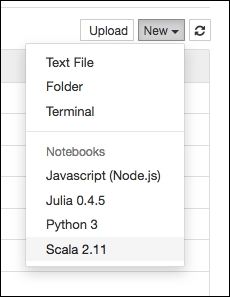
If we create a Scala notebook, we end up with the familiar layout...

lock icon The rest of the chapter is locked
Register for a free Packt account to unlock a world of extra content!
A free Packt account unlocks extra newsletters, articles, discounted offers, and much more. Start advancing your knowledge today.
Unlock this book and the full library FREE for 7 days
Get unlimited access to 7000+ expert-authored eBooks and videos courses covering every tech area you can think of
Renews at $15.99/month. Cancel anytime
Visually different images