Getting started with GCP
Getting started on the GCP is pretty much straightforward. All you really need is a Google account. Go to https://cloud.google.com/, log in with your Google account, and follow the instructions. Add your billing information as needed. This gives you access to the web-based UI of the GCP. We'll cover command line and shell accessibility and related SSH key creation in the next chapter.
Note
Free trialsAt the time of writing this, Google has a pretty generous free trial offer with a 12-month period and a credit of $300 for new accounts. There are, however, limitations on some services. For instance, you cannot launch the Google Compute Engine VM instances with more than eight CPUs and you are limited in the number of projects you create, though you can request more than your allocated quota. There is no SLA. Using Google Cloud services for activities such as bitcoin mining is not allowed. Once you upgrade your account, these limitations no longer apply and the money left out of the initial $300 is credited to your account. More information on the free trial offer is available at https://cloud.google.com/free/docs/frequently-asked-questions.
Project-based organization
One key aspect of the GCP is its project-centered organization. All billing, permissions, resources, and settings are grouped within a user-defined project, which basically acts as a global namespace. It is simply not possible to launch a resource without specifying the project it belongs to first.
Each one of these projects has:
- A project name, which you choose.
- A project ID, suggested by GCP but editable. The project ID is used by API calls and resources within the project.
- A project number, which is provided by the GCP.
Both the project ID and project numbers are unique across all GCP projects. The project organization has several straightforward benefits:
- As resources are dedicated to a single project, budget allocation and billing are simplified
- As the resources allocated to a project are subject to the same regions-and-zones rules and share the same metadata, operations and communications between them work seamlessly
- Similarly, access management is coherent across a single project, limiting the overall complexity of access control
Project-based organization greatly simplifies the management of your resources and is a key aspect of what makes the GCP quite easy to work with.
Creating your first project
To create a new project:
- Go to the resource management page, https://console.cloud.google.com/cloud-resource-manager.
- Click on
CREATE PROJECT. - Write down your project title and notice how Google generates a project ID on the fly. Edit it as needed.
- Click on
Create. - You are redirected to the
Rolesection of the IAM service.
Roles and permissions
By default, when you create a new project, your Google account is set as the owner of the project with full permissions and access across all the project's resources and billing. In the roles section of the IAM page, https://console.cloud.google.com/iam-admin/roles/, you can add people to your project and define the role for that person. You can also create new custom roles on a service-by-service basis or allocate predefined roles organized by the services.
- Go to the IAM page and select the project you just created, if it's not already selected: https://console.cloud.google.com/iam-admin/iam/project. You should see your Google account email as the owner of the project.
- To add a new person to the project:
- Click on
+ ADD. - Input the person's Google account email (it has to correspond to an active Google account).
- Select all the roles for that person, as shown in the following screenshot:
- Click on
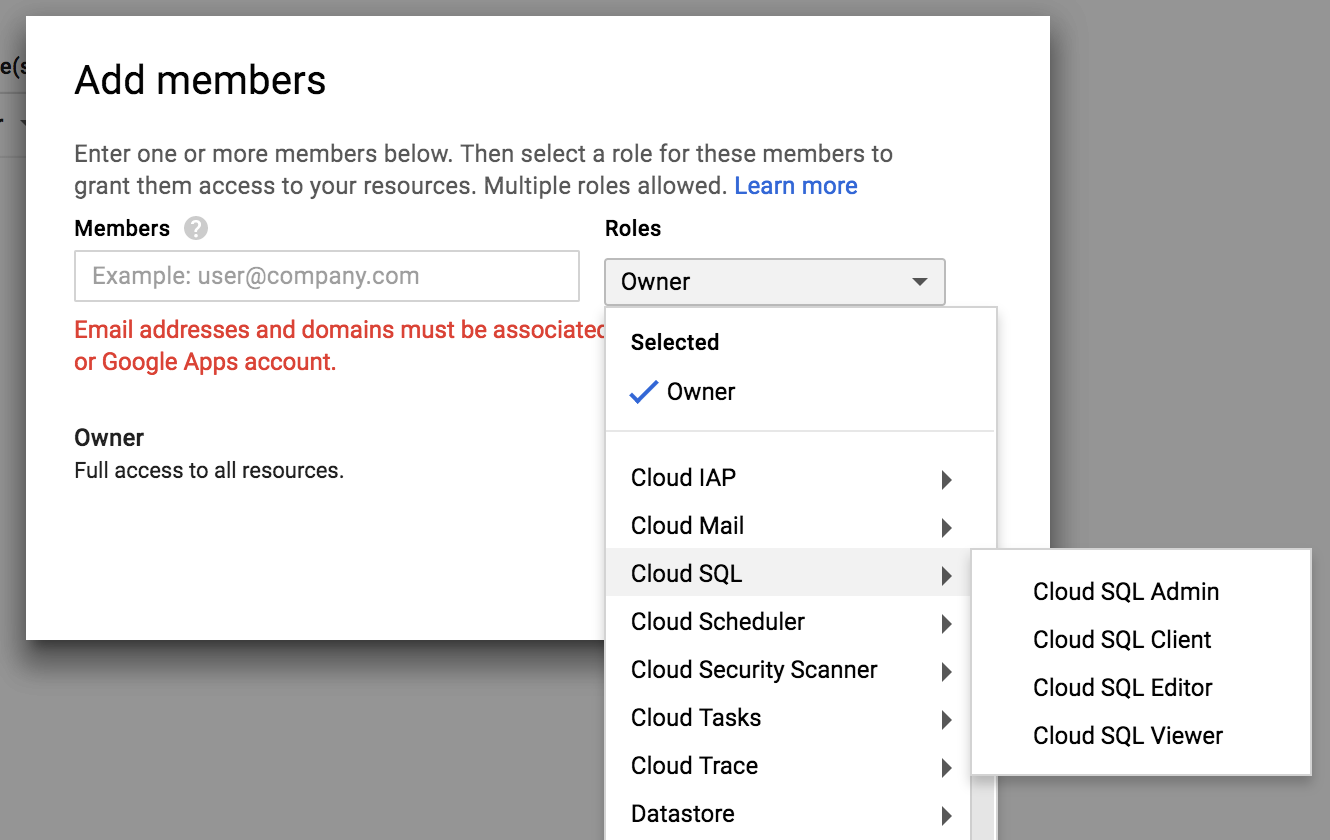
The role menu is organized by services and administrative domain (billing, logging, and monitoring), and for each service, by level of access. Although this differs depending on the service, you can roughly choose between four types of roles:
- Admin: Full control over the resources
- Client: Connectivity access
- Editor/creator: Full control except for user management, SSL certificates, and deleting instances
- Viewer: Read-only access
You can also create new custom made roles from the roles IAM page at https://console.cloud.google.com/iam-admin/roles/project?project=packt-gcp.
As you allocate new resources to your project, the platform creates the adequate and required roles and permissions between the services. You can view and manage these access permissions and associated roles from the info panel on the right of the manage resource page or the IAM page for the given project. Google does a great job of generating the right access levels, which makes the platform-user's life easier.
Note
Our Google Cloud projectFor this book I created the packt-gcp project. Since the name was unique across all other GCP projects, the project ID is also packt-gcp. And all the resources are created in the us-central1 zone.