Search icon CANCEL
Subscription
0
Cart icon
Your Cart (0 item)
Close icon
You have no products in your basket yet
Save more on your purchases! discount-offer-chevron-icon
Savings automatically calculated. No voucher code required.
Arrow left icon
All Products
Best Sellers
New Releases
Books
Videos
Audiobooks
Learning Hub
Newsletter Hub
Free Learning
Arrow right icon
timer SALE ENDS IN
0 Days
:
00 Hours
:
00 Minutes
:
00 Seconds
Arrow up icon
GO TO TOP
Extending Microsoft Dynamics NAV 2016 Cookbook

You're reading from   Extending Microsoft Dynamics NAV 2016 Cookbook Extend Dynamics NAV 2016 to win the business world

Arrow left icon
Product type Paperback
Published in Jan 2017
Publisher Packt
ISBN-13 9781786460608
Length 458 pages
Edition 1st Edition
Languages
Arrow right icon
Author (1):
Arrow left icon
Alexander Drogin Alexander Drogin
Author Profile Icon Alexander Drogin
Alexander Drogin
Arrow right icon
View More author details
Toc

Table of Contents (17) Chapters Close

Extending Microsoft Dynamics NAV 2016 Cookbook
Credits
About the Author
About the Reviewer
www.PacktPub.com
Customer Feedback
Preface
1. Writing Basic C/AL Code FREE CHAPTER 2. Advanced C/AL Development 3. Reporting and Data Analysis 4. .NET Interoperability in C/AL 5. Extending C/AL with COM Components 6. SharePoint Integration 7. Control Add-ins 8. Web Services 9. Events and Extension Packages 10. PowerShell

Configuring user permissions


User authentication in NAV is performed by the NAV server, no matter whether the application is accessed from a role-tailored client, web client, or if it is published on a SharePoint site. SharePoint can control user access to its content--read applications, and list and execute an application, while NAV authentication requests will be redirected to the NAV server.

In this recipe, we will set up a user account that will be able to run NAV applications published on a SharePoint portal.

How to do it...

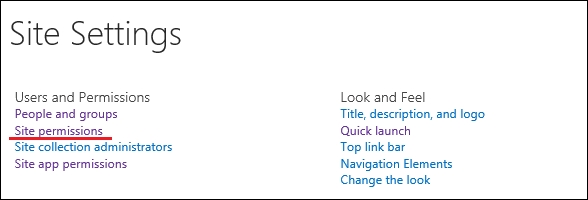
  1. Open the Settings menu and click Site Settings. On the Site Settings page, open Site permissions as shown:

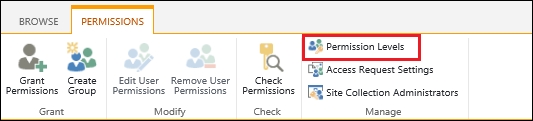
  2. To create a permission level, click Permission Levels in the PERMISSIONS menu:

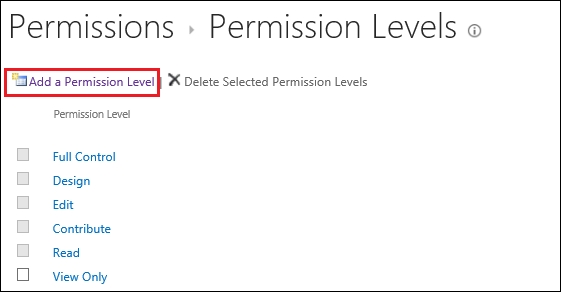
  3. SharePoint comes with a set of predefined permission levels that are listed in this page. To create a custom permission level, click Add a Permission Level:

  4. Enter the name of the new permission level (AppUsers) and a description. In the list of permissions, check the View Application...

lock icon The rest of the chapter is locked
Register for a free Packt account to unlock a world of extra content!
A free Packt account unlocks extra newsletters, articles, discounted offers, and much more. Start advancing your knowledge today.
Unlock this book and the full library FREE for 7 days
Get unlimited access to 7000+ expert-authored eBooks and videos courses covering every tech area you can think of
Renews at $15.99/month. Cancel anytime
Visually different images