Using the Arduino IDE
The Arduino IDE provides an easy way to write sketches for Arduino and other development boards. You can use ESP8266 with the Arduino IDE. First, install the ESP8266 board package on Arduino IDE.
The ESP8266 also supports the following development environments:
- Use a simple Notepad/GCC setup
- Fine-tune an Eclipse environment
- Use a virtual machine provided by Espressif
Installing the Arduino core for an ESP8266 Wi-Fi chip
The Arduino core for ESP8266 includes a set of libraries to do the following things with your ESP8266 Wi-Fi module:
- Communicate over Wi-Fi using TCP and UDP protocols
- Set up HTTP, mDNS, SSDP, and DNS servers
- Perform OTA updates
- Use a filesystem in flash memory
- Work with SD cards, servos, SPI, and I2C peripherals
It also allows you to write sketches for ESP8266 with the core Arduino functions and libraries. You can run the sketches directly on ESP8266 without using an external microcontroller board:
- Open the Arduino IDE and on the menu bar select
File|Preferences.
- Type the URL
http://arduino.esp8266.com/stable/package_esp8266com_index.jsonfor the ESP8266 board manager package for Arduino in theAdditional Boards Manager URLstext box and click onOKto close the dialog box (Figure 1.9):

Figure 1.9: The Arduino IDE preferences
- Open the
Boards Managerby selectingTools|Board|Boards Manager. You should see a new entry in the list titledesp8266 by ESP8266 Community(Figure 1.10):
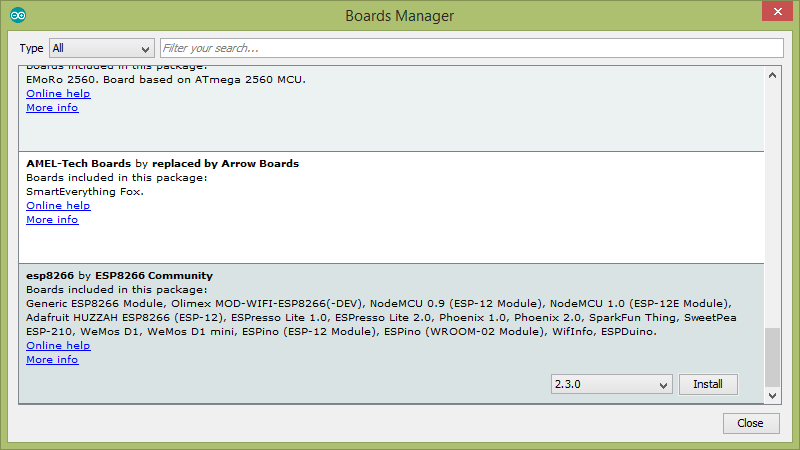
Figure 1.10: The Arduino IDE Boards Manager
- At the time of this writing, the Arduino core for ESP8266 Wi-Fi chip supports the following boards:
- Generic ESP8266 Module
- Olimex MOD-WIFI-ESP8266(-DEV)
- NodeMCU 0.9 (ESP-12 Module)
- NodeMCU 1.0 (ESP-12E Module)
- Adafruit HUZZAH ESP8266 (ESP-12)
- ESPresso Lite 1.0
- ESPresso Lite 2.0
- Phoenix 1.0
- Phoenix 2.0
- SparkFun Thing
- SweetPea ESP-210
- WeMos D1
- WeMos D1 mini
- ESPino (ESP-12 Module)
- ESPino (WROOM-02 Module)
- WifInfo
- ESPDuino
- Click on the
Installbutton to install it on your Arduino IDE. This will take a few minutes to install, depending on your internet speed. - Click on
Closeto close theBoards Managerdialog box. - Select
Tools|Board: "Generic ESP8266 Module"|Generic ESP8266for board type. - The upload speed should be 115200; however, you can increase it to a higher value by clicking on
Tools | Upload Speedand selecting a value greater than 115200.
Hello world
Now, you will write your first program (sketch) for ESP8266 with the Arduino IDE to blink a LED connected to PIN 2 of ESP8266.
You'll need the following things to build the circuit:
- One LED (any color)
- One 1 kilo ohm resistor
- 3V regulated power supply
Connect the components together, as shown in Figure 1.11:
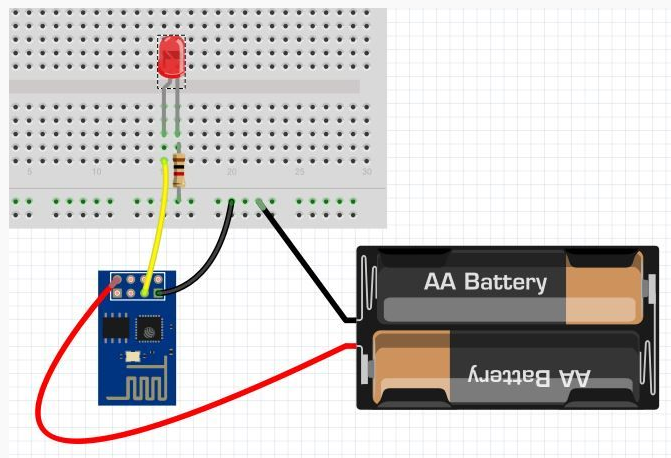
Figure 1.11: The LED blink circuit hook up
Listing 1-1 – Blink a LED
Using your Arduino IDE, type the code as shown in the Listing 1-1:
#define ESP8266_LED 2void setup() { pinMode(ESP8266_LED, OUTPUT);}void loop() { digitalWrite(ESP8266_LED, HIGH);delay(500);digitalWrite(ESP8266_LED, LOW);delay(500);}
Then, verify the sketch by clicking on the Verify button. Finally, upload the program by clicking on the Upload button. This will take a few seconds to complete. After completing the flashing, the LED will start to blink.