(For more resources related to this topic, see here.)
Concept of reusability
The concept of reusability has its roots in the production process. Typically, most of us go about creating e-learning using a process similar to what is shown in the following screenshot. It works well for large teams and the one man band, except in the latter case, you become a specialist for all the stages of production. That's a heavy load. It's hard to be good at all things and it demands that you constantly stretch and improve your skills, and find ways to increase the efficiency of what you do.

Reusability in Storyline is about leveraging the formatting, look and feel and interactions you create so that you can re-purpose your work and speed-up production. Not every project will be an original one-off, in fact most won't, so the concept is to approach development with a plan to repurpose 80 percent of the media, quizzes, interactions, and designs you create. As you do this, you begin to establish processes, templates, and libraries that can be used to rapidly assemble base courses. With a little tweaking and some minor customization, you'll have a new, original course in no time. Your client doesn't need to know that 80 percent was made from reusable elements with just 20 percent created as original, unique components, but you'll know the difference in terms of time and effort.
Leveraging existing assets
So how can you leverage existing assets with Storyline? The first things you'll want to look at are the courses you've built with other authoring programs, such as PowerPoint, QuizMaker Engage, Captivate, Flash, and Camtasia.
If there are design themes, elements, or interactions within these courses that you might want to use for future Storyline courses, you should focus your efforts on importing what you can, and further adjusting within Storyline to create a new version of the asset that can be reused for future Storyline courses. If re-working the asset is too complex or if you don't expect to reuse it in multiple courses, then using Storyline's web object feature to embed the interaction without re-working it in any way may be the better approach. In both cases, you'll save time by reusing content you've already put a lot of time in developing.
Importing external content
Here are the steps to bring external content into Storyline:
- From the Articulate Startup screen or by choosing the Insert tab, and then New Slide within a project, select the Import option.
- There are options to import PowerPoint, Quizmaker, and Storyline. All of these will display the slides within the file to be imported. You can pick and choose which slides to import into a new or the current scene in Storyline.
- The Engage option displays the entire interaction that can be imported into a single slide in the current or a new scene.
- Click on Import to complete the process.
Considerations when importing
Keep the following points in mind when importing:
- PowerPoint and Quizmaker files can be imported directly into Storyline. Once imported, you can edit the content like you would any other Storyline slide. Master slides come along with the import making it simple to reuse previous designs. Note that 64-bit PowerPoint is not supported and you must have an installed, activated version of Quizmaker for the import to work.
The PowerPoint to Storyline conversion is not one-to-one. You can expect some alignment issues with slide objects due to the fact that PowerPoint uses points and Storyline uses pixels. There are 2.66 pixels for each point which is why you'll need to tweak the imported slides just a bit. Same with Quizmaker though the reason why is slightly different; Quizmaker is 686 x 424 in size, whereas Storyline is 720 x 540 by default.
Unlock access to the largest independent learning library in Tech for FREE!
Get unlimited access to 7500+ expert-authored eBooks and video courses covering every tech area you can think of.
Renews at $15.99/month. Cancel anytime
- Engage files can be imported into Storyline and they are completely functional, but cannot be edited within Storyline. Though the option to import Engage appears on the Import screen, what Storyline is really doing is creating a web object to contain the Engage interaction. Once imported into a new scene, clicking on the Engage interaction will display an Options menu where you can make minor adjustments to the behavior of the interaction as well as Preview and Edit in it Engage. You can also resize and position the interaction just as you would any web object. Remember that though web objects work in iPad and HTML5 outputs, Engage content is Flash, so it will not playback on an iPad or in an HTML5 browser. Like Quizmaker, you'll need an installed, activated version of Engage for the import to work.
- Flash, Captivate, and Camtasia files cannot be imported in Storyline and cannot be edited within Storyline. You can however, use web objects to embed these projects into Storyline or the Insert Flash option. In both cases, the imported elements appear seamless to the learner while retaining full functionality.

Build once, and reuse many times
Quizzing is at the heart of many e-learning courses where often the quiz questions need to be randomized or even reused in different sections of a single course (that is, the same questions for a pre and post-test). The concept of building once and reusing many times works well with several aspects of Storyline. We'll start with quizzing and a feature called Question Banks as follows:
Question Banks
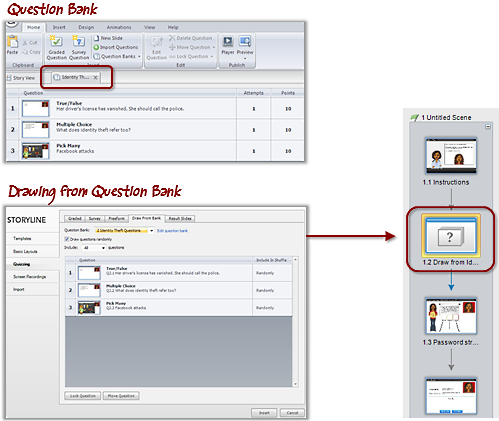
Question Bank offers a way to pool, reuse, and randomize questions within a project. Slides in a question bank are housed within the project file but are not visible until placed into the story. Question Banks can include groups of quiz slides and regular slides (that is, you might include a regular slide if you need to provide instructions for the quiz or would like to include a post-quiz summary).
When you want to include questions from a Question Bank, you just need to insert a new Quizzing slide, and then choose Draw from Bank . You can then select one or more questions to include and randomize them if desired.
Follow along…
In this exercise we will be removing three questions from a scene and moving them into a question bank. This will allow you to draw one or more of those questions at any point in the project where the quiz questions are needed, as follows:
- From the Home tab, choose Question Banks , and then Create Question bank . Title this Identity Theft Questions .
- Notice that a new tab has opened in Normal View . The Question Bank appears in this tab. Click on the Import link and navigate to question slides 2, 3, and 4. From the Import drop-down menu at the top, select move questions into question bank .
- Click on the Story View tab and notice the three slides containing the quiz questions are no longer in the story. Click back on the Identity Theft tab and notice that they are located here. The questions will not become a part of the story until the next step, when you draw them from the bank.
- In Story View, click once on slide 1 to select it, and then from the Home tab, choose Question Banks and New Draw from Question Bank .
- From the Question Bank drop-down menu, select Identity Theft Questions . All questions will be selected by default and will be randomized after being placed into the story. This means that the learner will need to answer three questions before continuing onto the next slide in the story. Click on Insert .
- The Question Bank draw has been inserted as slide 2. To see how this works, Preview the scene.
- Save as Exercise 11 – Identity Theft Quiz.

There are multiple ways to get back to the questions that are in a question bank. You can do this by selecting the tab the questions are located in (in this case, Identity Theft ), you can view the question bank slide in Normal View or choose Question Banks from the Home tab and navigate to the name of the question bank you'd like to edit.
 United States
 Great Britain
 India
India
 Germany
 France
 Canada
 Russia
 Spain
Spain
 Brazil
 Australia
 South Africa
 Thailand
 Ukraine
 Switzerland
 Slovakia
 Luxembourg
 Hungary
 Romania
 Denmark
 Ireland
 Estonia
 Belgium
 Italy
Italy
 Finland
 Cyprus
 Lithuania
 Latvia
 Malta
Malta
 Netherlands
 Portugal
 Slovenia
 Sweden
 Argentina
 Colombia
 Ecuador
 Indonesia
 Mexico
 New Zealand
 Norway
 South Korea
 Taiwan
 Turkey
 Czechia
 Austria
 Greece
 Isle of Man
 Bulgaria
 Japan
Japan
 Philippines
 Poland
 Singapore
 Egypt
Egypt
 Chile
Chile
 Malaysia


