Creating NAT on EC2 instance
In this recipe, you'll learn how to create a NAT instance on EC2 instances created in a public subnet. The private subnet does not have any Internet Gateway attached to it, so EC2 on private subnet cannot directly communicate with the outside world.
Getting ready
We need an AWS account and user with proper permissions for creating a NAT instance on EC2. Create an EC2 in the same way as the previous recipe. The only difference is, you don't put any Advanced Details in the Choose Network page. In the security group page, create NATSG security group and attach the same with instance with the following rules. We are allowing all traffic for simplicity. However, you should only put the required CIDR ranges.
NATSG: Rules
Inbound | |||
Type | Protocol | Port range | Source |
HTTP | TCP |
| 0.0.0.0/0 and ::/0 |
HTTPS | TCP |
| 0.0.0.0/0 and ::/0 |
SSL | TCP |
| 0.0.0.0/0 and ::/0 |
Outbound | |||
Destination | Protocol | Port range | Comments |
All traffic | TCP | ALL | 0.0.0.0/0 and ::/0 |
You can use the same key pair created before for this instance as well. In the Add tag page, put Nat Instance in value for Name and Key. We also need to create an Elastic IP for attaching it to a NAT instance. This we shall show in the recipe.
How to do it...
- I have created one more EC2 instance as visible in the
Instancessection of the EC2 console.

EC2 created for NAT
- Click on
Elastic IPsin the left menu bar.

Elastic IP dashboard
- Click on
Allocate new address.

Elastic IP creation page
- Click on
Allocate.

Elastic IP creation success message
- Click on
Close. The Elastic IP page will be visible. ChooseElastic IPand click onActions|Associate address.

Elastic IP Action menu
- Choose
Instancein theResource type. SelectNat Instancefrom theInstancedrop-down menu. Click onAssociate. A success message is shown.

Elastic IP association with EC2 instance
- Go to the
Instancesmenu. You can see that the public DNS and IPv4 public IP has changed. You can seeChange Source/Dest.Checkis true for the instance.

EC2 instance with Elastic IP
- Select
Actions|Networking|Change Source/Dest. Check.

Changing Source/Dest Check for NAT instance
- You can see that
Change Source/Dest. Checkis now false.

NAT instance details
- We need to update the main Route Table attached to the VPC. Let's go back to the VPC dashboard and select our VPC.

VPC dashboard
- Click on the
Route Tablesstarting withrtb.

Main Route Table
- Select the Route Table and navigate to the
Routestab. Click on theEditbutton. Add0.0.0.0/0in the destination and the NAT instance ID inTarget. ClickSave.
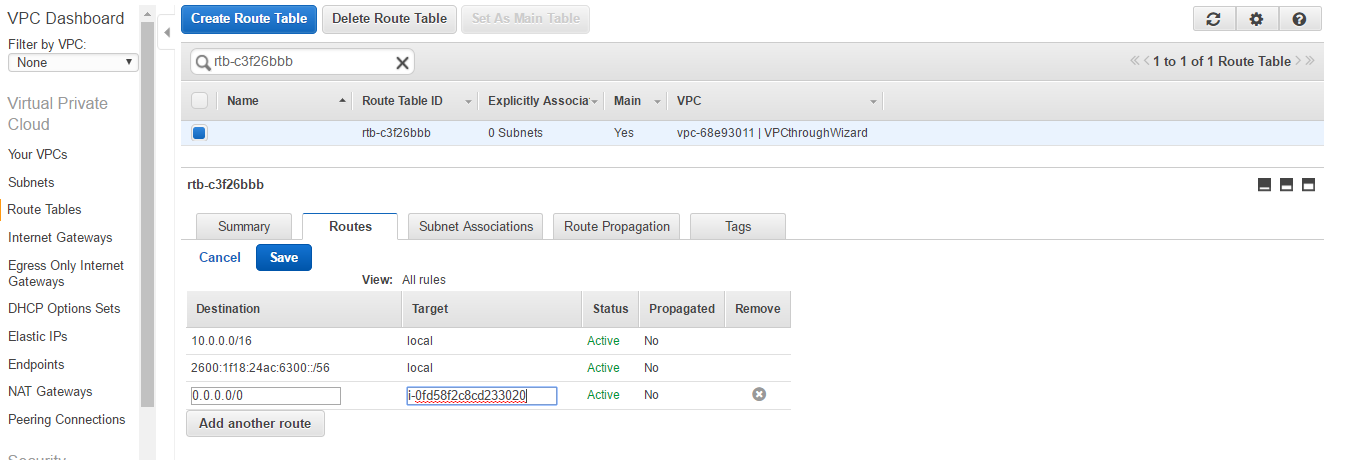
Attach NAT in main Route Table
How it works...
By default, EC2 instance can either be a source or destination for network traffic request or response. However, NAT instances need to forward requests to the internet that were originated from a private subnet and return the response back to them. That's why we need to disable the source destination check for NAT instance.
There's more...
NAT instance does not support IPv6. To support NAT for IPv6 we need to create an Egress-Only Internet Gateway from the VPC console and attach it to main Route Table.