
Setting up OpenGL using SDL on Windows
In this section, we'll discuss how to set up OpenGL on a Windows machine using SDL and GLEW. SDL stands for Simple DirectMedia Layer, and it allows us to create a render window and provides access to input devices through OpenGL. SDL is prominently used to code games and other media applications that run on various operating systems. It's a cross-platform multimedia library written in the C language. GLEW (OpenGL Extension Wrangler), as seen in the previous sections, allows us to easily use extensions and non-core OpenGL functionality.
Downloading the SDL library
We'll begin the setup by downloading the essential libraries. Let's first download the SDL library by following these steps:
- Visit http://libsdl.org/index.php, go to
Download, and click on the latest version; at the time of writing this book, SDL 2.0 was the latest version. - Once you have clicked on the latest version, you may either want to download the development libraries or the runtime libraries. For this project, it is recommended that you download
Development Libraries. - We'll go for the Visual C++ one, which is
SDL2-devel-2.0.8-VC.zip. Click on the filename and download it. - Once you've downloaded the file, unzip it and put it in the
SDLfolder inside theOpenGLfolder that we created in previous sections. - After downloading the SDL library, we move on to downloading the GLEW libraries, but as we've already downloaded them in the previous sections, you can just refer to that.
Note
If you want a quick review on downloading GLEW, you can refer to the Downloading the essential libraries section at the start of the chapter.
Setting up OpenGL using SDL and GLEW with absolute linking
Follow these steps to set up the environment in Visual Studio for OpenGL using SDL and GLEW with absolute linking:
- Open up Visual Studio and click on
Create new Project...in the home page window. - Go to
Visual C++|Windows Desktop|Windows Console Application, name your projectSDLOpenGL, and then clickOK. - Next, right-click on the project in the
Solution Explorerwindow. Click onProperties. - A
Property Pageswindow will pop up, click onC/C++|General, and then go toAdditional Include Directories. Click on the dropdown, then click onEdit, and you will get a pop up window. - Click on the
Newbutton, and then click on the three dots. And now, you want to go to SDL in theOpenGLfolder. Selectincludeand then click on theSelect Folderbutton. Repeat the same process for including GLEW files. Once both the files have been included, click on theOKbutton. - Now, again in the
Property Pageswindow, we'll go toLinker | General, and then go toAdditional Library Directories. Click on the dropdown, then click onEdit, and you will get a pop-up window. - In the window, click on the
Newbutton, then click on the three dots, and go to the SDL folder. Open thelibfolder, go tox86(which is a 32-bit file, actually), and then click on theSelect Folderbutton. - Repeat the same process for including GLEW libraries. Open the
libfolder, then double-click on theReleasefolder, selectWin32, and then click on theSelect Folderbutton. Once you have added both the libraries, click on theOKbutton. - Next, we'll go to
Linker|Input,and then go toAdditional Dependencies. Click on the dropdown, then click onEdit,opengl32.lib. Then, we'll typeglew32s.lib. If you don't want to statically link the library, you can just remove thes. Next, we'll typeSDL2.libandSDL2main.lib, and then click onOK. - Then, click on the
Applybutton.
Setting up OpenGL using SDL and GLEW with relative linking
In this section, we'll take a look at how to set up OpenGL using SDL and GLEW as the provider for creating a render window with relative linking. Follow these steps:
- Click on
Create new project...and go toVisual C++.SelectWindows Console Applicationand name it something likeSDLApp. - Then, in the
New Projectwindow, click on theBrowse...button. Go to theOpenGLfolder that you created on the desktop and placed the downloaded libraries intoExternal Libraries. Just select the folder and then clickOK. - Now, we'll right-click on the project in the
Solution Explorerwindow. Go toAdd | New Item, and you will get anAdd New Itemwindow. SelectC++ File, as this will be our main entry point; let's name itmain.cppand then click on theAddbutton. - Next, again right-click on the project in the
Solution Explorerwindow. Click onProperties. - A
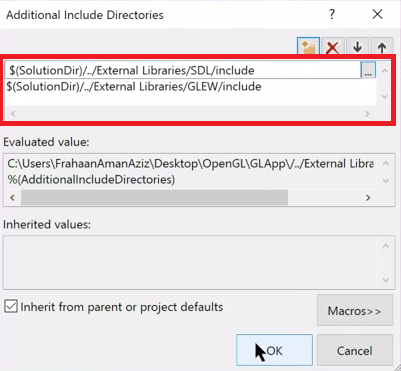
Property Pageswindow will pop up. Click onC/C++|Generaland then go toAdditional Include Directories. Click on the dropdown, and then click onEdit. - Then, click on the
Newbutton and type$(SolutionDir)in the textbox. This command refers to the folder that contains our.slnfile. So if we were to specify a folder in the path, and whenever we do something new in the project, it'd be relatively linked to wherever that file is located.
- To link up the include files, add the paths, as shown in the following screenshot:
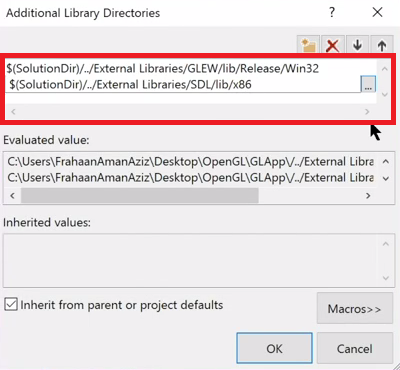
- Next, we'll link up the libraries. So, go to
Linker | General, and then go toAdditional Library Directories. Click on the dropdown and then click onEdit. Click onNewand add the paths, as shown in the following screenshot, then clickOK, and clickApply:
- Next, we'll link up the
.libfiles. So, go to the dropdown and clickEdit. Now, just type inopengl32.lib. Then, we'll typeglew32s.lib. Next, we'll typeSDL2.libandSDL2main.lib, and then click onOK. - Then, click on the
Applybutton.
Adding a DLL file to the project
As we saw in the previous sections, before completing the setup, we'll have to copy the dynamic link library into our project. Follow these steps to do that:
- Go to
C:\OpenGL\SDL\lib\x86and copy theSDL2.dlldynamic link library, as seen in the following screenshot:
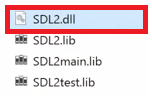
SDL2.dll dynamic link library
- Now, go to the location in your system where the
main.cppfile of your project is located and paste the dynamic link library there. We'll also have to copy and paste theglew32.dllfile here from thebinfolder of theGLEWfolder.