Getting started with Firebase
Before we actually use Firebase in our sample app, we have to create our Firebase project through Firebase Console at https://console.firebase.google.com/. Opening this link will redirect you to the Google sign in the page where you will have to log in to your existing Google Account or by creating a new one.
Once you successfully log in to the Firebase console, you will see a dashboard like the following screenshot:
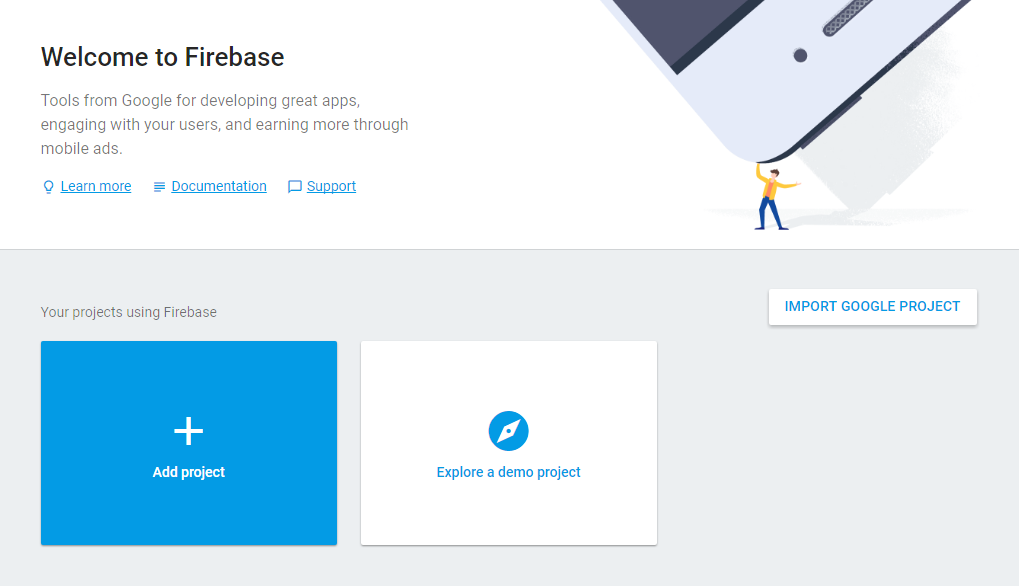
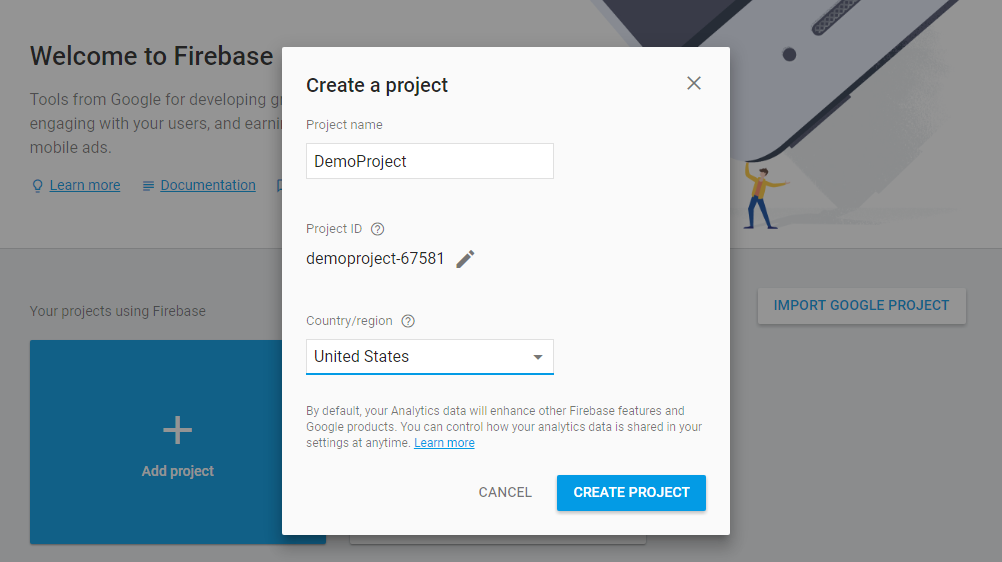
We will create our first project by clicking on the Add project button. Once you click on the Add project button, it will show a pop-up window asking for the name of your project and the country of your organization. I will call it a DemoProject, set country to the United States, and click on the CREATE PROJECT button:
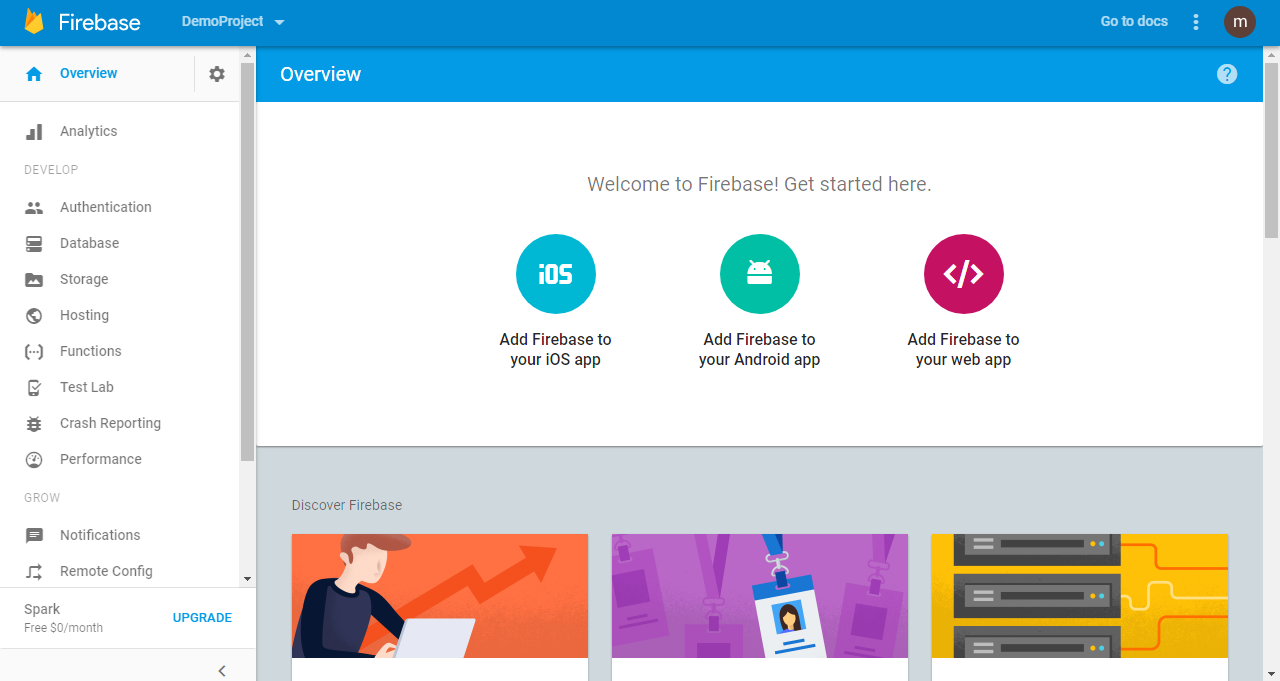
Once the project is created, you are good to go. You will be redirected to the project dashboard where you can configure the products/services you want to use in your project:
Next, we will look at how we can integrate this Firebase project in a web app. Your web app can be any JavaScript Or NodeJS project.
First, we will create an example with plain JavaScript, and then we will move further and include React.
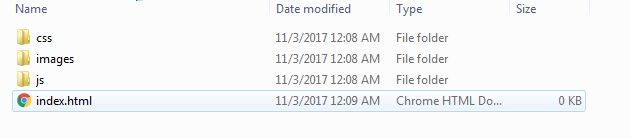
Now you need to create a directory in your system with the name of DemoProject and inside it, you will create a couple of folders named images, css, and js (JavaScript) to make your application manageable. Once you have completed the folder structure, it will look like this:
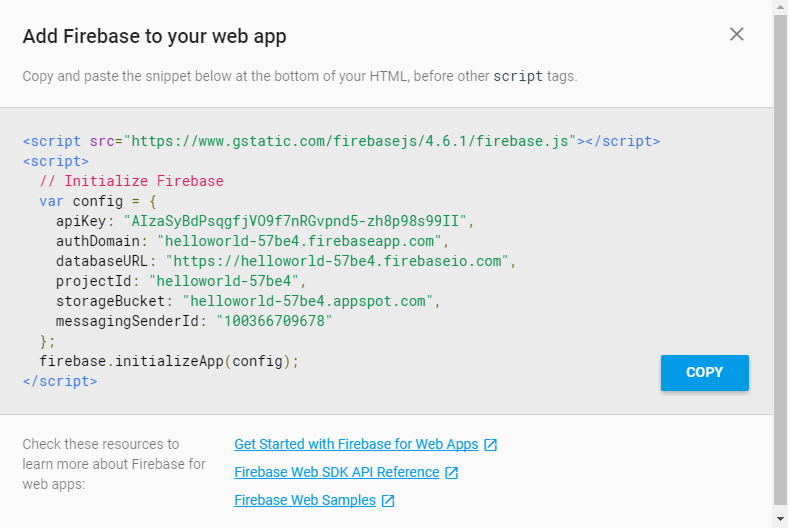
To integrate our Firebase project to our JavaScript app, we will need a code snippet that has to be added in our JavaScript code. To get it, click on Add Firebase to your web app and note the initialization code it has generated, which should look like the following code:
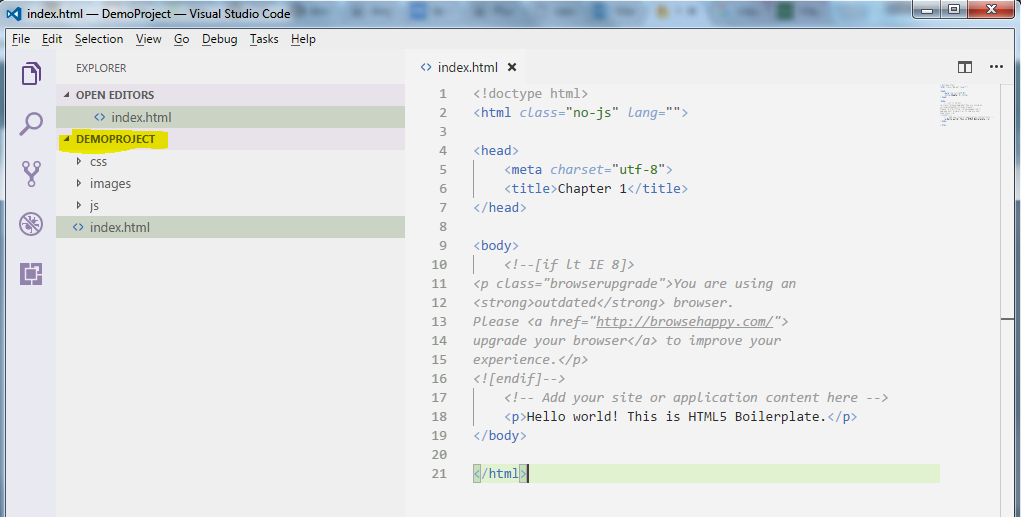
When we start making an application with ReactJS or plain JavaScript, we need to do some setup, which just involves an HTML page and includes a few files. First, we create a directory (folder) called chapter1. Open it up in any of your code editors. Create a new file called index.html directly inside it and add the following HTML5 Boilerplate code:
- For example, I have created a folder called
DemoProject - Create a file called
index.htmlin the folder - In your HTML, add the code snippet we copied from Firebase console:
Note
I prefer and recommend that you use Visual Studio code editor for any type of JavaScript application development over the listed text editors because of its vast array of features.
Now, we need to copy the Firebase code snippet into the HTML:
<!doctype html>
<html class="no-js" lang="">
<head>
<meta charset="utf-8">
<title>Chapter 1</title>
</head>
<body>
<!--[if lt IE 8]>
<p class="browserupgrade">You are using an
<strong>outdated</strong> browser.
Please <a href="http://browsehappy.com/">
upgrade your browser</a> to improve your
experience.</p>
<![endif]-->
<!-- Add your site or application content here -->
<p>Hello world! This is HTML5 Boilerplate.</p>
<script src="https://www.gstatic.com/firebasejs/4.6.1/firebase.js"></script>
<script>
// Initialize Firebase
var config = {
apiKey: "<PROJECT API KEY>",
authDomain: "<PROJECT AUTH DOMAIN>",
databaseURL: "<PROJECT DATABASE AUTH URL>",
projectId: "<PROJECT ID>",
storageBucket: "",
messagingSenderId: "<MESSANGING ID>"
};
firebase.initializeApp(config);
</script>
</body>
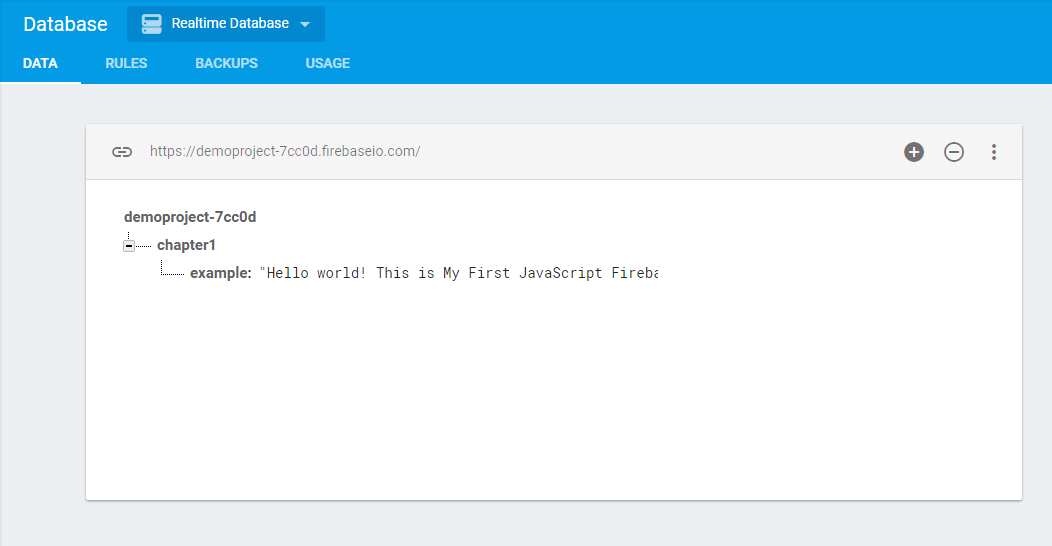
</html>The following shows the data in our database, which we will fetch and display on the UI with JavaScript:
//HTML Code to show the message
<p id="message">Hello world! This is HTML5 Boilerplate.</p>
<script>
//Firebase script to get the value from database and replace the "message".
var messageLabel = document.getElementById('message');
 var db = firebase.database();
 db.ref().on("value", function(snapshot) {
 console.log(snapshot.val());
 var object = snapshot.val();
 messageLabel.innerHTML = object.chapter1.example;
 });
</script>
In the preceding code, we are using the on() method to retrieve the data. It takes the event type as value and then retrieves the snapshot of the data. When we add the val() method to the snapshot, we will get data to show in the messageField.
Let me give you a brief of the available events in Firebase that we can use to read the data.
Note
As for now, in Database rules, we are allowing anyone to read and write the data in the database; otherwise, it shows the permission denied error. Consider this as an example:{ "rules": { ".read": true, ".write": true }}
Firebase events
If you can see the preceding code, we have used the callback function that receives a DataSnapshot, which holds the data of snapshot. A snapshot is a picture of the data at a particular database reference at a single point in time, and if no data exists at the reference's location, the snapshot's value returns null.
value
Recently, we have used this valuable event to read the data from Realtime Database. This event type will be triggered every time the data changes, and the callback function will retrieve all the data including children.
child_added
This event type will be triggered once when we need to retrieve the list of items object and every time when a new object is added to our data as given path. Unlike value, which returns the entire object of that location, this event callback is passed as a snapshot that contains two arguments, which include the new child and previous child data.
Note
For example, if you want to retrieve the data on each new comment added to your post in blogging app, you can use child_added.
child_changed
The child_changed event is triggered when any child object is changed.
child_removed
The child_removed event is triggered when an immediate child is removed. It is typically used in combination with child_added and child_changed. This event callback contains the data for the removed child.
child_moved
The child_moved event is triggered when you're working with ordered data like drag and drop in list items.
Now, let's take quick look at our full code:
<!doctype html>
<htmlclass="no-js"lang="">
<head>
<metacharset="utf-8">
<title>Chapter 1</title><scriptsrc="</span>https://www.gstatic.com/firebasejs/4.6.1/firebase.js"></script>
</head>
<body><!--[if lt IE 8]>
<p class="browserupgrade">You are using an<strong>outdated</strong> browser.Please <a href="http://browsehappy.com/">upgrade your browser</a> to improve yourexperience.
</p>
<![endif]-->
<!-- Add your site or application content here -->
<pid="message">Hello world! This is HTML5 Boilerplate.</p>
<script>
// Initialize Firebase
varconfig={
 apiKey: "<PROJECT API KEY>",
 authDomain: "<PROJECT AUTH DOMAIN>",
 databaseURL: "<PROJECT DATABASE AUTH URL>",
 projectId: "<PROJECT ID>",
 storageBucket: "",
 messagingSenderId: "<MESSANGING ID>"
};
firebase.initializeApp(config);
varmessageLabel=document.getElementById('message');
vardb=firebase.database();
db.ref().on("value",function(snapshot){
 console.log(snapshot.val());
 var object=snapshot.val();
 messageLabel.innerHTML=object.chapter1.example;
});</script>
</body>
</html>
Now, open index.html in your browser, and let's look at the result:
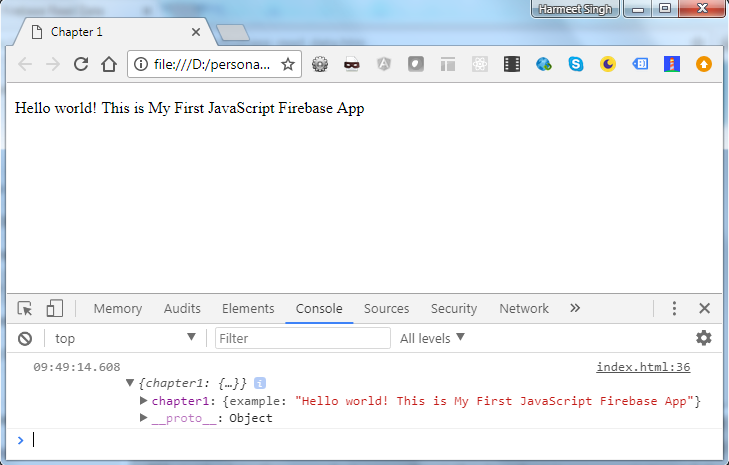
In the preceding screen excerpt, we can see the database value on MessageLabel and JavaScript data representation in the browser console.
Let's extend this example further by taking the input value from the user and save those values in the database. Then, using the events, we will display that messages in the browser in Realtime:
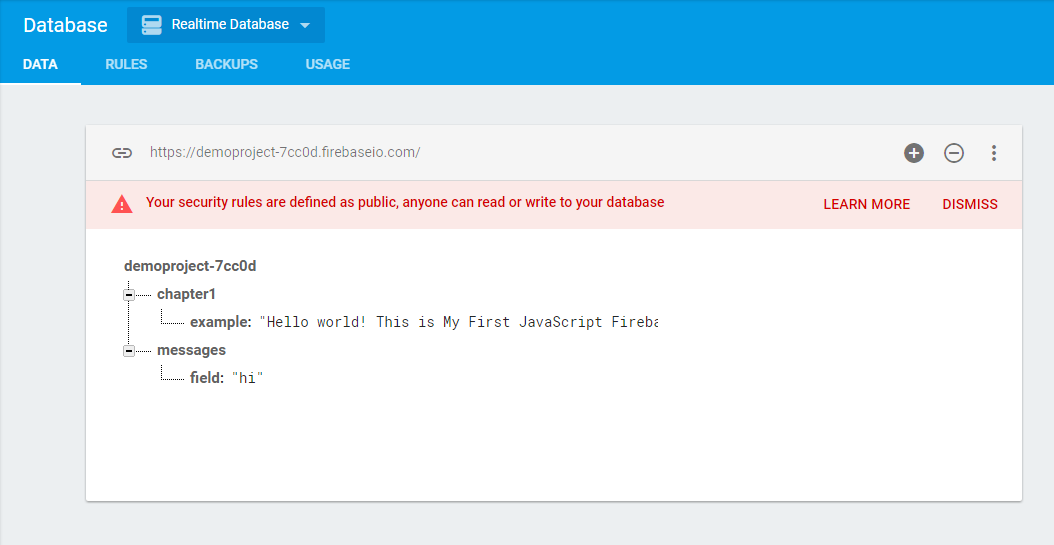
As shown here, I have added a child node messages in the database. Now, we will add the form input in our HTML with the Save button and at the bottom, we will display those messages list in Realtime when the user submits.
Here's the HTML Code:
<input type="text" id="messageInput" />
 <button type="button" onclick="addData()">Send message</button>
<h2>Messages</h2>
 <p id="list">sdfdf</p>
Now, we will create the addData()function to get and save the data to Firebase:
 // Save data to firebase
 function addData() {
 var message = messageInput.value;
   db.ref().child('users').push({
    field: message
  });
  messageInput.value = '';
 }
In the next screenshot, I have added some messages to the input text:

Now, we need to display those messages into HTML at the bottom of the messages title:
// Update list of messages when data is added
db.ref().on('child_added', function(snapshot) {
var data = snapshot.val();
console.log("New Message Added", data);
  snapshot.forEach(function(childSnap) {
    console.log(childSnap.val());
    var message = childSnap.val();
    messages.innerHTML = '\n' + message.field;
  });
});
We have used the child_added event, which means whenever any child is added in the messages on node, we need to take that value and update the messages list.
Now, open your browser and note the output:
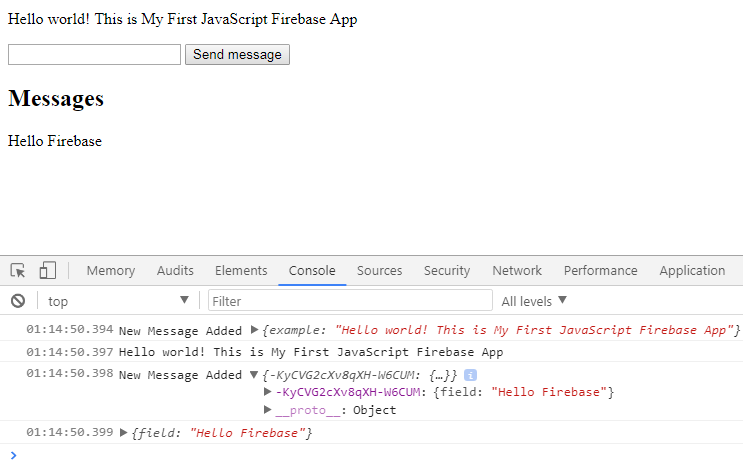
That looks great. We are now be able to see the message that users have submitted and our data is also getting updated with the new message in Realtime.
Now, let's take a quick look at how our code looks:
<!doctype html>
<html class="no-js" lang="">
<head>
 <meta charset="utf-8">
 <title>Chapter 1</title>
 <script src="https://www.gstatic.com/firebasejs/4.6.1/firebase.js"></script>
</head>
<body>
 <!-- Add your site or application content here -->
 <p id="message">Hello world! This is HTML5 Boilerplate.</p>
 <input type="text" id="messageInput" />
 <button type="button" onclick="addData()">Send message</button>
 <h2>Messages</h2>
 <p id="list"></p>
<script>
 // Initialize Firebase
 var config = {
   apiKey: "<PROJECT API KEY>",
   authDomain: "<PROJECT AUTH DOMAIN>",
   databaseURL: "<PROJECT DATABASE AUTH URL>",
   projectId: "<PROJECT ID>",
   storageBucket: "",
   messagingSenderId: "<MESSANGING ID>"
 };
 firebase.initializeApp(config);

 var messageLabel = document.getElementById('message');
 var messageInput = document.getElementById('messageInput');
 var messages = document.getElementById('list');
 var db = firebase.database();
 db.ref().on("value", function(snapshot) {
     var object = snapshot.val();
     messageLabel.innerHTML = object.chapter1.example;
    //console.log(object);
 });
// Save data to firebase
 function addData() {
   var message = messageInput.value;
   db.ref().child('messages').push({
   field: message
 });
   messageInput.value = '';
 }
// Update results when data is added
 db.ref().on('child_added', function(snapshot) {
   var data = snapshot.val();
   console.log("New Message Added", data);
   snapshot.forEach(function(childSnap) {
   console.log(childSnap.val());
   var message = childSnap.val();
   messages.innerHTML = '\n' + message.field;
  });
 });
 </script>
</body>
</html>