Most people know Bitcoin exists because of blockchain. But what is blockchain? It is an append-only database that consists of blocks that are linked by hashing. Here, each block contains many transactions of transferring value (but could be other things) between participants secured by cryptography; a consensus between many nodes that hold an identical database decides on which new block is to be appended next.
You don't have to understand the definition at this point; those are a lot of words to chew on! First, I'll explain blockchain to you so that you can adjust to this new knowledge as we move through this book.
Going back to the definition of blockchain, we can summarize the definition as an append-only database. Once you put something into the database, it cannot be changed; there is no Undo. We'll talk about the ramifications of this feature in Chapter 2, Smart Contract Fundamentals. This definition entails many things and opens up a whole new world.
So, what can you put into this append-only database? It depends on the cryptocurrency. For Bitcoin, you can store the transactions of transferring value. For example, Nelson sends one Bitcoin to Dian. However, we accumulate many transactions into one block before appending them to the database. For Ethereum, the things that you can put into the append-only database are richer. This not only includes the transaction of transferring value—it could also be a change of state. What I mean by state here is really general. For example, a queue for buying a ticket for a show can have a state. This state can be empty or full. Similarly to Bitcoin, in Ethereum, you gather all the transactions before appending them together in this append-only database.
To make it clearer, we put all these transactions into the block before appending them to the append-only database. Aside from the list of transactions, we store other things in this block, such as the time when we append the block into the append-only database, the target's difficulty (don't worry if you don't know about this), and the parent's hash (I'll explain this shortly), among many other things.
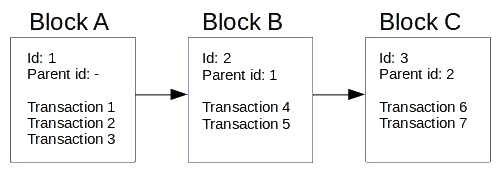
Now that you understand the block element of the blockchain, let's look at the chain element. As previously explained, aside from the list of transactions, we also put the parent's hash in the block. But for now, let's just use a simple ID to indicate the parent instead of using a hash. Parent id is just the previous block id. Here, think of the stack. In the beginning, there is no block. Instead, we put Block A, which has three transactions: Transaction 1, Transaction 2, and Transaction 3. Since Block A is the first block, it has no parent. We then apply Block B to Block A, which consists of two transactions: Transaction 4 and Transaction 5. Block B is not the first one in this blockchain. Consequently, we set the parent section in Block B as the Block A id because Block A is the parent of Block B. Then, we put Block C in the blockchain, which has two transactions: Transaction 6 and Transaction 7.
The parent section in Block C would be the Block B id, and so on. To simplify things, we increment the id from 0 by 1 for every new block:
Let's implement a database to record the history of what people like and hate. This means that when you said you like cats at one point in history, you won't be able to change that history. You may add new history when you change your mind (for example, if you then hate cats), but that won't change the fact that you liked them in the past. So, we can see that in the past you liked cats, but now you hate them. We want to make this database full of integrity and secure against cheating. Take a look at the following code block:
class Block:
    id = None
    history = None
    parent_id = None

block_A = Block()
block_A.id = 1
block_A.history = 'Nelson likes cat'

block_B = Block()
block_B.id = 2
block_B.history = 'Marie likes dog'
block_B.parent_id = block_A.id

block_C = Block()
block_C.id = 3
block_C.history = 'Sky hates dog'
block_C.parent_id = block_B.id
If you studied computer science, you will recognize this data structure, which is called a linked list. Now, there is a problem. Say Marie hates Nelson and wants to paint Nelson in a negative light. Marie can do this by changing the history of block A:
block_A.history = 'Nelson hates cat'
This is unfair to Nelson, who is a big fan of cats. So, we need to add a way in which only Nelson can write the history of his own preferences. The way to do this is by using a private key and a public key.
In blockchain, we use two keys to sign data, to authenticate a message and protect it from being altered by unauthorized users. The two keys are as follows:
The secrecy of the private key is guarded and it is not made known to the public. On the other hand, you let the public key be given out in public. You tell everyone, hey, this is my public key.
Let's generate the private key. To do this, we need openssl software. You can install this by doing the following:
$ sudo apt-get install openssl
So, Nelson generates the private key, which is the nelsonkey.pem file. He must keep this key secret. It is generated as follows:
$ openssl genrsa -out nelsonkey.pem 1024
From the private key, Nelson generates the public key:
$ openssl rsa -in nelsonkey.pem -pubout > nelsonkey.pub
Nelson can share this public key, nelsonkey.pub, with everyone. Now, in the real world we could set up a simple dictionary of the public key and its owner as follows:
{
'Nelson': 'nelsonkey.pub',
'Marie': 'mariekey.pub',
'Sky': 'skykey.pub'
}
We will now look at how Nelson can prove that he is the only one who can make changes to his history.
First, let's create a Python virtual environment:
$ python3 -m venv blockchain
$ source blockchain/bin/activate
(blockchain) $
Next, install the library:
(blockchain) $ pip install --upgrade pip
(blockchain) $ pip install wheel
(blockchain) $ pip install cryptography
This is the Python script that can be used to sign the message. Name this script verify_message.py (refer to the code file in the following GitLab link for the full code: https://gitlab.com/arjunaskykok/hands-on-blockchain-for-python-developers/blob/master/chapter_01/verify_message.py):
from cryptography.hazmat.primitives import hashes
from cryptography.hazmat.primitives.asymmetric import padding
from cryptography.hazmat.backends import default_backend
from cryptography.hazmat.primitives.asymmetric import rsa
from cryptography.hazmat.primitives import serialization

# Generate private key
#private_key = rsa.generate_private_key(
# public_exponent=65537,
# key_size=2048,
# backend=default_backend()
#)
...
...

# Message validation executed by other people
public_key.verify(
    signature,
    message,
    padding.PSS(mgf=padding.MGF1(hashes.SHA256()),
                salt_length=padding.PSS.MAX_LENGTH),
    hashes.SHA256())
When executing this script, nothing will happen, as expected. This means that the message is verified with the signature from the public key. The signature can only be created by Nelson because you need the private key in order to create a signature. However, to verify the message with the signature, you only need the public key.
Let's take a look at a case in which Marie tries to falsify the facts with a script named falsify_message.py. Marie tries to put Nelson hates cat in the history database as follows:
from cryptography.hazmat.primitives import hashes
from cryptography.hazmat.primitives.asymmetric import padding
from cryptography.hazmat.backends import default_backend
from cryptography.hazmat.primitives.asymmetric import rsa
from cryptography.hazmat.primitives import serialization

message = b'Nelson hates cat'
signature = b'Fake Signature'

with open("nelsonkey.pub", "rb") as key_file:
    public_key = serialization.load_pem_public_key(
        key_file.read(),
        backend=default_backend())

public_key.verify(
 signature,
 message,
 padding.PSS(mgf=padding.MGF1(hashes.SHA256()),
                salt_length=padding.PSS.MAX_LENGTH),
    hashes.SHA256())
Here's how the verify method works. Nelson calculates the hash from the message, then encrypts it with his private key. The result is the signature. For example, if Sky wants to verify the signature, he has the message and the signature. He calculates the hash of the message. Then, he decrypts the signature using the public key. The result is compared to the hash of the message. If it is the same, then everything is well. If not, either the message has been altered or the private key used to sign the message is different.
When doing this, you would get the following output:

So, what does the signature look like? Go back to verify_message.py and append this line to the end of the file. Then, run the script again:
print(signature)
The signature looks like this:

Every message has a different signature, and it's impossible for Marie to guess the signature in order to falsify the message. So, with the private key and the public key, we can verify whether or not the message is indeed from someone authorized, even if we communicate on an unsecured channel.
So with the private key, Nelson could create a signature that is unique to the message it tries to sign:

Everyone in the world who has Nelson's public key can verify that Nelson did indeed write Message A. Nelson can prove he did write Message A by showing Signature A. Everyone can take those two inputs and verify the truth:

So, to validate whether or not it is Nelson who wrote Nelson likes cat, input the following (refer to the code file in the following GitLab link for the full code: https://gitlab.com/arjunaskykok/hands-on-blockchain-for-python-developers/blob/master/chapter_01/validate_message.py):
# validate_message.py
from cryptography.hazmat.primitives import hashes
from cryptography.hazmat.primitives.asymmetric import padding
from cryptography.hazmat.backends import default_backend
from cryptography.hazmat.primitives.asymmetric import rsa
from cryptography.hazmat.primitives import serialization

def fetch_public_key(user):
    with open(user + "key.pub", "rb") as key_file:
        public_key = serialization.load_pem_public_key(
           key_file.read(),
           backend=default_backend())
    return public_key

# Message coming from user
message = b"Nelson likes cat"

# Signature coming from user, this is very specific to public key.
# Download the public key from Gitlab repository of this code so this signature matches the message.
# Otherwise, you should generate your own signature.
signature =
...
...
    padding.PSS(mgf=padding.MGF1(hashes.SHA256()),
                salt_length=padding.PSS.MAX_LENGTH),
    hashes.SHA256())
Now we know that only Nelson can write Nelson likes cats or Nelson hates cats, we can be at peace. However, to make the tutorial code short, we won't integrate the validation using the private key and the public key. We assume only authorized people are able to write the history in the block. Take a look at the following code block:
>>> block_A.history = 'Nelson likes cat'
When that happens, we assume it's Nelson who wrote that history. So, what is the problem in recording data with a linked list?
The problem is that the data can be altered easily. Say Nelson wants to be a senator. If many people in his district don't like cats, they may not be happy with the fact that Nelson likes them. Consequently, Nelson wants to alter the history:
>>> block_A.history = 'Nelson hates cat'
Just like that, the history has been changed. We can avoid this way of cheating by recording all history in the block every day. So, when Nelson alters the database, we can compare the data in the blockchain today to the data in the blockchain yesterday. If it's different, we can confirm that something fishy is happening. That method could work, but let's see if we can come up with something better.
Let's upgrade our linked list to the blockchain. To do this, we add a new property in the Block class, which is the parent's hash:
import hashlib
import json

class Block:
    id = None
    history = None
    parent_id = None
    parent_hash = None

block_A = Block()
block_A.id = 1
block_A.history = 'Nelson likes cat'

block_B = Block()
block_B.id = 2
block_B.history = 'Marie likes dog'
block_B.parent_id = block_A.id
block_B.parent_hash = hashlib.sha256(json.dumps(block_A.__dict__).encode('utf-8')).hexdigest()

block_C = Block()
block_C.id = 3
block_C.history = 'Marie likes dog'
block_C.parent_id = block_B.id
block_C.parent_hash = hashlib.sha256(json.dumps(block_B.__dict__).encode('utf-8')).hexdigest()
Let's demonstrate what the hashlib() function does:
>>> print(block_B.__dict__)
{'parent_hash': '880baef90c77ae39d49f364ff1074043eccb78717ecec85e5897c282482012f1', 'history': 'Marie likes dog', 'id': 2, 'parent_id': 1}
>>> print(json.dumps(block_B.__dict__))
{"parent_hash": "880baef90c77ae39d49f364ff1074043eccb78717ecec85e5897c282482012f1", "parent_id": 1, "history": "Marie likes dog", "id": 2}
>>> print(json.dumps(block_B.__dict__).encode(‘utf-8'))
b'{"id": 2, "parent_hash": "69a1db9d3430aea08030058a6bd63788569f1fde05adceb1be6743538b03dadb", "parent_id": 1, "history": "Marie likes dog"}'
>>> print(hashlib.sha256(json.dumps(block_B.__dict__).encode('utf-8')))
<sha256 HASH object @ 0x7f58518e3ee0>
>>> print(hashlib.sha256(json.dumps(block_B.__dict__).encode('utf-8')).hexdigest())
25a7a88637c507d33ae1402ba6b0ee87eefe9c90e33e75c43d56858358f1704e
If we change the history of block_A, the following code look like this:
>>> block_A.history = 'Nelson hates cat'
Again, the history has been changed just like that. However, this time there is a twist. We can verify that this change has occurred by printing the original parent's hash of block_C:
>>> print(block_C.parent_hash)
ca3d23274de8d89ada13fe52b6000afb87ee97622a3edfa3e9a473f76ca60b33
Now, let's recalculate the parent's hash of each block:
>>> block_B.parent_hash = hashlib.sha256(json.dumps(block_A.__dict__).encode('utf-8')).hexdigest()
>>> block_C.parent_hash = hashlib.sha256(json.dumps(block_B.__dict__).encode('utf-8')).hexdigest()
>>> print(block_C.parent_hash)
10b7d80f3ede91fdffeae4889279f3acbda32a0b9024efccc9c2318e2771e78c
These blocks are different. By looking at these, we can be very sure that the history has been altered. Consequently, Nelson would be caught red-handed. Now if Nelson wants to alter the history without getting caught, it is not enough to change the history in block_A anymore. Nelson needs to change all the parent_hash properties in every block (except block_A of course). This is tougher cheating. With three blocks only, Nelson needs to change two parent_hash properties. With a 1,000 blocks, Nelson needs to change 999 parent_hash properties!