The Hello World example
Since we are done setting up the Raspberry Pi, let's get things rolling by writing our first piece of code in Python. While learning a new programming language, it is customary to get started by printing Hello World on the computer screen. Let's print the following message: I am excited to learn Python programming with the Raspberry Pi Zero using Python.
In this book, we will learn Python using the Integrated Development and Learning Environment (IDLE) tool. We chose IDLE for the following reasons:
- The tool is installed and shipped as a package in the Raspbian OS image. No additional installation is required.
- It is equipped with an interactive tool that enables performing checks on a piece of code or a specific feature of the Python language.
- It comes with a text editor that enables writing code according to the conventions of the Python programming language. The text editor provides a color code for different elements of a Python script. This helps in writing a Python script with relative ease.
- The tool enables a step-by-step execution of any code sample and identify problems in it.
Setting up your Raspberry Pi Zero for Python programming
Before we get started, let's go ahead and set up the Raspberry Pi Zero to suit our needs:
- Let's add a shortcut to IDLE3 (for developing in Python 3.x) on the Raspberry Pi's desktop. Under the Programming submenu (located at the top-left corner of your Raspberry Pi Zero's desktop), right-click on
Python 3 (Iand click onDLE)Add to desktop. This adds a shortcut to the IDLE tool on your desktop thus making it easily accessible.

Add shortcut to IDLE3 to the Raspberry Pi's desktop
- In order to save all the code samples, let's go ahead and create a folder named
code_sampleson the Raspberry Pi's desktop. Right-click on your desktop and create a new folder.
IDLE's interactive tool
Let's write our first example using IDLE's interactive tool:
- Launch the IDLE3 (meant for Python 3.x) tool from the Raspberry Pi Zero's desktop by double-clicking on it.
- From the IDLE's interactive command-line tool, type the following line:
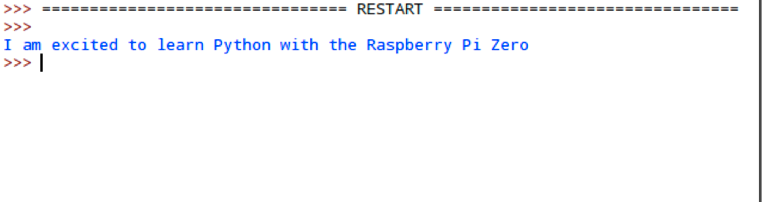
print("I am excited to learn Python with the Raspberry Pi Zero")
- This should print the following to the interactive command-line tool's screen:

We did it! We wrote a single line that prints out a line of text to the Raspberry Pi's screen.
The text editor approach
The command-line tool is useful for test coding logic, but it is neither practical nor elegant to write code using the interactive tool. It is easier to write a bunch of code at a time and test it. Let's repeat the same example using IDLE's text editor:
- Launch IDLE's text editor (in IDLE,
File|New File), enter thehello worldline discussed in the previous section and save it ashelloworld.py. - Now, the code could be executed by either pressing the F5 key or clicking on
RunModulefrom the drop-down menuRun, and you will get the output as shown in the following figure:
Launching the Python interpreter via the Linux Terminal
It is also possible to use the Python interpreter via the Linux Terminal. Programmers mostly use this to test their code or refer to the Python documentation tool, pydoc. This approach is convenient if the readers plan to use a text editor other than IDLE:
- Launch the Raspberry Pi's command-line terminal from the desktop toolbar.
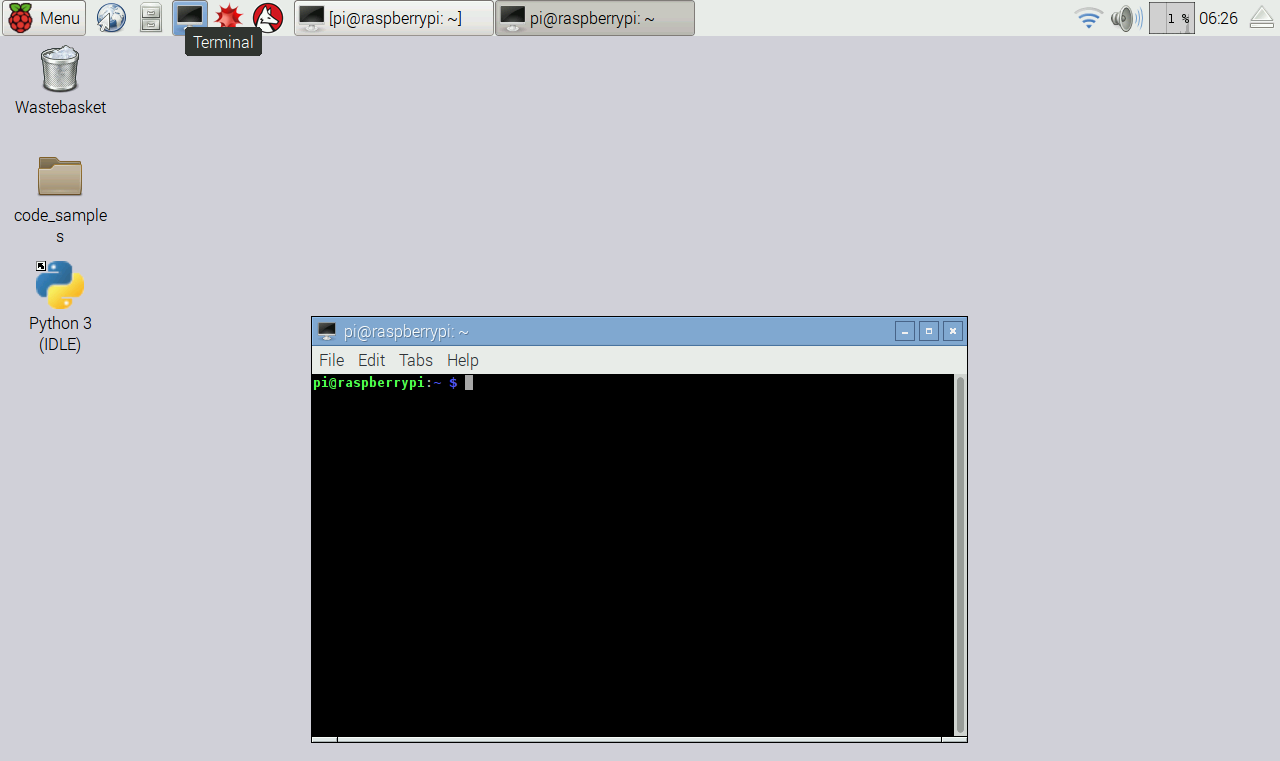
Launching the command-line terminal
- Type the command,
python3and press Enter. This should launch Python 3.x on the terminal. - Now, try running the same piece of code discussed in the previous section:
print("I am excited to learn Python with the Raspberry Pi Zero")This would give the following screenshot as the result:
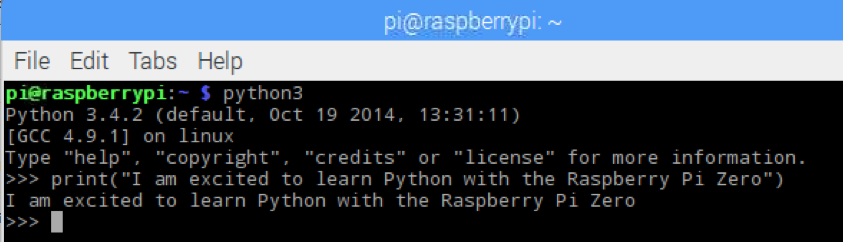
The result should be similar to that of the previous two sections
The Python interpreter in the Linux Terminal may be closed by typing exit() and pressing the return key
Executing Python scripts using the Linux Terminal
It is possible to execute code written using any text editor via the Linux Terminal. For example, Let's say the file helloworld.py is saved in a folder named code_samples on the Raspberry Pi's desktop. This file may be executed as follows from the Linux Terminal:
Note
If you are not familiar with the Linux command-line terminal, we have written up some tutorials to familiarize yourself with the command-line terminal on this book's website.
- On the Linux Terminal, switch to the directory where the Python script is located:
cd /home/pi/Desktop/code_samples- Execute the Python script as follows:
python3 helloworld.py- Alternatively, the Python script could be executed using its absolute location path:
python3 /home/pi/Desktop/code_samples/hello_world.pyWe did it! We just wrote our first piece of code and discussed different ways to execute the code.
The print() function
In our first helloworld example, we discussed printing something on the screen. We used the print() function to obtain our result. In Python, a function is a code block that executes a set of defined tasks. The print() function is a part of Python's standard library that prints any combination of alphanumeric characters that is passed as an argument between the quotes. The print() function is used to print information to the screen. It is especially helpful while trying to debug the code. In this example, the print() function was used to print a message on the screen.
In this chapter, the function print() executed the string I am excited to learn Python programming with the Raspberry Pi Zero (we will discuss strings in the later section of this book). It is also possible to write custom function to execute a repetitive task required by the user.
Similarly, the exit() function executes the predefined task of exiting the Python interpreter at the user's call.
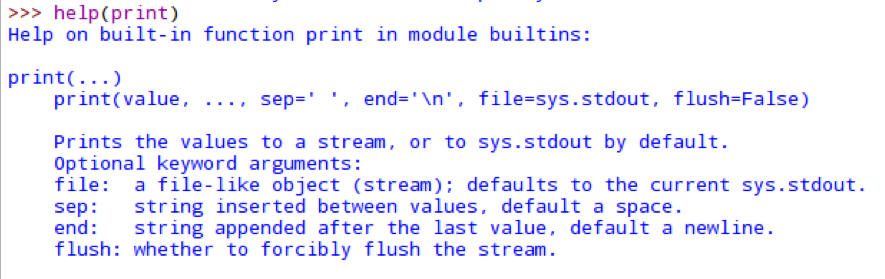
The help() function
While getting started, it is going to be difficult to remember the syntax of every function in Python. It is possible to refer to a function's documentation and syntax using the help function in Python. For example, in order to find the use of the print function in Python, we can call help on the command-line terminal or the interactive shell as follows:
help(print)
This would return a detailed description of the function and its syntax: