Installing the Post Processing Stack
Before we can use the Post Processing Stack, we must first get it from the newly introduced Package Manager. A Unity package is a single file that contains various assets that can be used in Unity in a similar manner to a .zip file. Previously, Unity used the Asset Store to share these files with users, but as time has gone on, the Package Manager has been added to give users an easy way to get free content from Unity. We will actually be using the Package Manager again in Chapter 12, Shader Graph, but right now we will be using it for the Post-Processing package that it contains.
Getting ready
To get started with this recipe, you will need to have Unity running and have created a new project. This chapter also requires you to have an environment to work from. The code files provided with this book will contain a basic scene and content to create the scene Unity's Standard Assets.
Open the Chapter 1 | Starting Point scene inside of the Asset | Chapter 01 | Scenes folder from the Project browser. If all goes well, you should see something like this from the Game tab:

This is a simple environment that will allow us to easily see how changes made in post-processing effects can modify how things are drawn on the screen.
Note
If you are interested in learning how to create the environment used, check out my previous book, Unity 5.x Game Development Blueprints, also available from Packt Publishing.
How to do it...
To begin:
- Open up the
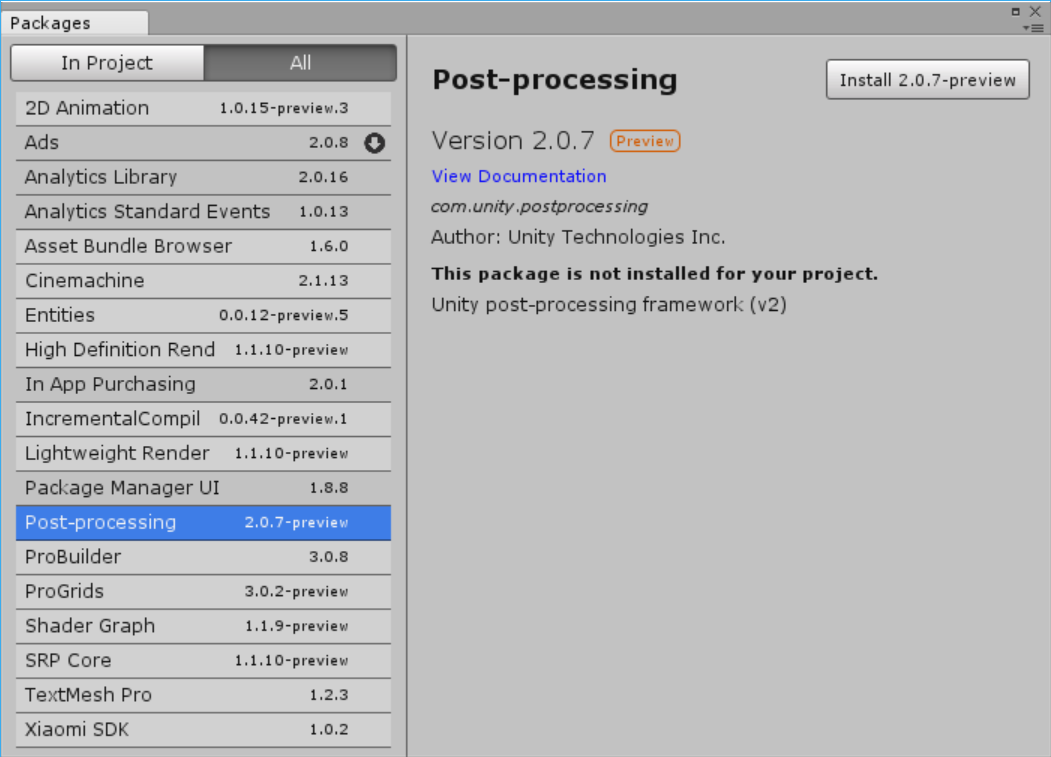
Package Managerby going toWindow|Package Manager(or by pressing Ctrl + 9):

- From the list view, click on the
Allbutton to display a list of all of the possible packages that are there. Once the list populates with all of the choices, select thePost-processingoption:

- From there, at the top right of the menu, click on the
Install 2.0.7-previewbutton. You may need to wait for a while for it to complete downloading the content. Once it's completed, you should be brought back to theInProjectselection and now you'll seePost-processingadded to the list:

- Close out of the
Packagestab and go back to theScenewindow to see the level. Then, from theHierarchywindow, we want to select the object that has ourCameracomponent attached to it, as the Post Processing Stack needs to know which screen we want to modify. If you are using your own project, you may select theMainCameraobject that comes with the default Unity scene, but the example project that is being used has theCameralocated as a child of theFPSControllerobject. To select it, click on the arrow next to the name to extend the object's children and then select theFirstPersonCharacterobject:

This object has the Camera component on it, which is in charge of drawing what it sees to the Game tab when the game starts.
Note
You can double-click on a game object in the Hierarchy tab to zoom the camera from the Scene tab to its location. This makes it very easy to find things, even in a large game level.
- With the object selected and our
Cameracomponent attached to it,next we need to add thePost-processing Behaviorcomponent to the object by going intoComponent|Rendering|Post-process Layer:

- Once added, from the
Inspectortab, scroll down to thePost Process Layer(Script)component and, underLayer, change the dropdown toPostProcessing. - This tells the component which objects we want to draw on the screen. When setting this, an object must have its
Layerproperty set toPostProcessingin order to be seen.
- To create a
Post Process Volume, go to the menu and selectGameObject|3D Object|Post Process Volume. From there, go to theInspectortab and change theLayerproperty toPostProcessing. Finally, to make it easier to work with, change thePositionto0,0,0and under thePost Process Volumecomponent, check theIs Globalproperty:

Notice that there is a Profile property to the volume. This property will contain information about how we wish to modify the screen. By checking Is Global, we are saying that this information should always be drawn on an object. By unchecking it, the effects will only be visible from a certain distance from where the volume is placed. Depending on the game, this could allow you to drastically modify how the game appears in certain areas, but we care only about getting the visual effect at this point.


