Revisiting the case study
To set up the test environment, we will require multiple operating systems with primarily two different host-only networks. Also, we will need the following components:
Component name | Type | Version used | Network details | Network type |
Kali Linux VM Image | Operating System | Kali Rolling (2017.3) x64 |
| Host-only |
Ubuntu 14.04 LTS | Operating System | 14.04 (trusty) |
192.168.116.129 (Vmnet6) | Host-only Host-only |
Windows 7 | Operating System | Professional Edition | 192.168.116.133 (Vmnet6) | Host-only |
Ubuntu 16.04 LTS | Operating System | 16.04.3 LTS (xenial) | 192.168.116.133 (Vmnet6) | Host-only |
PhpCollab | Web Application | 2.5.1 | ||
Disk Pulse | Enterprise Disk Management Software | 9.9.16 | ||
WinSCP | SSH and SFTP | 5.7 |
Revising the approach
Throughout this exercise, we performed the following critical steps:
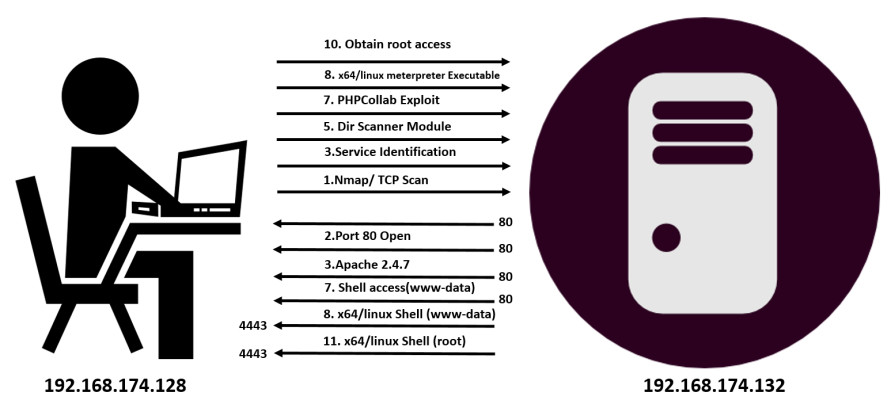
- We started by conducting an Nmap scan on the target IP address, which is
192.168.174.132. - The Nmap scan revealed that port
80at192.168.174.132is open. - Next, we did a fingerprint of the application running on port
80and encountered Apache 2.4.7 running. - We tried browsing to the HTTP port. However, we couldn't find anything.
- We ran the
dir_scannermodule to perform a dictionary-based check on the Apache server and found the PhpCollab application directory. - We found an exploit module for PhpCollab using
searchsploitand had to import the third-party exploit into Metasploit. - Next, we exploited the application and gained limited user access to the target system.
- To improve our access mechanism, we uploaded a backdoored executable and achieved a better level of access to the target.
- To gain root access, we run the exploit
suggestermodule and found that the overlayfs privilege escalation exploit will help us achieve root access to the target. - We downloaded the overlayfs exploit from https://exploit-db.com/, compiled it, and run it to gain root access to the target.
- Using the same previously generated backdoor, we opened another Meterpreter shell, but this time with root privileges.
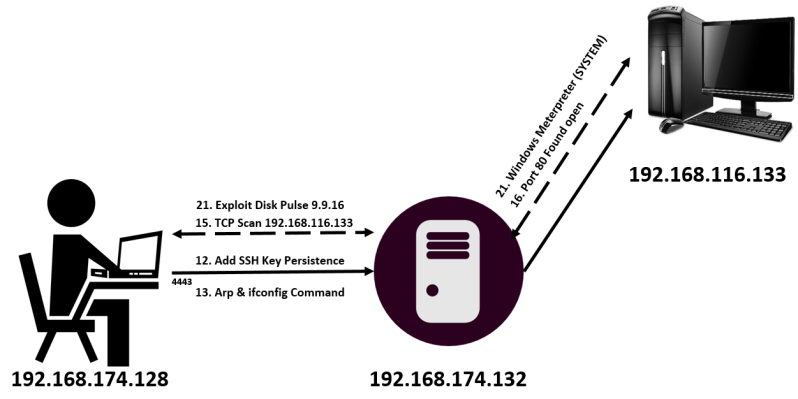
- We added persistence to the system by using the
sshkey_persistencemodule in Metasploit. - Running the
arpcommand on the target, we found that there was a separate network connection to the host, which is in the target range of192.168.116.0/24. - We added a route to this network by using the autoroute script.
- We scanned the system found from the
arpcommand using the TCP port scanner module in Metasploit. - We saw that port
80of the system was open. - Since we only had access to the target network through Meterpreter, we used the
socks4amodule in Metasploit for making other tools connect to the target through Meterpreter. - Running the socks proxy, we configured our browser to utilize the
socks4aproxy on port1080.
- We opened
192.168.116.133through our browser and saw that it was running the Disk Pulse 9.9.16 web server service. - We searched Metasploit for Disk Pulse and found that it was vulnerable to an SEH-based buffer overflow vulnerability.
- We exploited the vulnerability and gained the highest level of privileges on the target since the software runs with SYSTEM-level privileges.
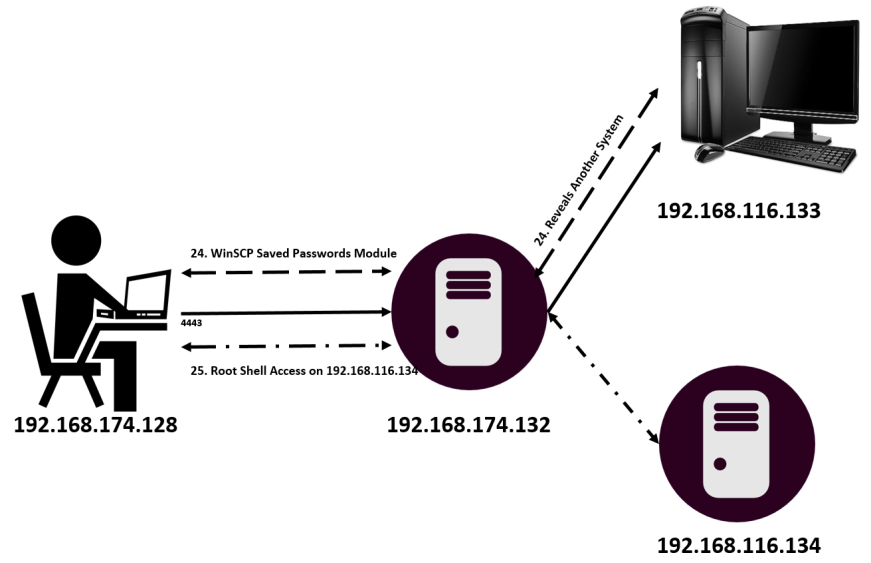
- We enumerated the list of installed applications and found that WinSCP 5.7 is installed on the system.
- We saw that Metasploit contains an inbuilt module to harvest saved credentials from WinSCP.
- We collected the root credentials from WinSCP and used the
ssh_loginmodule to gain a root shell on the target.
- We uploaded another backdoor to gain a Meterpreter shell with root privileges on the target.