Search icon CANCEL
Subscription
0
Cart icon
Your Cart (0 item)
Close icon
You have no products in your basket yet
Save more on your purchases! discount-offer-chevron-icon
Savings automatically calculated. No voucher code required.
Arrow left icon
All Products
Best Sellers
New Releases
Books
Videos
Audiobooks
Learning Hub
Newsletter Hub
Free Learning
Arrow right icon
timer SALE ENDS IN
0 Days
:
00 Hours
:
00 Minutes
:
00 Seconds
Arrow up icon
GO TO TOP
Learning Continuous Integration with Jenkins

You're reading from   Learning Continuous Integration with Jenkins A beginner's guide to implementing Continuous Integration and Continuous Delivery using Jenkins 2

Arrow left icon
Product type Paperback
Published in Dec 2017
Publisher Packt
ISBN-13 9781788479356
Length 362 pages
Edition 2nd Edition
Tools
Arrow right icon
Author (1):
Arrow left icon
 Pathania Pathania
Author Profile Icon Pathania
Pathania
Arrow right icon
View More author details
Toc

Table of Contents (18) Chapters Close

Title Page
Credits
About the Author
About the Reviewer
www.PacktPub.com
Customer Feedback
Preface
1. Concepts of Continuous Integration FREE CHAPTER 2. Installing Jenkins 3. The New Jenkins 4. Configuring Jenkins 5. Distributed Builds 6. Installing SonarQube and Artifactory 7. Continuous Integration Using Jenkins 8. Continuous Delivery Using Jenkins 9. Continuous Deployment Using Jenkins 10. Supporting Tools and Installation Guide Index

Adding Jenkins slaves – standalone Windows machine/VMs


In the following section, we will try to add a standalone Windows machine as a Jenkins slave. Make sure you have Java installed on your soon-to-be Jenkins slave machine. Follow the given steps:

  1. From the left-hand side menu, click on New Node. On the resultant page, you will be asked to provide a name for your node and choose the type, as shown in the following screenshot:
  2. From the Jenkins dashboard, click on Manage Jenkins | Manage Nodes.

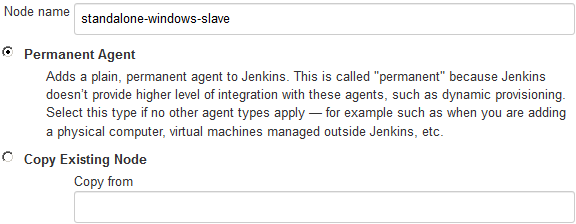
Adding a name and choosing the agent type (type of slave)

  1. Add a meaningful name under the Node name field and choose the agent type as Permanent Agent. These are the types of agents that are mainly physical machines and VMs. Also, there is an option to clone an existing Jenkins slave. To do so, choose the Copy Existing Node option and under the Copy from field, enter the name of the Jenkins slave source.
  2. In the following example however, we will choose the Permanent Agentoption.
  3. Click on the OK button to...
lock icon The rest of the chapter is locked
Register for a free Packt account to unlock a world of extra content!
A free Packt account unlocks extra newsletters, articles, discounted offers, and much more. Start advancing your knowledge today.
Unlock this book and the full library FREE for 7 days
Get unlimited access to 7000+ expert-authored eBooks and videos courses covering every tech area you can think of
Renews at £13.99/month. Cancel anytime
Visually different images