Search icon CANCEL
Subscription
0
Cart icon
Your Cart (0 item)
Close icon
You have no products in your basket yet
Save more on your purchases! discount-offer-chevron-icon
Savings automatically calculated. No voucher code required.
Arrow left icon
All Products
Best Sellers
New Releases
Books
Videos
Audiobooks
Learning Hub
Newsletter Hub
Free Learning
Arrow right icon
timer SALE ENDS IN
0 Days
:
00 Hours
:
00 Minutes
:
00 Seconds
Arrow up icon
GO TO TOP
Build Supercomputers with Raspberry Pi 3

You're reading from   Build Supercomputers with Raspberry Pi 3 A step-by-step guide that will enhance your skills in creating powerful systems to solve complex issues

Arrow left icon
Product type Paperback
Published in Mar 2017
Publisher Packt
ISBN-13 9781787282582
Length 254 pages
Edition 1st Edition
Languages
Arrow right icon
Author (1):
Arrow left icon
Carlos R. Morrison Carlos R. Morrison
Author Profile Icon Carlos R. Morrison
Carlos R. Morrison
Arrow right icon
View More author details
Toc

Table of Contents (20) Chapters Close

Build Supercomputers with Raspberry Pi 3
Credits
About the Author
About the Reviewer
www.PacktPub.com
Customer Feedback
Dedication
Preface
1. Getting Started with Supercomputing FREE CHAPTER 2. One Node Supercomputing 3. Preparing the Initial Two Nodes 4. Static IP Address and Hosts File Setup 5. Creating a Common User for All Nodes 6. Creating a Mountable Drive on the Master Node 7. Configuring the Eight Nodes 8. Testing the Super Cluster 9. Real-World Math Application 10. Real-World Physics Application 11. Real-World Engineering Application 1. Appendix

Transferring the code


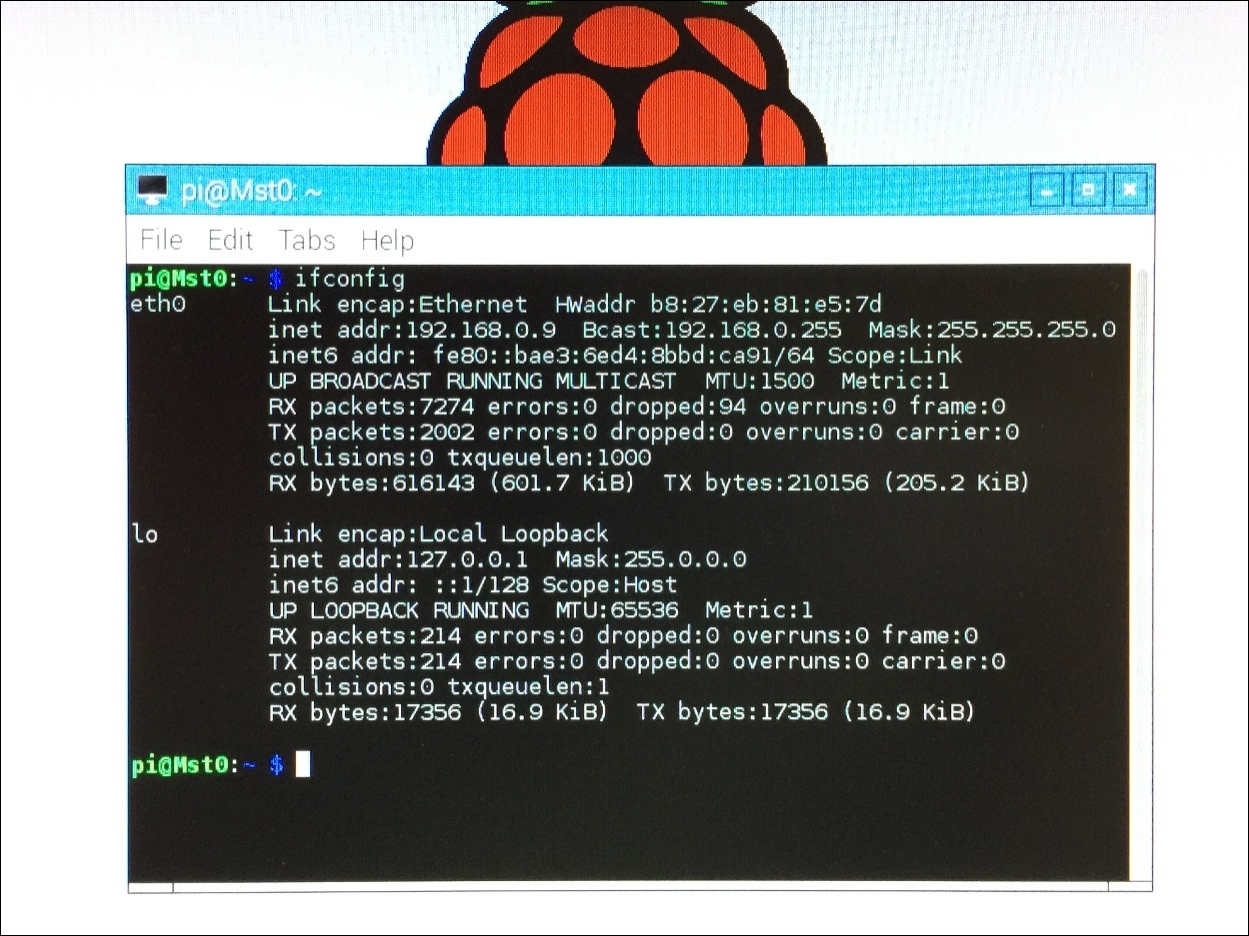
The next step is to transfer your codes from the main PC to the master Pi2 or Pi3, after which you will again compile and run the codes, much like you did earlier. But before we proceed, you need to ascertain the IP address of the master Pi2 or Pi3. Go ahead and enter the ifconfig command, in the Pi terminal window (see the following screenshot):

IP address

Note

The author's Pi2 IP address is 192.168.0.9 (see the second line of the displayed text). The MAC address is b8:27:eb:81:e5:7d (see the first line of the displayed text), and the net mask address is 255.255.255.0. Write down these numbers, as they will be needed later when configuring the Pis and switch.

Your IP address may be similar, possibly except for the last two highlighted numbers depicted earlier. Return to your main PC, and list the contents in the code folder located in the Desktop directory; that is, type and enter ls -la. The list of the folder content is displayed. You can now Secure File Transfer Protocol...

lock icon The rest of the chapter is locked
Register for a free Packt account to unlock a world of extra content!
A free Packt account unlocks extra newsletters, articles, discounted offers, and much more. Start advancing your knowledge today.
Unlock this book and the full library FREE for 7 days
Get unlimited access to 7000+ expert-authored eBooks and videos courses covering every tech area you can think of
Renews at £13.99/month. Cancel anytime
Visually different images