Search icon CANCEL
Subscription
0
Cart icon
Your Cart (0 item)
Close icon
You have no products in your basket yet
Save more on your purchases! discount-offer-chevron-icon
Savings automatically calculated. No voucher code required.
Arrow left icon
All Products
Best Sellers
New Releases
Books
Videos
Audiobooks
Learning Hub
Newsletter Hub
Free Learning
Arrow right icon
timer SALE ENDS IN
0 Days
:
00 Hours
:
00 Minutes
:
00 Seconds
Arrow up icon
GO TO TOP
Arduino Development Cookbook

You're reading from   Arduino Development Cookbook Over 50 hands-on recipes to quickly build and understand Arduino projects, from the simplest to the most extraordinary

Arrow left icon
Product type Paperback
Published in Apr 2015
Publisher
ISBN-13 9781783982943
Length 246 pages
Edition 1st Edition
Tools
Concepts
Arrow right icon
Author (1):
Arrow left icon
Cornel M Amariei Cornel M Amariei
Author Profile Icon Cornel M Amariei
Cornel M Amariei
Arrow right icon
View More author details
Toc

Table of Contents (16) Chapters Close

Arduino Development Cookbook
Credits
About the Author
About the Reviewers
www.PacktPub.com
Preface
1. Power on – Arduino Basics FREE CHAPTER 2. Blinking LEDs 3. Working with Buttons 4. Sensors 5. Motor Control 6. More Output Devices 7. Digital Communication with Arduino 8. Hacking Electronics – the Basics Index

Working with breadboards


When we need to test a schematic, we can quickly assemble electronic components on a breadboard. It is a simple and very powerful invention that makes electronics prototyping easy.

Look at the breadboard and correlate with the following diagram. Breadboards differ in size, shape, and color but they all share the same principle:

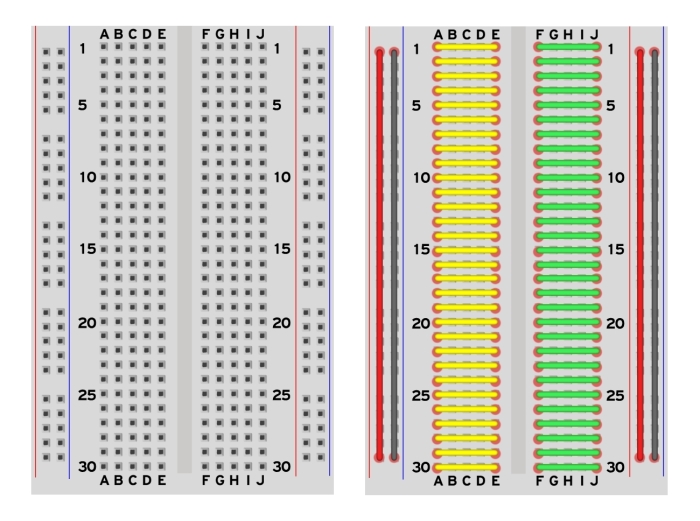
On the left we have a simple breadboard; on the right, we have the same breadboard with the internal connections shown. At the bottom and the top of the board we can see letters. If we follow, we can see that, on each row, the letters A, B, C, D, and E are interconnected, as shown by the yellow wire.

This means that, if we plug a pin in A, we will have a connection to B, C, D and E on the same row. Rows are not interconnected. As seen in the diagram, each row is individual. Also, on the same row, A, B, C, D, and E are not connected in any way to F, G, H, I, and J.

Some breadboards also have long power connectors on the sides. We can see them in this example by the red and black cable. These long strips are very useful for supplying power and GND to different parts of the board easily.

lock icon The rest of the chapter is locked
Register for a free Packt account to unlock a world of extra content!
A free Packt account unlocks extra newsletters, articles, discounted offers, and much more. Start advancing your knowledge today.
Unlock this book and the full library FREE for 7 days
Get unlimited access to 7000+ expert-authored eBooks and videos courses covering every tech area you can think of
Renews at £13.99/month. Cancel anytime
Visually different images