
Creating the parser
In order to run our code for the first time, we need to create a parser. We can quickly create a parser to run our code and check whether the values are being parsed properly.
Let's go ahead and create a file called weather_com_parser.py in the weatherterm/parsers directory. To make it simple, we are going to create just the necessary methods, and the only thing we are going to do when the methods are invoked is to raise a NotImplementedError:
from weatherterm.core import ForecastType


class WeatherComParser:

    def __init__(self):
        self._forecast = {
            ForecastType.TODAY: self._today_forecast,
            ForecastType.FIVEDAYS: self._five_and_ten_days_forecast,
            ForecastType.TENDAYS: self._five_and_ten_days_forecast,
            ForecastType.WEEKEND: self._weekend_forecast,
            }

    def _today_forecast(self, args):
        raise NotImplementedError()

    def _five_and_ten_days_forecast(self, args):
        raise NotImplementedError()

    def _weekend_forecast(self, args):
        raise NotImplementedError()

    def run(self, args):
        self._forecast_type = args.forecast_option
        forecast_function = self._forecast[args.forecast_option]
        return forecast_function(args)
In the initializer, we create a dictionary where the key is a member of the ForecasType enumeration, and the value is the method bound to any of these options. Our application will be able to present today's, a five-day, ten-day, and the weekend forecast, so we implement all four methods.
The run method only does two things; it looks up the function that needs to be executed using the forecast_option that we passed as an argument in the command line, and executes the function returning its value.
Now, the application is finally ready to be executed for the first time if you run the command in the command line:
$ python -m weatherterm --helpYou should see the application's help options:
usage: weatherterm [-h] -p {WeatherComParser} [-u {Celsius,Fahrenheit}] -a AREA_CODE [-v] [-td] [-5d] [-10d] [-w]

Weather info from weather.com on your terminal

optional arguments:
  -h, --help show this help message and exit
  -u {Celsius,Fahrenheit}, --unit {Celsius,Fahrenheit}
                        Specify the unit that will be used to display
                        the temperatures.
  -v, --version show program's version number and exit
  -td, --today Show the weather forecast for the current day

require arguments:
  -p {WeatherComParser}, --parser {WeatherComParser}
                    Specify which parser is going to be used to scrape
                    weather information.
  -a AREA_CODE, --areacode AREA_CODE
                    The code area to get the weather broadcast from. It
                     can be obtained at https://weather.com
As you can see, the ArgumentParse module already provides out-of-the-box output for help. There are ways you can customize the output how you want to, but I find the default layout really good.
Notice that the -p argument already gave you the option to choose the WeatherComParser. It wasn't necessary to hardcode it anywhere because the parser loader did all the work for us. The -u (--unit) flag also contains the items of the enumeration Unit. If someday you want to extend this application and add new units, the only thing you need to do here is to add the new item to the enumeration, and it will be automatically picked up and included as an option for the -u flag.
Now, if you run the application again and this time pass some parameters:
$ python -m weatherterm -u Celsius -a SWXX2372:1:SW -p WeatherComParser -tdYou will get an exception similar to this:
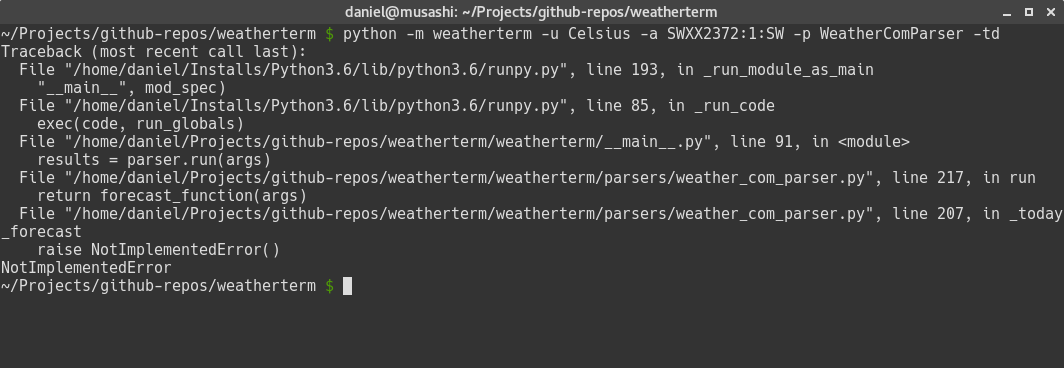
Don't worry -- this is exactly what we wanted! If you follow the stack trace, you can see that everything is working as intended. When we run our code, we call the run method on the selected parser from the __main__.py file, then we select the method associated with the forecast option, in this case, _today_forecast, and finally store the result in the forecast_function variable.
When the function stored in the forecast_function variable was executed, the NotImplementedError exception was raised. So far so good; the code is working perfectly and now we can start adding the implementation for each of these methods.
Getting today's weather forecast
The core functionality is in place and the entry point of the application with the argument parser will give the users of our application a much better experience. Now, it is finally the time we all have been waiting for, the time to start implementing the parser. We will start implementing the method to get today's weather forecast.
Since I am in Sweden, I will use the area code SWXX2372:1:SW (Stockholm, Sweden); however, you can use any area code you want. To get the area code of your choice, go to https://weather.com and search for the area you want. After selecting the area, the weather forecast for the current day will be displayed. Note that the URL changes, for example, when searching Stockholm, Sweden, the URL changes to:
https://weather.com/weather/today/l/SWXX2372:1:SW
For São Paulo, Brazil it will be:
https://weather.com/weather/today/l/BRXX0232:1:BR
Note that there is only one part of the URL that changes, and this is the area code that we want to pass as an argument to our application.
Adding helper methods
To start with, we need to import some packages:
import re

from weatherterm.core import Forecast
from weatherterm.core import Request
from weatherterm.core import Unit
from weatherterm.core import UnitConverter
And in the initializer, we are going to add the following code:
self._base_url = 'http://weather.com/weather/{forecast}/l/{area}'
self._request = Request(self._base_url)

self._temp_regex = re.compile('([0-9]+)\D{,2}([0-9]+)')
self._only_digits_regex = re.compile('[0-9]+')

self._unit_converter = UnitConverter(Unit.FAHRENHEIT)
In the initializer, we define the URL template we are going to use to perform requests to the weather website; then, we create a Request object. This is the object that will perform the requests for us.
Regular expressions are only used when parsing today's weather forecast temperatures.
We also define a UnitConverter object and set the default unit to Fahrenheit.
Now, we are ready to start adding two methods that will be responsible for actually searching for HTML elements within a certain class and return its contents. The first method is called _get_data:
def _get_data(self, container, search_items):
    scraped_data = {}

    for key, value in search_items.items():
        result = container.find(value, class_=key)

        data = None if result is None else result.get_text()

        if data is not None:
            scraped_data[key] = data

    return scraped_data
The idea of this method is to search items within a container that matches some criteria. The container is just a DOM element in the HTML and the search_items is a dictionary where the key is a CSS class and the value is the type of the HTML element. It can be a DIV, SPAN, or anything that you wish to get the value from.
It starts looping through search_items.items() and uses the find method to find the element within the container. If the item is found, we use get_text to extract the text of the DOM element and add it to a dictionary that will be returned when there are no more items to search.
The second method that we will implement is the _parser method. This will make use of the _get_data that we just implemented:
def _parse(self, container, criteria):
    results = [self._get_data(item, criteria)
               for item in container.children]

    return [result for result in results if result]
Here, we also get a container and criteria like the _get_data method. The container is a DOM element and the criterion is a dictionary of nodes that we want to find. The first comprehension gets all the container's children elements and passes them to the _get_data method.
The results will be a list of dictionaries with all the items that have been found, and we will only return the dictionaries that are not empty.
There are only two more helper methods we need to implement in order to get today's weather forecast in place. Let's implement a method called _clear_str_number:
def _clear_str_number(self, str_number):
    result = self._only_digits_regex.match(str_number)
    return '--' if result is None else result.group()
This method will use a regular expression to make sure that only digits are returned.
And the last method that needs to be implemented is the _get_additional_info method:
def _get_additional_info(self, content):
    data = tuple(item.td.span.get_text()
                 for item in content.table.tbody.children)
    return data[:2]
This method loops through the table rows, getting the text of every cell. This comprehension will return lots of information about the weather, but we are only interested in the first 2, the wind and the humidity.
Implementing today's weather forecast
It's time to start adding the implementation of the _today_forecast method, but first, we need to import BeautifulSoup. At the top of the file, add the following import statement:
from bs4 import BeautifulSoup
Now, we can start adding the _today_forecast method:
def _today_forecast(self, args):
    criteria = {
        'today_nowcard-temp': 'div',
        'today_nowcard-phrase': 'div',
        'today_nowcard-hilo': 'div',
        }

    content = self._request.fetch_data(args.forecast_option.value,
                                       args.area_code)

    bs = BeautifulSoup(content, 'html.parser')

    container = bs.find('section', class_='today_nowcard-container')

    weather_conditions = self._parse(container, criteria)

    if len(weather_conditions) < 1:
        raise Exception('Could not parse weather foreecast for
        today.')

    weatherinfo = weather_conditions[0]

    temp_regex = re.compile(('H\s+(\d+|\-{,2}).+'
                             'L\s+(\d+|\-{,2})'))
    temp_info = temp_regex.search(weatherinfo['today_nowcard-hilo'])
    high_temp, low_temp = temp_info.groups()

    side = container.find('div', class_='today_nowcard-sidecar')
    humidity, wind = self._get_additional_info(side)

    curr_temp = self._clear_str_number(weatherinfo['today_nowcard-
    temp'])

    self._unit_converter.dest_unit = args.unit

    td_forecast = Forecast(self._unit_converter.convert(curr_temp),
                           humidity,
                           wind,
                           high_temp=self._unit_converter.convert(
                               high_temp),
                           low_temp=self._unit_converter.convert(
                               low_temp),
                           description=weatherinfo['today_nowcard-
                            phrase'])

    return [td_forecast]
That is the function that will be called when the -td or --today flag is used on the command line. Let's break down this code so that we can easily understand what it does. Understanding this method is important because these methods parse data from other weather forecast options (five days, ten days, and weekend) that are very similar to this one.
The method's signature is quite simple; it only gets args, which is the Argument object that is created in the __main__ method. The first thing we do in this method is to create a criteria dictionary with all the DOM elements that we want to find in the markup:
criteria = {
    'today_nowcard-temp': 'div',
    'today_nowcard-phrase': 'div',
    'today_nowcard-hilo': 'div',
}
As mentioned before, the key to the criteria dictionary is the name of the DOM element's CSS class, and the value is the type of the HTML element:
- The
today_nowcard-tempclass is a CSS class of the DOM element containing the current temperature - The
today_nowcard-phraseclass is a CSS class of the DOM element containing weather conditions text (Cloudy, Sunny, and so on) - The
today_nowcard-hiloclass is the CSS class of the DOM element containing the highest and lowest temperature
Next, we are going to fetch, create, and use BeautifulSoup to parse the DOM:
content = self._request.fetch_data(args.forecast_option.value,
                                   args.area_code)

bs = BeautifulSoup(content, 'html.parser')

container = bs.find('section', class_='today_nowcard-container')

weather_conditions = self._parse(container, criteria)

if len(weather_conditions) < 1:
    raise Exception('Could not parse weather forecast for today.')

weatherinfo = weather_conditions[0]
First, we make use of the fetch_data method of the Request class that we created on the core module and pass two arguments; the first is the forecast option and the second argument is the area code that we passed on the command line.
After fetching the data, we create a BeautifulSoup object passing the content and a parser. Since we are getting back HTML, we use html.parser.
Now is the time to start looking for the HTML elements that we are interested in. Remember, we need to find an element that will be a container, and the _parser function will search through the children elements and try to find items that we defined in the dictionary criteria. For today's weather forecast, the element that contains all the data we need is a section element with the today_nowcard-container CSS class.
BeautifulSoup contains the find method, which we can use to find elements in the HTML DOM with specific criteria. Note that the keyword argument is called class_ and not class because class is a reserved word in Python.
Now that we have the container element, we can pass it to the _parse method, which will return a list. We perform a check if the result list contains at least one element and raise an exception if it is empty. If it is not empty, we just get the first element and assign it to the weatherinfo variable. The weatherinfo variable now contains a dictionary with all the items that we were looking for.
The next step is split the highest and lowest temperature:
temp_regex = re.compile(('H\s+(\d+|\-{,2}).+'
                         'L\s+(\d+|\-{,2})'))
temp_info = temp_regex.search(weatherinfo['today_nowcard-hilo'])
high_temp, low_temp = temp_info.groups()
We want to parse the text that has been extracted from the DOM element with the today_nowcard-hilo CSS class, and the text should look something like H 50 L 60, H -- L 60, and so on. An easy and simple way of extracting the text we want is to use a regular expression:
H\s+(\d+|\-{,2}).L\s+(\d+|\-{,2})
We can break this regular expression into two parts. First, we want to get the highest temperature—H\s+(\d+|\-{,2}); this means that it will match an H followed by some spaces, and then it will group a value that matches either numbers or a maximum of two dash symbols. After that, it will match any character. Lastly, comes the second part that basically does the same; however, it starts matching an L.
After executing the search method, it gets regular expression groups that have been returned calling the groups() function, which in this case will return two groups, one for the highest temperature and the second for the lowest.
Other information that we want to provide to our users is information about wind and humidity. The container element that contains this information has a CSS class called today_nowcard-sidecar:
side = container.find('div', class_='today_nowcard-sidecar')
wind, humidity = self._get_additional_info(side)
We just find the container and pass it into the _get_additional_info method that will loop through the children elements of the container, extracting the text and finally returning the results for us.
Finally, the last part of this method:
curr_temp = self._clear_str_number(weatherinfo['today_nowcard-temp'])

self._unit_converter.dest_unit = args.unit

td_forecast = Forecast(self._unit_converter.convert(curr_temp),
                       humidity,
                       wind,
                       high_temp=self._unit_converter.convert(
                           high_temp),
                       low_temp=self._unit_converter.convert(
                           low_temp),
                       description=weatherinfo['today_nowcard-
                        phrase'])

return [td_forecast]
Since the current temperature contains a special character (degree sign) that we don't want to have at this point, we use the _clr_str_number method to pass the today_nowcard-temp item of the weatherinfo dictionary.
Now that we have all the information we need, we construct the Forecast object and return it. Note that we are returning an array here; this is because all other options that we are going to implement (five-day, ten-day, and weekend forecasts) will return a list, so to make it consistent; also to facilitate when we will have to display this information on the terminal, we are also returning a list.
Another thing to note is that we are making use of the convert method of our UnitConverter to convert all the temperatures to the unit selected in the command line.
When running the command again:
$ python -m weatherterm -u Fahrenheit -a SWXX2372:1:SW -p WeatherComParser -tdYou should see an output similar to this:

Congratulations! You have implemented your first web scraping application. Next up, let's add the other forecast options.
Getting five- and ten-day weather forecasts
The site that we are currently scraping the weather forecast from (weather.com) also provides the weather forecast for five and ten days, so in this section, we are going to implement methods to parse these forecast options as well.
The markup of the pages that present data for five and ten days are very similar; they have the same DOM structure and share the same CSS classes, which makes it easier for us to implement just one method that will work for both options. Let's go ahead and add a new method to the wheater_com_parser.py file with the following contents:
def _parse_list_forecast(self, content, args):
    criteria = {
        'date-time': 'span',
        'day-detail': 'span',
        'description': 'td',
        'temp': 'td',
        'wind': 'td',
        'humidity': 'td',
    }

    bs = BeautifulSoup(content, 'html.parser')

    forecast_data = bs.find('table', class_='twc-table')
    container = forecast_data.tbody

    return self._parse(container, criteria)
As I mentioned before, the DOM for the five- and ten-day weather forecasts is very similar, so we create the _parse_list_forecast method, which can be used for both options. First, we define the criteria:
- The
date-timeis aspanelement and contains a string representing the day of the week - The
day-detailis aspanelement and contains a string with the date, for example,SEP 29 - The
descriptionis aTDelement and contains the weather conditions, for example,Cloudy tempis aTDelement and contains temperature information such as high and low temperaturewindis aTDelement and contains wind informationhumidityis aTDelement and contains humidity information
Now that we have the criteria, we create a BeatufulSoup object, passing the content and the html.parser. All the data that we would like to get is on the table with a CSS class named twc-table. We find the table and define the tbody element as a container.
Finally, we run the _parse method, passing the container and the criteria that we defined. The return of this function will look something like this:
[{'date-time': 'Today',
  'day-detail': 'SEP 28',
  'description': 'Partly Cloudy',
  'humidity': '78%',
  'temp': '60°50°',
  'wind': 'ESE 10 mph '},
 {'date-time': 'Fri',
  'day-detail': 'SEP 29',
  'description': 'Partly Cloudy',
  'humidity': '79%',
  'temp': '57°48°',
  'wind': 'ESE 10 mph '},
 {'date-time': 'Sat',
  'day-detail': 'SEP 30',
  'description': 'Partly Cloudy',
  'humidity': '77%',
  'temp': '57°49°',
  'wind': 'SE 10 mph '},
 {'date-time': 'Sun',
  'day-detail': 'OCT 1',
  'description': 'Cloudy',
  'humidity': '74%',
  'temp': '55°51°',
  'wind': 'SE 14 mph '},
 {'date-time': 'Mon',
  'day-detail': 'OCT 2',
  'description': 'Rain',
  'humidity': '87%',
  'temp': '55°48°',
  'wind': 'SSE 18 mph '}]
Another method that we need to create is a method that will prepare the data for us, for example, parsing and converting temperature values and creating a Forecast object. Add a new method called _prepare_data with the following content:
def _prepare_data(self, results, args):
    forecast_result = []

    self._unit_converter.dest_unit = args.unit

    for item in results:
        match = self._temp_regex.search(item['temp'])
        if match is not None:
            high_temp, low_temp = match.groups()

        try:
            dateinfo = item['weather-cell']
            date_time, day_detail = dateinfo[:3], dateinfo[3:]
            item['date-time'] = date_time
            item['day-detail'] = day_detail
        except KeyError:
            pass

        day_forecast = Forecast(
            self._unit_converter.convert(item['temp']),
            item['humidity'],
            item['wind'],
            high_temp=self._unit_converter.convert(high_temp),
            low_temp=self._unit_converter.convert(low_temp),
            description=item['description'].strip(),
            forecast_date=f'{item["date-time"]} {item["day-
             detail"]}',
            forecast_type=self._forecast_type)
        forecast_result.append(day_forecast)

    return forecast_result
This method is quite simple. First, loop through the results and apply the regex that we created to split the high and low temperatures stored in item['temp']. If there's a match, it will get the groups and assign the value to high_temp and low_temp.
After that, we create a Forecast object and append it to a list that will be returned later on.
Lastly, we add the method that will be invoked when the -5d or -10d flag is used. Create another method called _five_and_ten_days_forecast with the following contents:
def _five_and_ten_days_forecast(self, args):
    content = self._request.fetch_data(args.forecast_option.value, args.area_code)
    results = self._parse_list_forecast(content, args)
    return self._prepare_data(results)
This method only fetches the contents of the page passing the forecast_option value and the area code, so it will be possible to build the URL to perform the request. When the data is returned, we pass it down to the _parse_list_forecast, which will return a list of Forecast objects (one for each day); finally, we prepare the data to be returned using the _prepare_data method.
Before we run the command, we need to enable this option in the command line tool that we implemented; go over to the __main__.py file, and, just after the definition of the -td flag, add the following code:
argparser.add_argument('-5d', '--fivedays',
                       dest='forecast_option',
                       action='store_const',
                       const=ForecastType.FIVEDAYS,
                       help='Shows the weather forecast for the next
                       5 days')
Now, run the application again, but this time using the -5d or --fivedays flag:
$ python -m weatherterm -u Fahrenheit -a SWXX2372:1:SW -p WeatherComParser -5dIt will produce the following output:
>> [Today SEP 28]
    High 60° / Low 50° (Partly Cloudy)
    Wind: ESE 10 mph / Humidity: 78%

>> [Fri SEP 29]
    High 57° / Low 48° (Partly Cloudy)
    Wind: ESE 10 mph / Humidity: 79%

>> [Sat SEP 30]
    High 57° / Low 49° (Partly Cloudy)
    Wind: SE 10 mph / Humidity: 77%

>> [Sun OCT 1]
    High 55° / Low 51° (Cloudy)
    Wind: SE 14 mph / Humidity: 74%

>> [Mon OCT 2]
    High 55° / Low 48° (Rain)
    Wind: SSE 18 mph / Humidity: 87%
To wrap this section up, let's include the option to get the weather forecast for the next ten days as well, in the __main__.py file, just below the -5d flag definition. Add the following code:
argparser.add_argument('-10d', '--tendays',
                       dest='forecast_option',
                       action='store_const',
                       const=ForecastType.TENDAYS,
                       help='Shows the weather forecast for the next
                       10 days')
If you run the same command as we used to get the five-day forecast but replace the -5d flag with -10d, like so:
$ python -m weatherterm -u Fahrenheit -a SWXX2372:1:SW -p WeatherComParser -10dYou should see the ten-day weather forecast output:
>> [Today SEP 28]
    High 60° / Low 50° (Partly Cloudy)
    Wind: ESE 10 mph / Humidity: 78%

>> [Fri SEP 29]
    High 57° / Low 48° (Partly Cloudy)
    Wind: ESE 10 mph / Humidity: 79%

>> [Sat SEP 30]
    High 57° / Low 49° (Partly Cloudy)
    Wind: SE 10 mph / Humidity: 77%

>> [Sun OCT 1]
    High 55° / Low 51° (Cloudy)
    Wind: SE 14 mph / Humidity: 74%

>> [Mon OCT 2]
    High 55° / Low 48° (Rain)
    Wind: SSE 18 mph / Humidity: 87%

>> [Tue OCT 3]
    High 56° / Low 46° (AM Clouds/PM Sun)
    Wind: S 10 mph / Humidity: 84%

>> [Wed OCT 4]
    High 58° / Low 47° (Partly Cloudy)
    Wind: SE 9 mph / Humidity: 80%

>> [Thu OCT 5]
    High 57° / Low 46° (Showers)
    Wind: SSW 8 mph / Humidity: 81%

>> [Fri OCT 6]
    High 57° / Low 46° (Partly Cloudy)
    Wind: SW 8 mph / Humidity: 76%

>> [Sat OCT 7]
    High 56° / Low 44° (Mostly Sunny)
    Wind: W 7 mph / Humidity: 80%

>> [Sun OCT 8]
    High 56° / Low 44° (Partly Cloudy)
    Wind: NNE 7 mph / Humidity: 78%

>> [Mon OCT 9]
    High 56° / Low 43° (AM Showers)
    Wind: SSW 9 mph / Humidity: 79%

>> [Tue OCT 10]
    High 55° / Low 44° (AM Showers)
    Wind: W 8 mph / Humidity: 79%

>> [Wed OCT 11]
    High 55° / Low 42° (AM Showers)
    Wind: SE 7 mph / Humidity: 79%

>> [Thu OCT 12]
    High 53° / Low 43° (AM Showers)
    Wind: NNW 8 mph / Humidity: 87%
As you can see, the weather was not so great here in Sweden while I was writing this book.
Getting the weekend weather forecast
The last weather forecast option that we are going to implement in our application is the option to get the weather forecast for the upcoming weekend. This implementation is a bit different from the others because the data returned by the weekend's weather is slightly different from today's, five, and ten days weather forecast.
The DOM structure is different and some CSS class names are different as well. If you remember the previous methods that we implemented, we always use the _parser method, which gives us arguments such as the container DOM and a dictionary with the search criteria. The return value of that method is also a dictionary where the key is the class name of the DOM that we were searching and the value is the text within that DOM element.
Since the CSS class names of the weekend page are different, we need to implement some code to get that array of results and rename all the keys so the _prepare_data function can use scraped results properly.
With that said, let's go ahead and create a new file in the weatherterm/core directory called mapper.py with the following contents:
class Mapper:

    def __init__(self):
        self._mapping = {}

    def _add(self, source, dest):
        self._mapping[source] = dest

    def remap_key(self, source, dest):
        self._add(source, dest)

    def remap(self, itemslist):
        return [self._exec(item) for item in itemslist]

    def _exec(self, src_dict):
        dest = dict()

        if not src_dict:
            raise AttributeError('The source dictionary cannot be
            empty or None')

        for key, value in src_dict.items():
            try:
                new_key = self._mapping[key]
                dest[new_key] = value
            except KeyError:
                dest[key] = value
        return dest
The Mapper class gets a list with dictionaries and renames specific keys that we would like to rename. The important methods here are remap_key and remap. The remap_key gets two arguments, source and dest. source is the key that we wish to rename and dest is the new name for that key. The remap_key method will add it to an internal dictionary called _mapping, which will be used later on to look up the new key name.
The remap method simply gets a list containing the dictionaries and, for every item on that list, it calls the _exec method that first creates a brand new dictionary, then checks whether the dictionary is empty. In that case, it raises an AttributeError.
If the dictionary has keys, we loop through its items, search for whether the current item's key has a new name in the mapping dictionary. If the new key name is found, will to create a new item with the new key name; otherwise, we just keep the old name. After the loop, the list is returned with all the dictionaries containing the keys with a new name.
Now, we just need to add it to the __init__.py file in the weatherterm/core directory:
from .mapper import Mapper
And, in the weather_com_parser.py file in weatherterm/parsers, we need to import the Mapper:
from weatherterm.core import Mapper
With the mapper in place, we can go ahead and create the _weekend_forecast method in the weather_com_parser.py file, like so:
def _weekend_forecast(self, args):
    criteria = {
        'weather-cell': 'header',
        'temp': 'p',
        'weather-phrase': 'h3',
        'wind-conditions': 'p',
        'humidity': 'p',
    }

    mapper = Mapper()
    mapper.remap_key('wind-conditions', 'wind')
    mapper.remap_key('weather-phrase', 'description')

    content = self._request.fetch_data(args.forecast_option.value,
                                       args.area_code)

    bs = BeautifulSoup(content, 'html.parser')

    forecast_data = bs.find('article', class_='ls-mod')
    container = forecast_data.div.div

    partial_results = self._parse(container, criteria)
    results = mapper.remap(partial_results)

    return self._prepare_data(results, args)
The method starts off by defining the criteria in exactly the same way as the other methods; however, the DOM structure is slightly different and some of the CSS names are also different:
weather-cell: Contains the forecast date:FriSEP 29temp: Contains the temperature (high and low):57°F48°Fweather-phrase: Contains the weather conditions:Cloudywind-conditions: Wind informationhumidity: The humidity percentage
As you can see, to make it play nicely with the _prepare_data method, we will need to rename some keys in the dictionaries in the result set—wind-conditions should be wind and weather-phrase should be the description.
Luckily, we have introduced the Mapper class to help us out:
mapper = Mapper()
mapper.remap_key('wind-conditions', 'wind')
mapper.remap_key('weather-phrase', 'description')
We create a Mapper object and say, remap wind-conditions to wind and weather-phrase to description:
content = self._request.fetch_data(args.forecast_option.value,
                                   args.area_code)

bs = BeautifulSoup(content, 'html.parser')

forecast_data = bs.find('article', class_='ls-mod')
container = forecast_data.div.div

partial_results = self._parse(container, criteria)
We fetch all the data, create a BeautifulSoup object using the html.parser, and find the container element that contains the children elements that we are interested in. For the weekend forecast, we are interested in getting the article element with a CSS class called ls-mod and within that article we go down to the first child element, which is a DIV, and gets its first child element, which is also a DIV element.
The HTML should look something like this:
<article class='ls-mod'>
  <div>
    <div>
      <!-- this DIV will be our container element -->
    </div>
  </div>
</article>
That's the reason we first find the article, assign it to forecast_data, and then use forecast_data.div.div so we get the DIV element we want.
After defining the container, we pass it to the _parse method together with the container element; when we get the results back, we simply need to run the remap method of the Mapper instance, which will normalize the data for us before we call _prepare_data.
Now, the last detail before we run the application and get the weather forecast for the weekend is that we need to include the --w and --weekend flag to the ArgumentParser. Open the __main__.py file in the weatherterm directory and, just below the --tenday flag, add the following code:
argparser.add_argument('-w', '--weekend',
                       dest='forecast_option',
                       action='store_const',
                       const=ForecastType.WEEKEND,
                       help=('Shows the weather forecast for the
                             next or '
                             'current weekend'))
Great! Now, run the application using the -w or --weekend flag:
>> [Fri SEP 29]
    High 13.9° / Low 8.9° (Partly Cloudy)
    Wind: ESE 10 mph / Humidity: 79%

>> [Sat SEP 30]
    High 13.9° / Low 9.4° (Partly Cloudy)
    Wind: SE 10 mph / Humidity: 77%

>> [Sun OCT 1]
    High 12.8° / Low 10.6° (Cloudy)
    Wind: SE 14 mph / Humidity: 74%
Note that this time, I used the -u flag to choose Celsius. All the temperatures in the output are represented in Celsius instead of Fahrenheit.