Using the Radio Button widget
This recipe displays certain flight types via Radio Button and when the user selects the radio button, the price associated with that flight will be displayed. We need to first understand the workings of Radio Button.
Understanding Radio Button
The Radio Button widgets are very popular when you want the user to select only one option out of the available options. Such options are known as mutually exclusive options. When the user selects an option, the previously selected option is automatically deselected. The Radio Button widgets are instances of the QRadioButton class. Every radio button has an associated text label. The radio button can be either in selected (checked) or unselected (unchecked) states. If you want two or more sets of radio buttons, where each set allows the exclusive selection of a radio button, put them into different button groups (instances of QButtonGroup). The methods provided by QRadioButton are shown next.
Methods
The QRadioButton class provides the following methods:
isChecked(): This method returns the Boolean value true if the button is in the selected state.setIcon(): This method displays an icon with the radio button.setText(): This method assigns the text to the radio button. If you want to specify a shortcut key for the radio button, precede the preferred character in the text with an ampersand (&). The shortcut character will be underlined.setChecked(): To make any radio button appear selected by default, pass the Boolean value true to this method.
Signal description
Signals emitted by QRadioButton are as follows:
toggled(): This signal is emitted whenever the button changes its state from checked to unchecked or vice versaclicked(): This signal is emitted when a button is activated (that is, pressed and released) or when its shortcut key is pressedstateChanged(): This signal is emitted when a radio button changes its state from checked to unchecked or vice versa
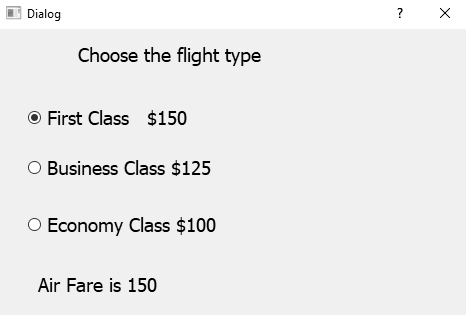
To understand the concept of radio buttons, let's create an application that asks the user to select the flight type and displays three options, First Class, Business Class, and Economy Class, in the form of radio buttons. On selecting an option through the radio button, the price for that flight will be displayed.
How to do it...
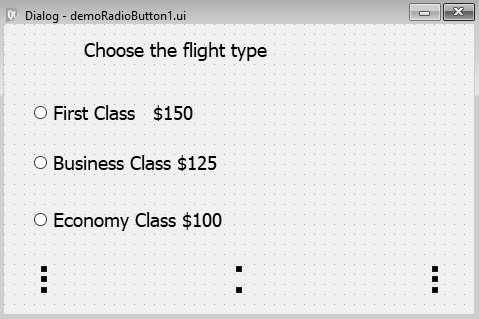
Let's create a new application based on the Dialog without Buttons template. This application will display different flight types along with their respective prices. When a user selects a flight type, its price will be displayed on the screen:
- Drag and drop two
Labelwidgets and threeRadio Buttonwidgets onto the form. - Set the
textproperty of the firstLabelwidget toChoose the flight typeand delete thetextproperty of the secondLabelwidget. Thetextproperty of the secondLabelwidget will be set through code; it will be used to display the price of the selected flight type. - Set the
textproperty of the threeRadio Buttonwidgets toFirst Class $150,Business Class $125, andEconomy Class $100. - Set the
objectNameproperty of the secondLabelwidget tolabelFare. The default object names of the three radio buttons areradioButton,radioButton_2, andradioButton_3. Change theobjectNameproperty of these three radio buttons toradioButtonFirstClass,radioButtonBusinessClass, andradioButtonEconomyClass. - Save the application with name
demoRadioButton1.ui.
Take a look at the following screenshot:
The demoRadioButton1.ui application is an XML file and needs to be converted into Python code through thepyuic5command utility. The generated Python code, demoRadioButton1.py, can be seen in the source code bundle of this book.
- Import the
demoRadioButton1.pyfile as a header file in the Python script that you are going to create next to invoke the user interface design. - In the Python script, write the code to display the flight type on the basis of the radio button selected by the user. Name the source file
callRadioButton1.py; its code is shown here:
import sys
from PyQt5.QtWidgets import QDialog, QApplication
from demoRadioButton1 import *
class MyForm(QDialog):
    def __init__(self):
        super().__init__()
        self.ui = Ui_Dialog()
        self.ui.setupUi(self)
        self.ui.radioButtonFirstClass.toggled.connect(self.
        dispFare)
        self.ui.radioButtonBusinessClass.toggled.connect(self.
        dispFare)
        self.ui.radioButtonEconomyClass.toggled.connect(self.
        dispFare)
        self.show()
    def dispFare(self):
        fare=0
        if self.ui.radioButtonFirstClass.isChecked()==True:
            fare=150
        if self.ui.radioButtonBusinessClass.isChecked()==True:
            fare=125
        if self.ui.radioButtonEconomyClass.isChecked()==True:
            fare=100
        self.ui.labelFare.setText("Air Fare is "+str(fare))
if __name__=="__main__":
    app = QApplication(sys.argv)
    w = MyForm()
    w.show()
    sys.exit(app.exec_())
How it works...
The toggled() event of Radio Button is connected to the dispFare() function, which will display the price of the selected flight type. In the dispFare() function, you check the state of the radio buttons. Hence, if radioButtonFirstClass is selected, the value 50 is assigned to the fare variable. Similarly, if radioButtonBusinessClass is selected, the value 125 is assigned to the fare variable. Similarly, the value 100 is assigned to the fare variable when radioButtonEconomyClass is selected. Finally, the value in the fare variable is displayed via labelFare.
On executing the previous program, you get a dialog that displays three flight types and prompts the user to select the one that he/she wants to use for travel. On selecting a flight type, the price of the selected flight type is displayed, as shown in the following screenshot: