In this article Integrating Google Play Services by Raul Portales, author of the book Mastering Android Game Development, we will cover the tools that Google Play Services offers for game developers. We'll see the integration of achievements and leaderboards in detail, take an overview of events and quests, save games, and use turn-based and real-time multiplaying. Google provides Google Play Services as a way to use special features in apps. Being the game services subset the one that interests us the most. Note that Google Play Services are updated as an app that is independent from the operating system. This allows us to assume that most of the players will have the latest version of Google Play Services installed.
(For more resources related to this topic, see here.)
More and more features are being moved from the Android SDK to the Play Services because of this.
Play Services offer much more than just services for games, but there is a whole section dedicated exclusively to games, Google Play Game Services (GPGS). These features include achievements, leaderboards, quests, save games, gifts, and even multiplayer support.
GPGS also comes with a standalone app called "Play Games" that shows the user the games he or she has been playing, the latest achievements, and the games his or her friends play. It is a very interesting way to get exposure for your game.
Even as a standalone feature, achievements and leaderboards are two concepts that most games use nowadays, so why make your own custom ones when you can rely on the ones made by Google?
GPGS can be used on many platforms: Android, iOS and web among others. It is more used on Android, since it is included as a part of Google apps.
There is extensive step-by-step documentation online, but the details are scattered over different places. We will put them together here and link you to the official documentation for more detailed information.
For this article, you are supposed to have a developer account and have access to the Google Play Developer Console. It is also advisable for you to know the process of signing and releasing an app. If you are not familiar with it, there is very detailed official documentation at http://developer.android.com/distribute/googleplay/start.html.
There are two sides of GPGS: the developer console and the code. We will alternate from one to the other while talking about the different features.
Setting up the developer console
Now that we are approaching the release state, we have to start working with the developer console.
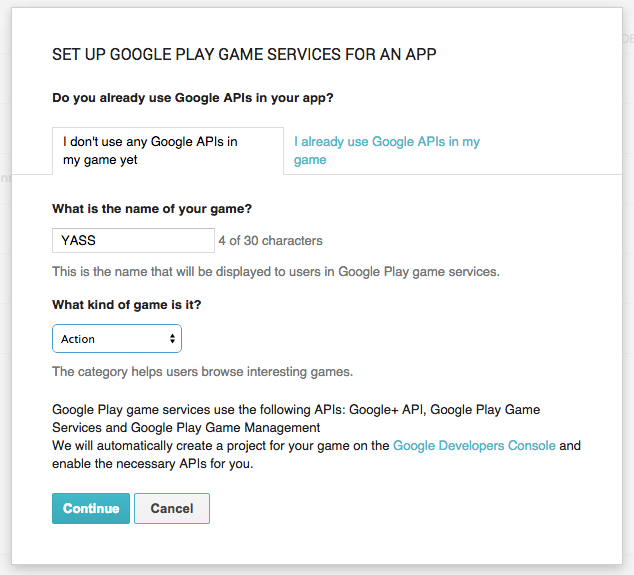
The first thing we need to do is to get into the Game services section of the console to create and configure a new game. In the left menu, we have an option labeled Game services. This is where you have to click. Once in the Game services section, click on Add new game:

This bring us to the set up dialog. If you are using other Google services like Google Maps or Google Cloud Messaging (GCM) in your game, you should select the second option and move forward. Otherwise, you can just fill in the fields for I don't use any Google APIs on my game yet and continue. If you don't know whether you are already using them, you probably aren't.
Now, it is time to link a game to it. I recommend you publish your game beforehand as an alpha release. This will let you select it from the list when you start typing the package name.
Publishing the game to the alpha channel before adding it to Game services makes it much easier to configure.
If you are not familiar with signing and releasing your app, check out the official documentation at http://developer.android.com/tools/publishing/app-signing.html.
Finally, there are only two steps that we have to take when we link the first app. We need to authorize it and provide branding information. The authorization will generate an OAuth key—that we don't need to use since it is required for other platforms—and also a game ID. This ID is unique to all the linked apps and we will need it to log in. But there is no need to write it down now, it can be found easily in the console at anytime.
Authorizing the app will generate the game ID, which is unique to all linked apps.
Note that the app we have added is configured with the release key. If you continue and try the login integration, you will get an error telling you that the app was signed with the wrong certificate:

You have two ways to work with this limitation:
- Always make a release build to test GPGS integration
- Add your debug-signed game as a linked app
I recommend that you add the debug signed app as a linked app. To do this, we just need to link another app and configure it with the SHA1 fingerprint of the debug key. To obtain it, we have to open a terminal and run the keytool utility:
keytool -exportcert -alias androiddebugkey -keystore <path-to-debug-keystore> -list -v
Note that in Windows, the debug keystore can be found at C:Users<USERNAME>.androiddebug.keystore. On Mac and Linux, the debug keystore is typically located at ~/.android/debug.keystore.

Dialog to link the debug application on the Game Services console
Now, we have the game configured. We could continue creating achievements and leaderboards in the console, but we will put it aside and make sure that we can sign in and connect with GPGS.
The only users who can sign in to GPGS while a game is not published are the testers. You can make the alpha and/or beta testers of a linked app become testers of the game services, and you can also add e-mail addresses by hand for this. You can modify this in the Testing tab.
Only test accounts can access a game that is not published.
The e-mail of the owner of the developer console is prefilled as a tester. Just in case you have problems logging in, double-check the list of testers.
A game service that is not published will not appear in the feed of the Play Services app, but it will be possible to test and modify it. This is why it is a good idea to keep it in draft mode until the game itself is ready and publish both the game and the game services at the same time.
Setting up the code
The first thing we need to do is to add the Google Play Services library to our project. This should already have been done by the wizard when we created the project, but I recommend you to double-check it now.
The library needs to be added to the build.gradle file of the main module. Note that Android Studio projects contain a top-level build.gradle and a module-level build.gradle for each module. We will modify the one that is under the mobile module.
Make sure that the play services' library is listed under dependencies:
apply plugin: 'com.android.application'


dependencies {
compile 'com.android.support:appcompat-v7:22.1.1'
compile 'com.google.android.gms:play-services:7.3.0'
}
At the point of writing, the latest version is 7.3.0. The basic features have not changed much and they are unlikely to change. You could force Gradle to use a specific version of the library, but in general I recommend you use the latest version.
Once you have it, save the changes and click on Sync Project with Gradle Files.
To be able to connect with GPGS, we need to let the game know what the game ID is. This is done through the <meta-data> tag on AndroidManifest.xml. You could hardcode the value here, but it is highly recommended that you set it as a resource in your Android project.
We are going to create a new file for this under res/values, which we will name play_services.xml. In this file we will put the game ID, but later we will also have the achievements and leaderboard IDs in it. Using a separate file for these values is recommended because they are constants that do not need to be translated:
<application>
<meta-data android_name="com.google.android.gms.games.APP_ID" android_value="@string/app_id" />
<meta-data android_name="com.google.android.gms.version" android_value="@integer/google_play_services_version"/>
[...]
</application>
Adding this metadata is extremely important. If you forget to update the AndroidManifest.xml, the app will crash when you try to sign in to Google Play services. Note that the integer for the gms version is defined in the library and we do not need to add it to our file.
If you forget to add the game ID to the strings the app will crash.
Now, it is time to proceed to sign in. The process is quite tedious and requires many checks, so Google has released an open source project named BaseGameUtils, which makes it easier. Unfortunately this project is not a part of the play services' library and it is not even available as a library. So, we have to get it from GitHub (either check it out or download the source as a ZIP file).
BaseGameUtils abstracts us from the complexity of handling the connection with Play Services.
Even more cumbersome, BaseGameUtils is not available as a standalone download and has to be downloaded together with another project. The fact that this significant piece of code is not a part of the official library makes it quite tedious to set up. Why it has been done like this is something that I do not comprehend myself.
The project that contains BaseGameUtils is called android-basic-samples and it can be downloaded from https://github.com/playgameservices/android-basic-samples.
Adding BaseGameUtils is not as straightforward as we would like it to be.
Once android-basic-samples is downloaded, open your game project in Android Studio. Click on File > Import Module and navigate to the directory where you downloaded android-basic-samples. Select the BaseGameUtils module in the BasicSamples/libraries directory and click on OK.
Finally, update the dependencies in the build.gradle file for the mobile module and sync gradle again:
dependencies {
compile project(':BaseGameUtils')
[...]
}
After all these steps to set up the project, we are finally ready to begin the sign in.
We will make our main Activity extend from BaseGamesActivity, which takes care of all the handling of the connections, and sign in with Google Play Services.
One more detail: until now, we were using Activity and not FragmentActivity as the base class for YassActivity (BaseGameActivity extends from FragmentActivity) and this change will mess with the behavior of our dialogs while calling navigateBack. We can change the base class of BaseGameActivity or modify navigateBack to perform a pop-on fragment navigation hierarchy. I recommend the second approach:
public void navigateBack() {
// Do a pop on the navigation history
getFragmentManager().popBackStack();
}
This util class has been designed to work with single-activity games. It can be used in multiple activities, but it is not straightforward. This is another good reason to keep the game in a single activity.
The BaseGameUtils is designed to be used in single-activity games.
The default behavior of BaseGameActivity is to try to log in each time the Activity is started. If the user agrees to sign in, the sign in will happen automatically. But if the user rejects doing so, he or she will be asked again several times.
I personally find this intrusive and annoying, and I recommend you to only prompt to log in to Google Play services once (and again, if the user logs out). We can always provide a login entry point in the app.
This is very easy to change. The default number of attempts is set to 3 and it is a part of the code of GameHelper:
// Should we start the flow to sign the user in automatically on   startup? If
// so, up to
// how many times in the life of the application?
static final int DEFAULT_MAX_SIGN_IN_ATTEMPTS = 3;
int mMaxAutoSignInAttempts = DEFAULT_MAX_SIGN_IN_ATTEMPTS;
So, we just have to configure it for our activity, adding one line of code during onCreate to change the default behavior with the one we want: just try it once:
getGameHelper().setMaxAutoSignInAttempts(1);
Finally, there are two methods that we can override to act when the user successfully logs in and when there is a problem: onSignInSucceeded and onSignInFailed. We will use them when we update the main menu at the end of the article.
Further use of GPGS is to be made via the GameHelper and/or the GoogleApiClient, which is a part of the GameHelper. We can obtain a reference to the GameHelper using the getGameHelper method of BaseGameActivity.
Now that the user can sign into Google Play services we can continue with achievements and leaderboards. Let's go back to the developer console.
Achievements
We will first define a few achievements in the developer console and then see how to unlock them in the game. Note that to publish any game with GPGS, you need to define at least five achievements. No other feature is mandatory, but achievements are.
We need to define at least five achievements to publish a game with Google Play Game services.
If you want to use GPGS with a game that has no achievements, I recommend you to add five dummy secret achievements and let them be.
To add an achievement, we just need to navigate to the Achievements tab on the left and click on Add achievement:

The menu to add a new achievement has a few fields that are mostly self-explanatory. They are as follows:
- Name: the name that will be shown (can be localized to different languages).
- Description: the description of the achievement to be shown (can also be localized to different languages).
- Icon: the icon of the achievement as a 512x512 px PNG image. This will be used to show the achievement in the list and also to generate the locked image and the in-game popup when it is unlocked.
- Incremental achievements: if the achievement requires a set of steps to be completed, it is called an incremental achievement and can be shown with a progress bar. We will have an incremental achievement to illustrate this.
- Initial state: Revealed/Hidden depending on whether we want the achievement to be shown or not. When an achievement is shown, the name and description are visible, players know what they have to do to unlock it. A hidden achievement, on the other hand, is a secret and can be a funny surprise when unlocked. We will have two secret achievements.
- Points: GPGS allows each game to have 1,000 points to give for unlocking achievements. This gets converted to XP in the player profile on Google Play games. This can be used to highlight that some achievements are harder than others, and therefore grant a bigger reward. You cannot change these once they are published, so if you plan to have more achievements in the future, plan ahead with the points.
- List order: The order of the achievements is shown. It is not followed all the time, since on the Play Games app the unlocked ones are shown before the locked ones. It is still handy to rearrange them.

Dialog to add an achievement on the developer console
As we already decided, we will have five achievements in our game and they will be as follows:
- Big Score: score over 100,000 points in one game. This is to be granted while playing.
- Asteroid killer: destroy 100 asteroids. This will count them across different games and is an incremental achievement.
- Survivor: survive for 60 seconds.
- Target acquired: a hidden achievement. Hit 20 asteroids in a row without missing a hit. This is meant to reward players that only shoot when they should.
- Target lost: this is supposed to be a funny achievement, granted when you miss with 10 bullets in a row. It is also hidden, because otherwise it would be too easy to unlock.
So, we created some images for them and added them to the console.
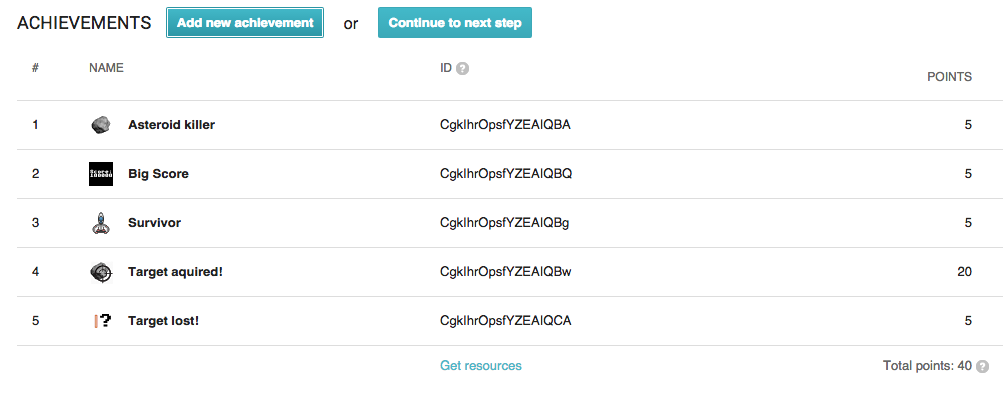
The developer console with all the configured achievements
Each achievement has a string ID. We will need these ids to unlock the achievements in our game, but Google has made it easy for us. We have a link at the bottom named Get resources that pops up a dialog with the string resources we need. We can just copy them from there and paste them in our project in the play_services.xml file we have already created.

Architecture
For our game, given that we only have five achievements, we are going to add the code for achievements directly into the ScoreObject. This will make it less code for you to read so we can focus on how it is done. However, for a real production code I recommend you define a dedicated architecture for achievements.
The recommended architecture is to have an AchievementsManager class that loads all the achievements when the game starts and stores them in three lists:
- All achievements
- Locked achievements
- Unlocked achievements
Then, we have an Achievement base class with an abstract check method that we implement for each one of them:
public boolean check (GameEngine gameEngine, GameEvent gameEvent) {
}
This base class takes care of loading the achievement state from local storage (I recommend using SharedPreferences for this) and modify it as per the result of check.
The achievements check is done at AchievementManager level using a checkLockedAchievements method that iterates over the list of achievements that can be unlocked. This method should be called as a part of onEventReceived of GameEngine.
This architecture allows you to check only the achievements that are yet to be unlocked and also all the achievements included in the game in a specific dedicated place.
In our case, since we are keeping the score inside the ScoreGameObject, we are going to add all achievements code there.
Note that making the GameEngine take care of the score and having it as a variable that other objects can read are also recommended design patterns, but it was simpler to do this as a part of ScoreGameObject.
Unlocking achievements
To handle achievements, we need to have access to an object of the class GoogleApiClient. We can get a reference to it in the constructor of ScoreGameObject:
private final GoogleApiClient mApiClient;

public ScoreGameObject(YassBaseFragment parent, View view, int viewResId) {
[…]
mApiClient =  parent.getYassActivity().getGameHelper().getApiClient();
}
The parent Fragment has a reference to the Activity, which has a reference to the GameHelper, which has a reference to the GoogleApiClient.
Unlocking an achievement requires just a single line of code, but we also need to check whether the user is connected to Google Play services or not before trying to unlock an achievement. This is necessary because if the user has not signed it, an exception is thrown and the game crashes.
Unlocking an achievement requires just a single line of code.
But this check is not enough. In the edge case, when the user logs out manually from Google Play services (which can be done in the achievements screen), the connection will not be closed and there is no way to know whether he or she has logged out.
We are going to create a utility method to unlock the achievements that does all the checks and also wraps the unlock method into a try/catch block and make the API client disconnect if an exception is raised:
private void unlockSafe(int resId) {
if (mApiClient.isConnecting() || mApiClient.isConnected()) {
   try {
     Games.Achievements.unlock(mApiClient, getString(resId));
   } catch (Exception e) {
     mApiClient.disconnect();
   }
}
}
Even with all the checks, the code is still very simple.
Let's work on the particular achievements we have defined for the game. Even though they are very specific, the methodology to track game events and variables and then check for achievements to unlock is in itself generic, and serves as a real-life example of how to deal with achievements.
The achievements we have designed require us to count some game events and also the running time. For the last two achievements, we need to make a new GameEvent for the case when a bullet misses, which we have not created until now. The code in the Bullet object to trigger this new GameEvent is as follows:
@Override
public void onUpdate(long elapsedMillis, GameEngine gameEngine) {
mY += mSpeedFactor * elapsedMillis;
if (mY < -mHeight) {
   removeFromGameEngine(gameEngine);
   gameEngine.onGameEvent(GameEvent.BulletMissed);
}
}
Now, let's work inside ScoreGameObject. We are going to have a method that checks achievements each time an asteroid is hit. There are three achievements that can be unlocked when that event happens:
- Big score, because hitting an asteroid gives us points
- Target acquired, because it requires consecutive asteroid hits
- Asteroid killer, because it counts the total number of asteroids that have been destroyed
The code is like this:
private void checkAsteroidHitRelatedAchievements() {
if (mPoints > 100000) {
   // Unlock achievement
   unlockSafe(R.string.achievement_big_score);
}
if (mConsecutiveHits >= 20) {
   unlockSafe(R.string.achievement_target_acquired);
}
// Increment achievement of asteroids hit
if (mApiClient.isConnecting() || mApiClient.isConnected()) {
   try {
     Games.Achievements.increment(mApiClient, getString(R.string.achievement_asteroid_killer), 1);
   } catch (Exception e) {
     mApiClient.disconnect();
   }
}
}
We check the total points and the number of consecutive hits to unlock the corresponding achievements.
The "Asteroid killer" achievement is a bit of a different case, because it is an incremental achievement. These type of achievements do not have an unlock method, but rather an increment method. Each time we increment the value, progress on the achievement is updated. Once the progress is 100 percent, it is unlocked automatically.
Incremental achievements are automatically unlocked, we just have to increment their value.
This makes incremental achievements much easier to use than tracking the progress locally. But we still need to do all the checks as we did for unlockSafe.
We are using a variable named mConsecutiveHits, which we have not initialized yet. This is done inside onGameEvent, which is the place where the other hidden achievement target lost is checked. Some initialization for the "Survivor" achievement is also done here:
public void onGameEvent(GameEvent gameEvent) {
if (gameEvent == GameEvent.AsteroidHit) {
   mPoints += POINTS_GAINED_PER_ASTEROID_HIT;
   mPointsHaveChanged = true;
   mConsecutiveMisses = 0;
   mConsecutiveHits++;
   checkAsteroidHitRelatedAchievements();
}
else if (gameEvent == GameEvent.BulletMissed) {
   mConsecutiveMisses++;
   mConsecutiveHits = 0;
   if (mConsecutiveMisses >= 20) {
     unlockSafe(R.string.achievement_target_lost);
   }
}
else if (gameEvent == GameEvent.SpaceshipHit) {
   mTimeWithoutDie = 0;
}
[…]
}
Each time we hit an asteroid, we increment the number of consecutive asteroid hits and reset the number of consecutive misses. Similarly, each time we miss a bullet, we increment the number of consecutive misses and reset the number of consecutive hits.
As a side note, each time the spaceship is destroyed we reset the time without dying, which is used for "Survivor", but this is not the only time when the time without dying should be updated. We have to reset it when the game starts, and modify it inside onUpdate by just adding the elapsed milliseconds that have passed:
@Override
public void startGame(GameEngine gameEngine) {
mTimeWithoutDie = 0;
[…]
}

@Override
public void onUpdate(long elapsedMillis, GameEngine gameEngine) {
mTimeWithoutDie += elapsedMillis;
if (mTimeWithoutDie > 60000) {
   unlockSafe(R.string.achievement_survivor);
}
}
So, once the game has been running for 60,000 milliseconds since it started or since a spaceship was destroyed, we unlock the "Survivor" achievement.
With this, we have all the code we need to unlock the achievements we have created for the game. Let's finish this section with some comments on the system and the developer console:
- As a rule of thumb, you can edit most of the details of an achievement until you publish it to production.
- Once your achievement has been published, it cannot be deleted. You can only delete an achievement in its prepublished state. There is a button labeled Delete at the bottom of the achievement screen for this.
Unlock access to the largest independent learning library in Tech for FREE!
Get unlimited access to 7500+ expert-authored eBooks and video courses covering every tech area you can think of.
Renews at $15.99/month. Cancel anytime
- You can also reset the progress for achievements while they are in draft. This reset happens for all players at once. There is a button labeled Reset achievement progress at the bottom of the achievement screen for this.
Also note that GameBaseActivity does a lot of logging. So, if your device is connected to your computer and you run a debug build, you may see that it lags sometimes. This does not happen in a release build for which the log is removed.
Leaderboards
Since YASS has only one game mode and one score in the game, it makes sense to have only one leaderboard on Google Play Game Services. Leaderboards are managed from their own tab inside the Game services area of the developer console.
Unlike achievements, it is not mandatory to have any leaderboard to be able to publish your game.
If your game has different levels of difficulty, you can have a leaderboard for each of them. This also applies if the game has several values that measure player progress, you can have a leaderboard for each of them.

Managing leaderboards on Play Games console
Leaderboards can be created and managed in the Leaderboards tag. When we click on Add leaderboard, we are presented with a form that has several fields to be filled. They are as follows:
- Name: the display name of the leaderboard, which can be localized. We will simply call it High Scores.
- Score formatting: this can be Numeric, Currency, or Time. We will use Numeric for YASS.
- Icon: a 512x512 px icon to identify the leaderboard.
- Ordering: Larger is better / Smaller is better. We are going to use Larger is better, but other score types may be Smaller is better as in a racing game.
- Enable tamper protection: this automatically filters out suspicious scores. You should keep this on.
- Limits: if you want to limit the score range that is shown on the leaderboard, you can do it here. We are not going to use this
- List order: the order of the leaderboards. Since we only have one, it is not really important for us.

Setting up a leaderboard on the Play Games console
Now that we have defined the leaderboard, it is time to use it in the game. As happens with achievements, we have a link where we can get all the resources for the game in XML. So, we proceed to get the ID of the leaderboard and add it to the strings defined in the play_services.xml file.
We have to submit the scores at the end of the game (that is, a GameOver event), but also when the user exits a game via the pause button. To unify this, we will create a new GameEvent called GameFinished that is triggered after a GameOver event and after the user exits the game.
We will update the stopGame method of GameEngine, which is called in both cases to trigger the event:
public void stopGame() {
if (mUpdateThread != null) {
   synchronized (mLayers) {
     onGameEvent(GameEvent.GameFinished);
   }
   mUpdateThread.stopGame();
 mUpdateThread = null;
}
[…]
}
We have to set the updateThread to null after sending the event, to prevent this code being run twice. Otherwise, we could send each score more than once.
Similarly, as happens for achievements, submitting a score is very simple, just a single line of code. But we also need to check that the GoogleApiClient is connected and we still have the same edge case when an Exception is thrown. So, we need to wrap it in a try/catch block.
To keep everything in the same place, we will put this code inside ScoreGameObject:
@Override
public void onGameEvent(GameEvent gameEvent) {
[…]
else if (gameEvent == GameEvent.GameFinished) {
   // Submit the score
   if (mApiClient.isConnecting() || mApiClient.isConnected()) {
     try {
       Games.Leaderboards.submitScore(mApiClient,
          getLeaderboardId(), mPoints);
     }
     catch (Exception e){
       mApiClient.disconnect();
     }
   }
}
}

private String getLeaderboardId() {
return mParent.getString(R.string.leaderboard_high_scores);
}
This is really straightforward. GPGS is now receiving our scores and it takes care of the timestamp of the score to create daily, weekly, and all time leaderboards. It also uses your Google+ circles to show the social score of your friends. All this is done automatically for you.
The final missing piece is to let the player open the leaderboards and achievements UI from the main menu as well as trigger a sign in if they are signed out.
Opening the Play Games UI
To complete the integration of achievements and leaderboards, we are going to add buttons to open the native UI provided by GPGS to our main menu.
For this, we are going to place two buttons in the bottom–left corner of the screen, opposite the music and sound buttons. We will also check whether we are connected or not; if not, we will show a single sign-in button.
For these buttons we will use the official images of GPGS, which are available for developers to use. Note that you must follow the brand guidelines while using the icons and they must be displayed as they are and not modified. This also provides a consistent look and feel across all the games that support Play Games.
Since we have seen a lot of layouts already, we are not going to include another one that is almost the same as something we already have.

The main menu with the buttons to view achievements and leaderboards.
To handle these new buttons we will, as usual, set the MainMenuFragment as OnClickListener for the views. We do this in the same place as the other buttons, that is, inside onViewCreated:
@Override
public void onViewCreated(View view, Bundle savedInstanceState) {
super.onViewCreated(view, savedInstanceState);
[...]
view.findViewById(
    R.id.btn_achievements).setOnClickListener(this);
view.findViewById(
    R.id.btn_leaderboards).setOnClickListener(this);
view.findViewById(R.id.btn_sign_in).setOnClickListener(this);
}
As happened with achievements and leaderboards, the work is done using static methods that receive a GoogleApiClient object. We can get this object from the GameHelper that is a part of the BaseGameActivity, like this:
GoogleApiClient apiClient =
getYassActivity().getGameHelper().getApiClient();
To open the native UI, we have to obtain an Intent and then start an Activity with it. It is important that you use startActivityForResult, since some data is passed back and forth.
To open the achievements UI, the code is like this:
Intent achievementsIntent =
 Games.Achievements.getAchievementsIntent(apiClient);
startActivityForResult(achievementsIntent, REQUEST_ACHIEVEMENTS);

This works out of the box. It automatically grays out the icons for the unlocked achievements, adds a counter and progress bar to the one that is in progress, and a padlock to the hidden ones.
Similarly, to open the leaderboards UI we obtain an intent from the Games.Leaderboards class instead:
Intent leaderboardsIntent = Games.Leaderboards.getLeaderboardIntent(
apiClient,
getString(R.string.leaderboard_high_scores));
startActivityForResult(leaderboardsIntent, REQUEST_LEADERBOARDS);
In this case, we are asking for a specific leaderboard, since we only have one. We could use getLeaderboardsIntent instead, which will open the Play Games UI for the list of all the leaderboards.
We can have an intent to open the list of leaderboards or a specific one.
What remains to be done is to replace the buttons for the login one when the user is not connected. For this, we will create a method that reads the state and shows and hides the views accordingly:
private void updatePlayButtons() {
GameHelper gameHelper = getYassActivity().getGameHelper();
if (gameHelper.isConnecting() || gameHelper.isSignedIn()) {
   getView().findViewById(
      R.id.btn_achievements).setVisibility(View.VISIBLE);
   getView().findViewById(
      R.id.btn_leaderboards).setVisibility(View.VISIBLE);
   getView().findViewById(
      R.id.btn_sign_in).setVisibility(View.GONE);
}
else {
   getView().findViewById(
      R.id.btn_achievements).setVisibility(View.GONE);
   getView().findViewById(
      R.id.btn_leaderboards).setVisibility(View.GONE);
   getView().findViewById(
      R.id.btn_sign_in).setVisibility(View.VISIBLE);
}
}
This method decides whether to remove or make visible the views based on the state. We will call it inside the important state-changing methods:
- onLayoutCompleted: the first time we open the game to initialize the UI.
- onSignInSucceeded: when the user successfully signs in to GPGS.
- onSignInFailed: this can be triggered when we auto sign in and there is no connection. It is important to handle it.
- onActivityResult: when we come back from the Play Games UI, in case the user has logged out.
But nothing is as easy as it looks. In fact, when the user signs out and does not exit the game, GoogleApiClient keeps the connection open. Therefore the value of isSignedIn from GameHelper still returns true. This is the edge case we have been talking about all through the article.
As a result of this edge case, there is an inconsistency in the UI that shows the achievements and leaderboards buttons when it should show the login one.
When the user logs out from Play Games, GoogleApiClient keeps the connection open. This can lead to confusion.
Unfortunately, this has been marked as work as expected by Google. The reason is that the connection is still active and it is our responsibility to parse the result in the onActivityResult method to determine the new state. But this is not very convenient.
Since it is a rare case we will just go for the easiest solution, which is to wrap it in a try/catch block and make the user sign in if he or she taps on leaderboards or achievements while not logged in. This is the code we have to handle the click on the achievements button, but the one for leaderboards is equivalent:
else if (v.getId() == R.id.btn_achievements) {
try {
   GoogleApiClient apiClient =
      getYassActivity().getGameHelper().getApiClient();
   Intent achievementsIntent =
      Games.Achievements.getAchievementsIntent(apiClient);
   startActivityForResult(achievementsIntent,
      REQUEST_ACHIEVEMENTS);
}
catch (Exception e) {
   GameHelper gameHelper = getYassActivity().getGameHelper();
   gameHelper.disconnect();
   gameHelper.beginUserInitiatedSignIn();
}
}
Basically, we have the old code to open the achievements activity, but we wrap it in a try/catch block. If an exception is raised, we disconnect the game helper and begin a new login using the beginUserInitiatedSignIn method.
It is very important to disconnect the gameHelper before we try to log in again. Otherwise, the login will not work.
We must disconnect from GPGS before we can log in using the method from the GameHelper.
Finally, there is the case when the user clicks on the login button, which just triggers the login using the beginUserInitiatedSignIn method from the GameHelper:
if (v.getId() == R.id.btn_sign_in) {
getYassActivity().getGameHelper().beginUserInitiatedSignIn();
}
Once you have published your game and the game services, achievements and leaderboards will not appear in the game description on Google Play straight away. It is required that "a fair amount of users" have used them. You have done nothing wrong, you just have to wait.
Other features of Google Play services
Google Play Game Services provides more features for game developers than achievements and leaderboards. None of them really fit the game we are building, but it is useful to know they exist just in case your game needs them. You can save yourself lots of time and effort by using them and not reinventing the wheel.
The other features of Google Play Games Services are:
- Events and quests: these allow you to monitor game usage and progression. Also, they add the possibility of creating time-limited events with rewards for the players.
- Gifts: as simple as it sounds, you can send a gift to other players or request one to be sent to you. Yes, this is seen in the very mechanical Facebook games popularized a while ago.
- Saved games: the standard concept of a saved game. If your game has progression or can unlock content based on user actions, you may want to use this feature. Since it is saved in the cloud, saved games can be accessed across multiple devices.
- Turn-based and real-time multiplayer: Google Play Game Services provides an API to implement turn-based and real-time multiplayer features without you needing to write any server code.
If your game is multiplayer and has an online economy, it may be worth making your own server and granting virtual currency only on the server to prevent cheating. Otherwise, it is fairly easy to crack the gifts/reward system and a single person can ruin the complete game economy.
However, if there is no online game economy, the benefits of gifts and quests may be more important than the fact that someone can hack them.
Let's take a look at each of these features.
Events
The event's APIs provides us with a way to define and collect gameplay metrics and upload them to Google Play Game Services.
This is very similar to the GameEvents we are already using in our game. Events should be a subset of the game events of our game. Many of the game events we have are used internally as a signal between objects or as a synchronization mechanism. These events are not really relevant outside the engine, but others could be. Those are the events we should send to GPGS.
To be able to send an event from the game to GPGS, we have to create it in the developer console first.
To create an event, we have to go to the Events tab in the developer console, click on Add new event, and fill in the following fields:
- Name: a short name of the event. The name can be up to 100 characters. This value can be localized.
- Description: a longer description of the event. The description can be up to 500 characters. This value can also be localized.
- Icon: the icon for the event of the standard 512x512 px size.
- Visibility: as for achievements, this can be revealed or hidden.
- Format: as for leaderboards, this can be Numeric, Currency, or Time.
- Event type: this is used to mark events that create or spend premium currency. This can be Premium currency sink, Premium currency source, or None.
While in the game, events work pretty much as incremental achievements. You can increment the event counter using the following line of code:
Games.Events.increment(mGoogleApiClient, myEventId, 1);
You can delete events that are in the draft state or that have been published as long as the event is not in use by a quest. You can also reset the player progress data for the testers of your events as you can do for achievements.
While the events can be used as an analytics system, their real usefulness appears when they are combined with quests.
Quests
A quest is a challenge that asks players to complete an event a number of times during a specific time frame to receive a reward.
Because a quest is linked to an event, to use quests you need to have created at least one event.
You can create a quest from the quests tab in the developer console. A quest has the following fields to be filled:
- Name: the short name of the quest. This can be up to 100 characters and can be localized.
- Description: a longer description of the quest. Your quest description should let players know what they need to do to complete the quest. The description can be up to 500 characters. The first 150 characters will be visible to players on cards such as those shown in the Google Play Games app.
- Icon: a square icon that will be associated with the quest.
- Banner: a rectangular image that will be used to promote the quest.
- Completion Criteria: this is the configuration of the quest itself. It consists of an event and the number of times the event must occur.
- Schedule: the start and end date and time for the quest. GPGS uses your local time zone, but stores the values as UTC. Players will see these values appear in their local time zone. You can mark a checkbox to notify users when the quest is about to end.
- Reward Data: this is specific to each game. It can be a JSON object, specifying the reward. This is sent to the client when the quest is completed.
Once configured in the developer console, you can do two things with the quests:
- Display the list of quests
- Process a quest completion
To get the list of quests, we start an activity with an intent that is provided to us via a static method as usual:
Intent questsIntent = Games.Quests.getQuestsIntent(mGoogleApiClient,
   Quests.SELECT_ALL_QUESTS);
startActivityForResult(questsIntent, QUESTS_INTENT);
To be notified when a quest is completed, all we have to do is register a listener:
Games.Quests.registerQuestUpdateListener(mGoogleApiClient, this);
Once we have set the listener, the onQuestCompleted method will be called once the quest is completed. After completing the processing of the reward, the game should call claim to inform Play Game services that the player has claimed the reward.
The following code snippet shows how you might override the onQuestCompleted callback:
@Override
public void onQuestCompleted(Quest quest) {
// Claim the quest reward.
Games.Quests.claim(mGoogleApiClient, quest.getQuestId(),
   quest.getCurrentMilestone().getMilestoneId());
// Process the RewardData to provision a specific reward.
String reward = new
   String(quest.getCurrentMilestone().getCompletionRewardData(),
   Charset.forName("UTF-8"));
}
The rewards themselves are defined by the client. As we mentioned before, this will make the game quite easy to crack and get rewards. But usually, avoiding the hassle of writing your own server is worth it.
Gifts
The gifts feature of GPGS allows us to send gifts to other players and to request them to send us one as well. This is intended to make the gameplay more collaborative and to improve the social aspect of the game.
As for other GPGS features, we have a built-in UI provided by the library that can be used. In this case, to send and request gifts for in-game items and resources to and from friends in their Google+ circles. The request system can make use of notifications.
There are two types of requests that players can send using the game gifts feature in Google Play Game Services:
- A wish request to ask for in-game items or some other form of assistance from their friends
- A gift request to send in-game items or some other form of assistance to their friends
A player can specify one or more target request recipients from the default request-sending UI. A gift or wish can be consumed (accepted) or dismissed by a recipient.
To see the gifts API in detail, you can visit https://developers.google.com/games/services/android/giftRequests.
Again, as for quest rewards, this is done entirely by the client, which makes the game susceptible to piracy.
Saved games
The saved games service offers cloud game saving slots. Your game can retrieve the saved game data to allow returning players to continue a game at their last save point from any device.
This service makes it possible to synchronize a player's game data across multiple devices. For example, if you have a game that runs on Android, you can use the saved games service to allow a player to start a game on their Android phone and then continue playing the game on a tablet without losing any of their progress. This service can also be used to ensure that a player's game play continues from where it was left off even if their device is lost, destroyed, or traded in for a newer model or if the game was reinstalled
The saved games service does not know about the game internals, so it provides a field that is an unstructured binary blob where you can read and write the game data. A game can write an arbitrary number of saved games for a single player subjected to user quota, so there is no hard requirement to restrict players to a single save file.
Saved games are done in an unstructured binary blob.
The API for saved games also receives some metadata that is used by Google Play Games to populate the UI and to present useful information in the Google Play Game app (for example, last updated timestamp).
Saved games has several entry points and actions, including how to deal with conflicts in the saved games. To know more about these check out the official documentation at https://developers.google.com/games/services/android/savedgames.
Multiplayer games
If you are going to implement multiplayer, GPGS can save you a lot of work. You may or may not use it for the final product, but it will remove the need to think about the server-side until the game concept is validated.
You can use GPGS for turn-based and real-time multiplayer games. Although each one is completely different and uses a different API, there is always an initial step where the game is set up and the opponents are selected or invited.
In a turn-based multiplayer game, a single shared state is passed among the players and only the player that owns the turn has permission to modify it. Players take turns asynchronously according to an order of play determined by the game.
A turn is finished explicitly by the player using an API call. Then the game state is passed to the other players, together with the turn.
There are many cases: selecting opponents, creating a match, leaving a match, canceling, and so on. The official documentation at https://developers.google.com/games/services/android/turnbasedMultiplayer is quite exhaustive and you should read through it if you plan to use this feature.
In a real-time multiplayer there is no concept of turn. Instead, the server uses the concept of room: a virtual construct that enables network communication between multiple players in the same game session and lets players send data directly to one another, a common concept for game servers.
Real-time multiplayer service is based on the concept of Room.
The API of real-time multiplayer allows us to easily:
- Manage network connections to create and maintain a real-time multiplayer room
- Provide a player-selection user interface to invite players to join a room, look for random players for auto-matching, or a combination of both
- Store participant and room-state information on the Play Game services' servers while the game is running
- Send room invitations and updates to players
To check the complete documentation for real-time games, please visit the official web at https://developers.google.com/games/services/android/realtimeMultiplayer.
Summary
We have added Google Play services to YASS, including setting up the game in the developer console and adding the required libraries to the project.
Then, we defined a set of achievements and added the code to unlock them. We have used normal, incremental, and hidden achievement types to showcase the different options available.
We have also configured a leaderboard and submitted the scores, both when the game is finished and when it is exited via the pause dialog.
Finally, we have added links to the native UI for leaderboards and achievements to the main menu.
We have also introduced the concepts of events, quests, and gifts and the features of saved games and multiplayer that Google Play Game services offers.
The game is ready to publish now.
Resources for Article:
Further resources on this subject:

 United States
 Great Britain
 India
India
 Germany
 France
 Canada
 Russia
 Spain
Spain
 Brazil
 Australia
 South Africa
 Thailand
 Ukraine
 Switzerland
 Slovakia
 Luxembourg
 Hungary
 Romania
 Denmark
 Ireland
 Estonia
 Belgium
 Italy
Italy
 Finland
 Cyprus
 Lithuania
 Latvia
 Malta
Malta
 Netherlands
 Portugal
 Slovenia
 Sweden
 Argentina
 Colombia
 Ecuador
 Indonesia
 Mexico
 New Zealand
 Norway
 South Korea
 Taiwan
 Turkey
 Czechia
 Austria
 Greece
 Isle of Man
 Bulgaria
 Japan
Japan
 Philippines
 Poland
 Singapore
 Egypt
Egypt
 Chile
Chile
 Malaysia


