In this article by Eric Pimpler, author of the book Programming ArcGIS with Python Cookbook - Second Edition, we will cover the following topics:
- Retrieving features from a feature class with SearchCursor
- Filtering records with a where clause
- Improving cursor performance with geometry tokens
- Inserting rows with InsertCursor
- Updating rows with UpdateCursor
(For more resources related to this topic, see here.)
We'll start this article with a basic question. What are cursors? Cursors are in-memory objects containing one or more rows of data from a table or feature class. Each row contains attributes from each field in a data source along with the geometry for each feature. Cursors allow you to search, add, insert, update, and delete data from tables and feature classes.
The arcpy data access module or arcpy.da was introduced in ArcGIS 10.1 and contains methods that allow you to iterate through each row in a cursor. Various types of cursors can be created depending on the needs of developers. For example, search cursors can be created to read values from rows. Update cursors can be created to update values in rows or delete rows, and insert cursors can be created to insert new rows.
There are a number of cursor improvements that have been introduced with the arcpy data access module. Prior to the development of ArcGIS 10.1, cursor performance was notoriously slow. Now, cursors are significantly faster. Esri has estimated that SearchCursors are up to 30 times faster, while InsertCursors are up to 12 times faster. In addition to these general performance improvements, the data access module also provides a number of new options that allow programmers to speed up processing. Rather than returning all the fields in a cursor, you can now specify that a subset of fields be returned. This increases the performance as less data needs to be returned. The same applies to geometry. Traditionally, when accessing the geometry of a feature, the entire geometric definition would be returned. You can now use geometry tokens to return a portion of the geometry rather than the full geometry of the feature. You can also use lists and tuples rather than using rows. There are also other new features, such as edit sessions and the ability to work with versions, domains, and subtypes.
There are three cursor functions in arcpy.da. Each returns a cursor object with the same name as the function. SearchCursor() creates a read-only SearchCursor object containing rows from a table or feature class. InsertCursor() creates an InsertCursor object that can be used to insert new records into a table or feature class. UpdateCursor() returns a cursor object that can be used to edit or delete records from a table or feature class. Each of these cursor objects has methods to access rows in the cursor. You can see the relationship between the cursor functions, the objects they create, and how they are used, as follows:
| Function |
Object created |
Usage |
| SearchCursor() |
SearchCursor |
This is a read-only view of data from a table or feature class |
| InsertCursor() |
InsertCursor |
This adds rows to a table or feature class |
| UpdateCursor() |
UpdateCursor |
This edits or deletes rows in a table or feature class |
The SearchCursor() function is used to return a SearchCursor object. This object can only be used to iterate through a set of rows returned for read-only purposes. No insertions, deletions, or updates can occur through this object. An optional where clause can be set to limit the rows returned.
Once you've obtained a cursor instance, it is common to iterate the records, particularly with SearchCursor or UpdateCursor. There are some peculiarities that you need to understand when navigating the records in a cursor. Cursor navigation is forward-moving only. When a cursor is created, the pointer of the cursor sits just above the first row in the cursor. The first call to next() will move the pointer to the first row. Rather than calling the next() method, you can also use a for loop to process each of the records without the need to call the next() method. After performing whatever processing you need to do with this row, a subsequent call to next() will move the pointer to row 2. This process continues as long as you need to access additional rows. However, after a row has been visited, you can't go back a single record at a time. For instance, if the current row is row 3, you can't programmatically back up to row 2. You can only go forward. To revisit rows 1 and 2, you would need to either call the reset() method or recreate the cursor and move back through the object. As I mentioned earlier, cursors are often navigated through the use of for loops as well. In fact, this is a more common way to iterate a cursor and a more efficient way to code your scripts. Cursor navigation is illustrated in the following diagram:

The InsertCursor() function is used to create an InsertCursor object that allows you to programmatically add new records to feature classes and tables. To insert rows, call the insertRow() method on this object. You can also retrieve a read-only tuple containing the field names in use by the cursor through the fields property. A lock is placed on the table or feature class being accessed through the cursor. Therefore, it is important to always design your script in a way that releases the cursor when you are done.
The UpdateCursor() function can be used to create an UpdateCursor object that can update and delete rows in a table or feature class. As is the case with InsertCursor, this function places a lock on the data while it's being edited or deleted. If the cursor is used inside a Python's with statement, the lock will automatically be freed after the data has been processed. This hasn't always been the case. Prior to ArcGIS 10.1, cursors were required to be manually released using the Python del statement. Once an instance of UpdateCursor has been obtained, you can then call the updateCursor() method to update records in tables or feature classes and the deleteRow() method to delete a row.
The subject of data locks requires a little more explanation. The insert and update cursors must obtain a lock on the data source they reference. This means that no other application can concurrently access this data source. Locks are a way of preventing multiple users from changing data at the same time and thus, corrupting the data. When the InsertCursor() and UpdateCursor() methods are called in your code, Python attempts to acquire a lock on the data. This lock must be specifically released after the cursor has finished processing so that the running applications of other users, such as ArcMap or ArcCatalog, can access the data sources. If this isn't done, no other application will be able to access the data. Prior to ArcGIS 10.1 and the with statement, cursors had to be specifically unlocked through Python's del statement. Similarly, ArcMap and ArcCatalog also acquire data locks when updating or deleting data. If a data source has been locked by either of these applications, your Python code will not be able to access the data. Therefore, the best practice is to close ArcMap and ArcCatalog before running any standalone Python scripts that use insert or update cursors.
In this article, we're going to cover the use of cursors to access and edit tables and feature classes. However, many of the cursor concepts that existed before ArcGIS 10.1 still apply.
Retrieving features from a feature class with SearchCursor
There are many occasions when you need to retrieve rows from a table or feature class for read-only purposes. For example, you might want to generate a list of all land parcels in a city with a value greater than $100,000. In this case, you don't have any need to edit the data. Your needs are met simply by generating a list of rows that meet some sort of criteria. A SearchCursor object contains a read-only copy of rows from a table or feature class. These objects can also be filtered through the use of a where clause so that only a subset of the dataset is returned.
Getting ready
The SearchCursor() function is used to return a SearchCursor object. This object can only be used to iterate a set of rows returned for read-only purposes. No insertions, deletions, or updates can occur through this object. An optional where clause can be set to limit the rows returned. In this article, you will learn how to create a basic SearchCursor object on a feature class through the use of the SearchCursor() function.
The SearchCursor object contains a fields property along with the next() and reset() methods. The fields property is a read-only structure in the form of a Python tuple, containing the fields requested from the feature class or table. You are going to hear the term tuple a lot in conjunction with cursors. If you haven't covered this topic before, tuples are a Python structure to store a sequence of data similar to Python lists. However, there are some important differences between Python tuples and lists. Tuples are defined as a sequence of values inside parentheses, while lists are defined as a sequence of values inside brackets. Unlike lists, tuples can't grow and shrink, which can be a very good thing in some cases when you want data values to occupy a specific position each time. This is the case with cursor objects that use tuples to store data from fields in tables and feature classes.
How to do it…
Follow these steps to learn how to retrieve rows from a table or feature class inside a SearchCursor object:
- Open IDLE and create a new script window.
- Save the script as C:ArcpyBookCh8SearchCursor.py.
- Import the arcpy.da module:
import arcpy.da
- Set the workspace:
arcpy.env.workspace = "c:/ArcpyBook/Ch8"
- Use a Python with statement to create a cursor:
with arcpy.da.SearchCursor("Schools.shp",("Facility","Name")) as cursor:
- Loop through each row in SearchCursor and print the name of the school. Make sure you indent the for loop inside the with block:for row in sorted(cursor): print("School name: " + row[1])
- The entire script should appear as follows:
import arcpy.da
arcpy.env.workspace = "c:/ArcpyBook/Ch8"
with arcpy.da.SearchCursor("Schools.shp",("Facility","Name")) as cursor:
   for row in sorted(cursor):
       print("School name: " + row[1])
- Save the script.
- You can check your work by examining the C:ArcpyBookcodeCh8SearchCursor_Step1.py solution file.
- Run the script. You should see the following output:
School name: ALLAN
School name: ALLISON
School name: ANDREWS
School name: BARANOFF
School name: BARRINGTON
School name: BARTON CREEK
School name: BARTON HILLS
School name: BATY
School name: BECKER
School name: BEE CAVE
How it works…
The with statement used with the SearchCursor() function will create, open, and close the cursor. So, you no longer have to be concerned with explicitly releasing the lock on the cursor as you did prior to ArcGIS 10.1. The first parameter passed into the SearchCursor() function is a feature class, represented by the Schools.shp file. The second parameter is a Python tuple containing a list of fields that we want returned in the cursor. For performance reasons, it is a best practice to limit the fields returned in the cursor to only those that you need to complete the task. Here, we've specified that only the Facility and Name fields should be returned. The SearchCursor object is stored in a variable called cursor.
Inside the with block, we use a Python for loop to loop through each school returned. We also use the Python sorted() function to sort the contents of the cursor. To access the values from a field on the row, simply use the index number of the field you want to return. In this case, we want to return the contents of the Name column, which will be the 1 index number, since it is the second item in the tuple of field names that are returned.
Filtering records with a where clause
By default, SearchCursor will contain all rows in a table or feature class. However, in many cases, you will want to restrict the number of rows returned by some sort of criteria. Applying a filter through the use of a where clause limits the records returned.
Getting ready
By default, all rows from a table or feature class will be returned when you create a SearchCursor object. However, in many cases, you will want to restrict the records returned. You can do this by creating a query and passing it as a where clause parameter when calling the SearchCursor() function. In this article, you'll build on the script you created in the previous article by adding a where clause that restricts the records returned.
How to do it…
Follow these steps to apply a filter to a SearchCursor object that restricts the rows returned from a table or feature class:
- Open IDLE and load the SearchCursor.py script that you created in the previous recipe.
- Update the SearchCursor() function by adding a where clause that queries the facility field for records that have the HIGH SCHOOL text:
with arcpy.da.SearchCursor("Schools.shp",("Facility","Name"), '"FACILITY" = 'HIGH SCHOOL'') as cursor:
- You can check your work by examining the C:ArcpyBookcodeCh8SearchCursor_Step2.py solution file.
- Save and run the script. The output will now be much smaller and restricted to high schools only:
High school name: AKINS
High school name: ALTERNATIVE LEARNING CENTER
High school name: ANDERSON
High school name: AUSTIN
High school name: BOWIE
High school name: CROCKETT
High school name: DEL VALLE
High school name: ELGIN
High school name: GARZA
High school name: HENDRICKSON
High school name: JOHN B CONNALLY
High school name: JOHNSTON
High school name: LAGO VISTA
How it works…
The where clause parameter accepts any valid SQL query, and is used in this case to restrict the number of records that are returned.
Improving cursor performance with geometry tokens
Geometry tokens were introduced in ArcGIS 10.1 as a performance improvement for cursors. Rather than returning the entire geometry of a feature inside the cursor, only a portion of the geometry is returned. Returning the entire geometry of a feature can result in decreased cursor performance due to the amount of data that has to be returned. It's significantly faster to return only the specific portion of the geometry that is needed.
Getting ready
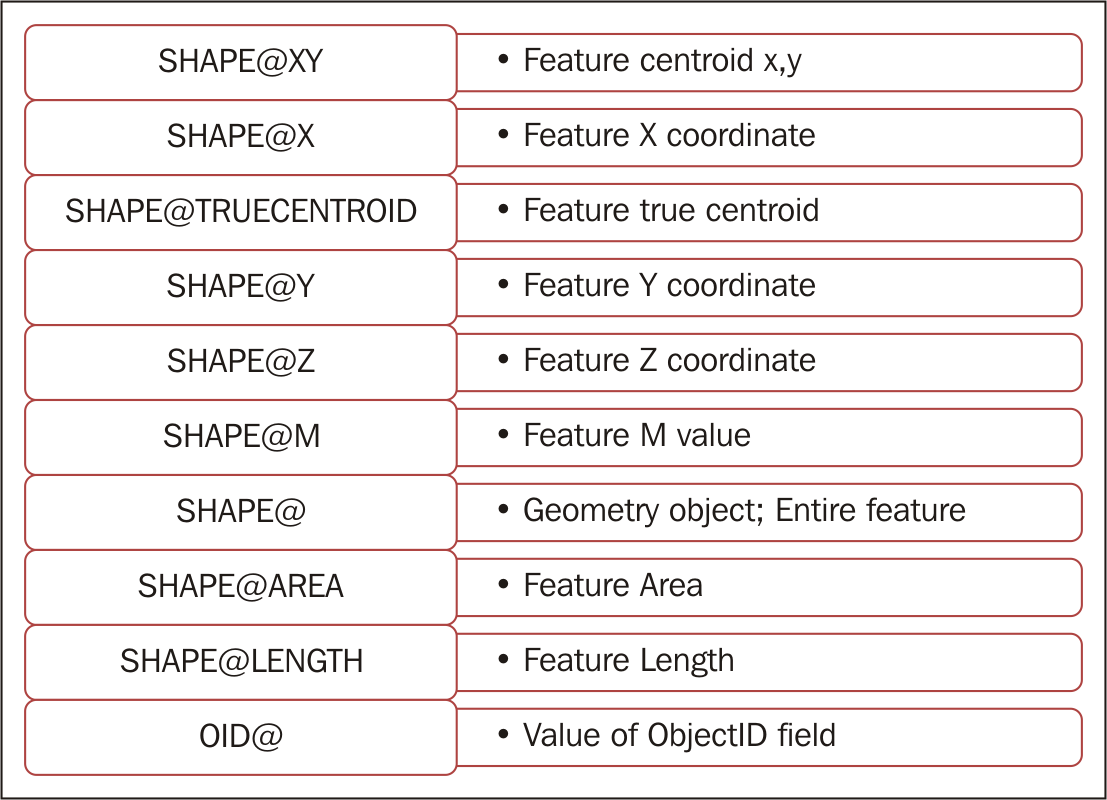
A token is provided as one of the fields in the field list passed into the constructor for a cursor and is in the SHAPE@<Part of Feature to be Returned> format. The only exception to this format is the OID@ token, which returns the object ID of the feature. The following code example retrieves only the X and Y coordinates of a feature:
with arcpy.da.SearchCursor(fc, ("SHAPE@XY","Facility","Name")) as cursor:
The following table lists the available geometry tokens. Not all cursors support the full list of tokens. Check the ArcGIS help files for information about the tokens supported by each cursor type. The SHAPE@ token returns the entire geometry of the feature. Use this carefully though, because it is an expensive operation to return the entire geometry of a feature and can dramatically affect performance. If you don't need the entire geometry, then do not include this token!
In this article, you will use a geometry token to increase the performance of a cursor. You'll retrieve the X and Y coordinates of each land parcel from the parcels feature class along with some attribute information about the parcel.
How to do it…
Follow these steps to add a geometry token to a cursor, which should improve the performance of this object:
- Open IDLE and create a new script window.
- Save the script as C:ArcpyBookCh8GeometryToken.py.
- Import the arcpy.da module and the time module:
import arcpy.da
import time
- Set the workspace:
arcpy.env.workspace = "c:/ArcpyBook/Ch8"
- We're going to measure how long it takes to execute the code using a geometry token. Add the start time for the script:
start = time.clock()
- Use a Python with statement to create a cursor that includes the centroid of each feature as well as the ownership information stored in the PY_FULL_OW field:
with arcpy.da.SearchCursor("coa_parcels.shp",("PY_FULL_OW","SHAPE@XY")) as cursor:
- Loop through each row in SearchCursor and print the name of the parcel and location. Make sure you indent the for loop inside the with block:
for row in cursor:
print("Parcel owner: {0} has a location of: {1}".format(row[0], row[1]))
- Measure the elapsed time:
elapsed = (time.clock() - start)
- Print the execution time:
print("Execution time: " + str(elapsed))
- The entire script should appear as follows:
import arcpy.da
import time
arcpy.env.workspace = "c:/ArcpyBook/Ch9"
start = time.clock()
with arcpy.da.SearchCursor("coa_parcels.shp",("PY_FULL_OW", "SHAPE@XY")) as cursor:
   for row in cursor:
       print("Parcel owner: {0} has a location of: {1}".format(row[0], row[1]))
elapsed = (time.clock() - start)
print("Execution time: " + str(elapsed))
- You can check your work by examining the C:ArcpyBookcodeCh8GeometryToken.py solution file.
- Save the script.
- Run the script. You should see something similar to the following output. Note the execution time; your time will vary:
Parcel owner: CITY OF AUSTIN ATTN REAL ESTATE DIVISION has a location of: (3110480.5197341456,
10070911.174956793)
Parcel owner: CITY OF AUSTIN ATTN REAL ESTATE DIVISION has a location of: (3110670.413783513,
10070800.960865)
Parcel owner: CITY OF AUSTIN has a location of: (3143925.0013213265, 10029388.97419636)
Parcel owner: CITY OF AUSTIN % DOROTHY NELL ANDERSON ATTN BARRY LEE ANDERSON has a location of:
(3134432.983822767, 10072192.047894118)
Execution time: 9.08046185109
Now, we're going to measure the execution time if the entire geometry is returned instead of just the portion of the geometry that we need:
- Save a new copy of the script as C:ArcpyBookCh8GeometryTokenEntireGeometry.py.
- Change the SearchCursor() function to return the entire geometry using SHAPE@ instead of SHAPE@XY:
with arcpy.da.SearchCursor("coa_parcels.shp",("PY_FULL_OW", "SHAPE@")) as cursor:
Unlock access to the largest independent learning library in Tech for FREE!
Get unlimited access to 7500+ expert-authored eBooks and video courses covering every tech area you can think of.
Renews at $15.99/month. Cancel anytime
- You can check your work by examining the C:ArcpyBookcodeCh8GeometryTokenEntireGeometry.py solution file.
- Save and run the script. You should see the following output. Your time will vary from mine, but notice that the execution time is slower. In this case, it's only a little over a second slower, but we're only returning 2600 features. If the feature class were significantly larger, as many are, this would be amplified:
Parcel owner: CITY OF AUSTIN ATTN REAL ESTATE DIVISION has a location of: <geoprocessing describe
geometry object object at 0x06B9BE00>
Parcel owner: CITY OF AUSTIN ATTN REAL ESTATE DIVISION has a location of: <geoprocessing describe
geometry object object at 0x2400A700>
Parcel owner: CITY OF AUSTIN has a location of: <geoprocessing describe geometry object object at
0x06B9BE00>
Parcel owner: CITY OF AUSTIN % DOROTHY NELL ANDERSON ATTN BARRY LEE ANDERSON has a location of:
<geoprocessing describe geometry object object at 0x2400A700>
Execution time: 10.1211390896
How it works…
A geometry token can be supplied as one of the field names supplied in the constructor for the cursor. These tokens are used to increase the performance of a cursor by returning only a portion of the geometry instead of the entire geometry. This can dramatically increase the performance of a cursor, particularly when you are working with large polyline or polygon datasets. If you only need specific properties of the geometry in your cursor, you should use these tokens.
Inserting rows with InsertCursor
You can insert a row into a table or feature class using an InsertCursor object. If you want to insert attribute values along with the new row, you'll need to supply the values in the order found in the attribute table.
Getting ready
The InsertCursor() function is used to create an InsertCursor object that allows you to programmatically add new records to feature classes and tables. The insertRow() method on the InsertCursor object adds the row. A row in the form of a list or tuple is passed into the insertRow() method. The values in the list must correspond to the field values defined when the InsertCursor object was created. Similar to instances that include other types of cursors, you can also limit the field names returned using the second parameter of the method. This function supports geometry tokens as well.
The following code example illustrates how you can use InsertCursor to insert new rows into a feature class. Here, we insert two new wildfire points into the California feature class. The row values to be inserted are defined in a list variable. Then, an InsertCursor object is created, passing in the feature class and fields. Finally, the new rows are inserted into the feature class by using the insertRow() method:
rowValues = [(Bastrop','N',3000,(-105.345,32.234)), ('Ft Davis','N', 456, (-109.456,33.468))]
fc = "c:/data/wildfires.gdb/California"
fields = ["FIRE_NAME", "FIRE_CONTAINED", "ACRES", "SHAPE@XY"]
with arcpy.da.InsertCursor(fc, fields) as cursor:
for row in rowValues:
   cursor.insertRow(row)
In this article, you will use InsertCursor to add wildfires retrieved from a .txt file into a point feature class. When inserting rows into a feature class, you will need to know how to add the geometric representation of a feature into the feature class. This can be accomplished by using InsertCursor along with two miscellaneous objects: Array and Point. In this exercise, we will add point features in the form of wildfire incidents to an empty point feature class. In addition to this, you will use Python file manipulation techniques to read the coordinate data from a text file.
How to do it…
We will be importing the North American wildland fire incident data from a single day in October, 2007. This data is contained in a comma-delimited text file containing one line for each fire incident on this particular day. Each fire incident has a latitude, longitude coordinate pair separated by commas along with a confidence value. This data was derived by automated methods that use remote sensing data to derive the presence or absence of a wildfire. Confidence values can range from 0 to 100. Higher numbers represent a greater confidence that this is indeed a wildfire:
- Open the file at C:ArcpyBookCh8Wildfire DataNorthAmericaWildfire_2007275.txt and examine the contents.You will notice that this is a simple comma-delimited text file containing the longitude and latitude values for each fire along with a confidence value. We will use Python to read the contents of this file line by line and insert new point features into the FireIncidents feature class located in the C:ArcpyBookCh8 WildfireDataWildlandFires.mdb personal geodatabase.
- Close the file.
- Open ArcCatalog.
- Navigate to C:ArcpyBookCh8WildfireData.You should see a personal geodatabase called WildlandFires. Open this geodatabase and you will see a point feature class called FireIncidents. Right now, this is an empty feature class. We will add features by reading the text file you examined earlier and inserting points.
- Right-click on FireIncidents and select Properties.
- Click on the Fields tab.The latitude/longitude values found in the file we examined earlier will be imported into the SHAPE field and the confidence values will be written to the CONFIDENCEVALUE field.
- Open IDLE and create a new script.
- Save the script to C:ArcpyBookCh8InsertWildfires.py.
- Import the arcpy modules:
import arcpy
- Set the workspace:
arcpy.env.workspace = "C:/ArcpyBook/Ch8/WildfireData/WildlandFires.mdb"
- Open the text file and read all the lines into a list:
f = open("C:/ArcpyBook/Ch8/WildfireData/NorthAmericaWildfires_2007275.txt","r")
lstFires = f.readlines()
- Start a try block:
try:
- Create an InsertCursor object using a with block. Make sure you indent inside the try statement. The cursor will be created in the FireIncidents feature class:
with arcpy.da.InsertCursor("FireIncidents",("SHAPE@XY","CONFIDENCEVALUE")) as cur:
- Create a counter variable that will be used to print the progress of the script:
cntr = 1
- Loop through the text file line by line using a for loop. Since the text file is comma-delimited, we'll use the Python split() function to separate each value into a list variable called vals. We'll then pull out the individual latitude, longitude, and confidence value items and assign them to variables. Finally, we'll place these values into a list variable called rowValue, which is then passed into the insertRow() function for the InsertCursor object, and we then print a message:
for fire in lstFires:
     if 'Latitude' in fire:
       continue
     vals = fire.split(",")
     latitude = float(vals[0])
     longitude = float(vals[1])
     confid = int(vals[2])
     rowValue = [(longitude,latitude),confid]
     cur.insertRow(rowValue)
     print("Record number " + str(cntr) + " written to feature class")
     #arcpy.AddMessage("Record number" + str(cntr) + " written to feature class")
     cntr = cntr + 1
- Add the except block to print any errors that may occur:
except Exception as e:
print(e.message)
- Add a finally block to close the text file:
finally:
f.close()
- The entire script should appear as follows:
import arcpy

arcpy.env.workspace = "C:/ArcpyBook/Ch8/WildfireData/WildlandFires.mdb"
f = open("C:/ArcpyBook/Ch8/WildfireData/NorthAmericaWildfires_2007275.txt","r")
lstFires = f.readlines()
try:
with arcpy.da.InsertCursor("FireIncidents", ("SHAPE@XY","CONFIDENCEVALUE")) as cur:
   cntr = 1
   for fire in lstFires:
     if 'Latitude' in fire:
       continue
     vals = fire.split(",")
     latitude = float(vals[0])
     longitude = float(vals[1])
     confid = int(vals[2])
     rowValue = [(longitude,latitude),confid]
     cur.insertRow(rowValue)
     print("Record number " + str(cntr) + " written to feature class")
     #arcpy.AddMessage("Record number" + str(cntr) + "       written to feature class")
     cntr = cntr + 1
except Exception as e:
print(e.message)
finally:
f.close()
- You can check your work by examining the C:ArcpyBookcodeCh8InsertWildfires.py solution file.
- Save and run the script. You should see messages being written to the output window as the script runs:
Record number: 406 written to feature class
Record number: 407 written to feature class
Record number: 408 written to feature class
Record number: 409 written to feature class
Record number: 410 written to feature class
Record number: 411 written to feature class
- Open ArcMap and add the FireIncidents feature class to the table of contents. The points should be visible, as shown in the following screenshot:

- You may want to add a basemap to provide some reference for the data. In ArcMap, click on the Add Basemap button and select a basemap from the gallery.
How it works…
Some additional explanation may be needed here. The lstFires variable contains a list of all the wildfires that were contained in the comma-delimited text file. The for loop will loop through each of these records one by one, inserting each individual record into the fire variable. We also include an if statement that is used to skip the first record in the file, which serves as the header. As I explained earlier, we then pull out the individual latitude, longitude, and confidence value items from the vals variable, which is just a Python list object and assign them to variables called latitude, longitude, and confid. We then place these values into a new list variable called rowValue in the order that we defined when we created InsertCursor. Thus, the latitude and longitude pair should be placed first followed by the confidence value. Finally, we call the insertRow() function on the InsertCursor object assigned to the cur variable, passing in the new rowValue variable. We close by printing a message that indicates the progress of the script and also create the except and finally blocks to handle errors and close the text file. Placing the file.close() method in the finally block ensures that it will execute and close the file even if there is an error in the previous try statement.
Updating rows with UpdateCursor
If you need to edit or delete rows from a table or feature class, you can use UpdateCursor. As is the case with InsertCursor, the contents of UpdateCursor can be limited through the use of a where clause.
Getting ready
The UpdateCursor() function can be used to either update or delete rows in a table or feature class. The returned cursor places a lock on the data, which will automatically be released if used inside a Python with statement. An UpdateCursor object is returned from a call to this method.
The UpdateCursor object places a lock on the data while it's being edited or deleted. If the cursor is used inside a Python with statement, the lock will automatically be freed after the data has been processed. This hasn't always been the case. Previous versions of cursors were required to be manually released using the Python del statement. Once an instance of UpdateCursor has been obtained, you can then call the updateCursor() method to update records in tables or feature classes and the deleteRow() method can be used to delete a row.
In this article, you're going to write a script that updates each feature in the FireIncidents feature class by assigning a value of poor, fair, good, or excellent to a new field that is more descriptive of the confidence values using an UpdateCursor. Prior to updating the records, your script will add the new field to the FireIncidents feature class.
How to do it…
Follow these steps to create an UpdateCursor object that will be used to edit rows in a feature class:
- Open IDLE and create a new script.
- Save the script to C:ArcpyBookCh8UpdateWildfires.py.
- Import the arcpy module:
import arcpy
- Set the workspace:
arcpy.env.workspace = "C:/ArcpyBook/Ch8/WildfireData/WildlandFires.mdb"
- Start a try block:
try:
- Add a new field called CONFID_RATING to the FireIncidents feature class. Make sure to indent inside the try statement:
arcpy.AddField_management("FireIncidents","CONFID_RATING", "TEXT","10")
print("CONFID_RATING field added to FireIncidents")
- Create a new instance of UpdateCursor inside a with block:
with arcpy.da.UpdateCursor("FireIncidents", ("CONFIDENCEVALUE","CONFID_RATING")) as cursor:
- Create a counter variable that will be used to print the progress of the script. Make sure you indent this line of code and all the lines of code that follow inside the with block:
cntr = 1
- Loop through each of the rows in the FireIncidents fire class. Update the CONFID_RATING field according to the following guidelines:
- Confidence value 0 to 40 = POOR
- Confidence value 41 to 60 = FAIR
- Confidence value 61 to 85 = GOOD
- Confidence value 86 to 100 = EXCELLENT
This can be translated in the following block of code:
   for row in cursor:
     # update the confid_rating field
     if row[0] <= 40:
       row[1] = 'POOR'
     elif row[0] > 40 and row[0] <= 60:
       row[1] = 'FAIR'
     elif row[0] > 60 and row[0] <= 85:
       row[1] = 'GOOD'
     else:
       row[1] = 'EXCELLENT'
     cursor.updateRow(row)
     print("Record number " + str(cntr) + " updated")
     cntr = cntr + 1
- Add the except block to print any errors that may occur:
except Exception as e:
print(e.message)
- The entire script should appear as follows:
import arcpy

arcpy.env.workspace = "C:/ArcpyBook/Ch8/WildfireData/WildlandFires.mdb"
try:
#create a new field to hold the values
arcpy.AddField_management("FireIncidents", "CONFID_RATING","TEXT","10")
print("CONFID_RATING field added to FireIncidents")
with arcpy.da.UpdateCursor("FireIncidents",("CONFIDENCEVALUE", "CONFID_RATING")) as cursor:
   cntr = 1
   for row in cursor:
     # update the confid_rating field
     if row[0] <= 40:
       row[1] = 'POOR'
     elif row[0] > 40 and row[0] <= 60:
       row[1] = 'FAIR'
     elif row[0] > 60 and row[0] <= 85:
       row[1] = 'GOOD'
     else:
       row[1] = 'EXCELLENT'
     cursor.updateRow(row)
     print("Record number " + str(cntr) + " updated")
     cntr = cntr + 1
except Exception as e:
print(e.message)
- You can check your work by examining the C:ArcpyBookcodeCh8UpdateWildfires.py solution file.
- Save and run the script. You should see messages being written to the output window as the script runs:
Record number 406 updated
Record number 407 updated
Record number 408 updated
Record number 409 updated
Record number 410 updated
- Open ArcMap and add the FireIncidents feature class. Open the attribute table and you should see that a new CONFID_RATING field has been added and populated by UpdateCursor:

When you insert, update, or delete data in cursors, the changes are permanent and can't be undone if you're working outside an edit session. However, with the new edit session functionality provided by ArcGIS 10.1, you can now make these changes inside an edit session to avoid these problems. We'll cover edit sessions soon.
How it works…
In this case, we've used UpdateCursor to update each of the features in a feature class. We first used the Add Field tool to add a new field called CONFID_RATING, which will hold new values that we assign based on values found in another field. The groups are poor, fair, good, and excellent and are based on numeric values found in the CONFIDENCEVALUE field. We then created a new instance of UpdateCursor based on the FireIncidents feature class, and returned the two fields mentioned previously. The script then loops through each of the features and assigns a value of poor, fair, good, or excellent to the CONFID_RATING field (row[1]), based on the numeric value found in CONFIDENCEVALUE. A Python if/elif/else structure is used to control the flow of the script based on the numeric value. The value for CONFID_RATING is then committed to the feature class by passing the row variable into the updateRow() method.
Summary
In this article we studied, how to retrieve features from a feature class with SerchCursor, filtering records with a where clause, improving cursr performance with geoetry tokens, inserting rows with InsertCursor and updating rows with UpdateCursor.
Resources for Article:
Further resources on this subject:

 United States
 Great Britain
 India
India
 Germany
 France
 Canada
 Spain
Spain
 Brazil
 Australia
 South Africa
 Thailand
 Switzerland
 Slovakia
 Luxembourg
 Hungary
 Romania
 Denmark
 Ireland
 Estonia
 Belgium
 Italy
Italy
 Finland
 Cyprus
 Lithuania
 Latvia
 Malta
Malta
 Netherlands
 Portugal
 Slovenia
 Sweden
 Argentina
 Colombia
 Ecuador
 Indonesia
 Mexico
 New Zealand
 Norway
 South Korea
 Taiwan
 Turkey
 Czechia
 Austria
 Greece
 Isle of Man
 Bulgaria
 Japan
Japan
 Philippines
 Poland
 Singapore
 Egypt
Egypt
 Chile
Chile
 Malaysia